
DIY Rehab Room: Tips from Certified Therapists
DIY Rehab Room: Tips from Certified Therapists
Creating a dedicated rehabilitation space at home is one of the most impactful decisions you can make for your recovery journey. Whether you’re recovering from surgery, managing a chronic condition, or working through physical therapy, a well-designed rehab room becomes your personal healing sanctuary. Certified physical therapists consistently emphasize that the environment where you rehabilitate matters just as much as the exercises themselves.
This comprehensive guide draws insights from licensed physical rehabilitation specialists to help you transform any room into a functional, safe, and motivating space for your recovery. We’ll walk you through everything from selecting the right location to installing essential equipment, ensuring your home rehab setup rivals professional therapy clinics.
Understanding Physical Rehabilitation Therapy Fundamentals
Before diving into room setup, it’s essential to understand what physical rehabilitation therapy actually encompasses. Similar to other healthcare professions, becoming a physical rehabilitation therapist requires extensive education and certification. These professionals spend years mastering anatomy, physiology, exercise science, and patient assessment techniques.
Physical rehabilitation focuses on restoring function, improving mobility, and reducing pain through structured exercise and therapeutic interventions. The goals vary depending on your condition: post-surgical recovery might emphasize regaining range of motion, while chronic pain management prioritizes strength building and functional independence. Understanding these principles helps you design a home environment that supports your specific rehabilitation goals.
Certified therapists emphasize that effective rehabilitation isn’t just about having equipment—it’s about creating a systematic approach to progressive exercise. Your home rehab room should support this progression, allowing you to start with basic mobility work and gradually advance to strength training and functional activities. The space itself becomes a tool in your recovery, providing visual cues and organized systems that keep you motivated and accountable.
Choosing the Right Room for Your Rehab Space
Location selection is your first critical decision. Therapists recommend choosing a room that’s easily accessible from your bedroom or primary living area, especially during early recovery phases when mobility is limited. Ideally, your rehab room should be on the same floor as your bedroom to minimize stairs and travel distance.
Room size matters significantly. A 150-200 square foot space is optimal—large enough for exercise equipment and movement activities, but small enough to feel organized and manageable. Avoid basements prone to dampness or attics with temperature fluctuations; climate control is important for both comfort and equipment longevity. Spare bedrooms, home offices, or finished garage sections work exceptionally well.
Natural light is therapeutic. Position your rehab room where windows provide daylight, as natural light boosts mood and circadian rhythm regulation—both crucial for recovery. If natural light is limited, invest in full-spectrum LED lighting that mimics daylight and reduces eye strain during exercise sessions.
Flooring is non-negotiable. You need shock-absorbing surfaces that protect your joints and reduce impact stress. Concrete floors require cushioning; hardwood floors benefit from additional support. Professional-grade rubber flooring or interlocking foam tiles are industry standards that certified therapists recommend. These materials reduce injury risk and provide psychological comfort during rehabilitation.
Temperature and ventilation deserve careful attention. Maintain consistent temperatures between 68-72°F; too cold muscles become stiff, while excessive heat causes fatigue. Ensure adequate air circulation through windows or a dedicated ventilation system, as proper airflow prevents moisture accumulation and keeps the space fresh during intense exercise sessions.
Essential Equipment Every Home Rehab Room Needs
Certified physical therapists recommend starting with versatile, multi-functional equipment rather than specialized machines. This approach maximizes your investment while providing variety that keeps rehabilitation engaging.
Foundational Equipment:
- Therapy mat or exercise mat (at least 6×4 feet, cushioned for floor work)
- Adjustable therapy ball (sizes 45cm-85cm depending on height)
- Resistance bands in multiple resistance levels
- Dumbbells or adjustable weight system (5-30 pounds minimum)
- Foam roller for myofascial release and recovery
- Balance board or wobble cushion for proprioceptive training
- Parallel bars or sturdy furniture for gait training
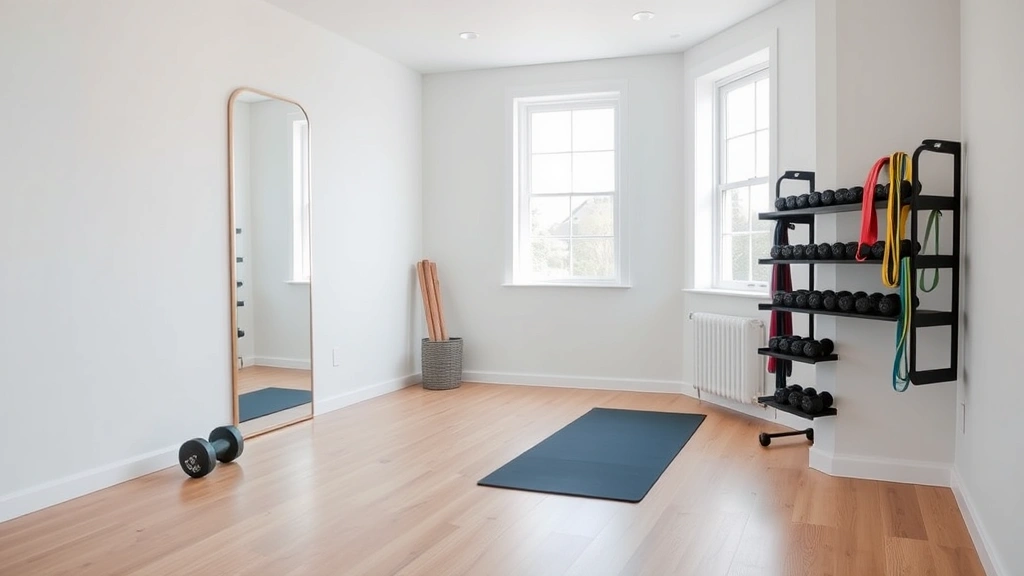
- Mirror system (full-length or sectional) for form feedback
These core items address 80% of rehabilitation needs across different conditions. As your recovery progresses, you can add specialized equipment. Many therapists suggest visiting Family Handyman for DIY equipment installation guides and storage solutions.
Advanced additions might include a stationary bike, rowing machine, or step platform, but these should only be added after consulting with your therapist about your specific progression timeline. Avoid the temptation to purchase expensive equipment before understanding your actual rehabilitation pathway.
Storage organization prevents clutter and maintains safety. Install wall-mounted racks for resistance bands, pegboard systems for smaller items, and shelving units for weights and accessories. A well-organized room reduces trip hazards and makes equipment accessible without searching, which improves workout consistency.
Safety Considerations and Accessibility Standards
Safety is paramount in home rehabilitation. Certified therapists stress that an unsafe environment undermines recovery and creates re-injury risk. Begin by ensuring clear pathways—maintain at least 3 feet of unobstructed space for walking and emergency access.
Install grab bars at strategic locations: near the mat area, along walls where balance support might be needed, and near any elevated equipment. These aren’t just for elderly users; they’re essential safety features for anyone recovering from lower body injuries or balance disorders. Use This Old House‘s installation standards for proper mounting into wall studs.
Flooring safety extends beyond cushioning. Ensure no tripping hazards exist from equipment cords, mat edges, or storage items. Use cord management systems to organize cables neatly along walls. Non-slip surfaces are critical; if you’re using mats, secure them with non-slip underlayment to prevent shifting during exercise.
Lighting must be adequate and glare-free. Install multiple light sources so you can adjust brightness for different times of day and activities. Emergency lighting or battery-powered options provide security during power outages. Therapists recommend 500+ lumens of illumination for safe exercise execution.
Temperature regulation prevents complications. Extreme heat increases fall risk and cardiovascular stress, while cold muscles are prone to straining. Maintain humidity between 30-50% to prevent respiratory issues and equipment deterioration. A basic hygrometer helps you monitor environmental conditions.
Consider your recovery stage when designing accessibility. Early-stage recovery requires grab bars and minimal floor obstacles, while later stages might emphasize balance challenge equipment. As you progress, your room layout should evolve—this flexibility is a major advantage of home rehabilitation.
Creating a Motivating and Therapeutic Environment
The psychological environment matters as much as the physical setup. Certified therapists recognize that patients who feel motivated and positive about their rehab space achieve better outcomes. Color psychology plays a role; soft blues and greens promote calm, while warm neutrals create welcoming atmospheres. Avoid harsh whites or clinical grays that feel institutional.
Personal touches transform a room from functional to therapeutic. Display motivational quotes, progress charts, or photos representing your recovery goals. Some patients benefit from vision boards showing activities they want to return to—hiking, playing with grandchildren, sports participation. These visual reminders maintain focus during difficult rehabilitation phases.
Music and sound create rhythm and motivation. A small Bluetooth speaker allows you to play upbeat music during cardio work or calming instrumental during stretching. Many therapists recommend 120-140 BPM music for strength training and 90-110 BPM for cool-down activities. Sound also masks external distractions, creating a focused environment.
Mirrors serve dual purposes: form feedback and psychological boost. Seeing yourself exercise builds confidence and allows real-time form correction. Position mirrors strategically to view your entire body during movements. Some patients find mirrors motivating; others prefer them only in specific areas. Consult your therapist about optimal mirror placement for your situation.
Climate comfort influences consistency. A room that’s too hot or cold becomes a barrier to daily practice. Invest in a quality thermometer and maintain your ideal temperature. Some therapists suggest slightly cool temperatures (68-70°F) as they promote alertness during exercise while preventing overheating.
Incorporate elements that engage your senses positively. Natural scents like lavender or eucalyptus can enhance relaxation during recovery phases, though avoid strong artificial fragrances that might trigger headaches. Plants add visual interest and improve air quality—pothos and snake plants are low-maintenance options.
Designing Your Exercise Program Layout
Your room layout should support your specific rehabilitation program. Work with your therapist to understand your exercise sequence and space requirements. If you’re beginning rehabilitation similar to health professional training, structured progressions matter significantly.
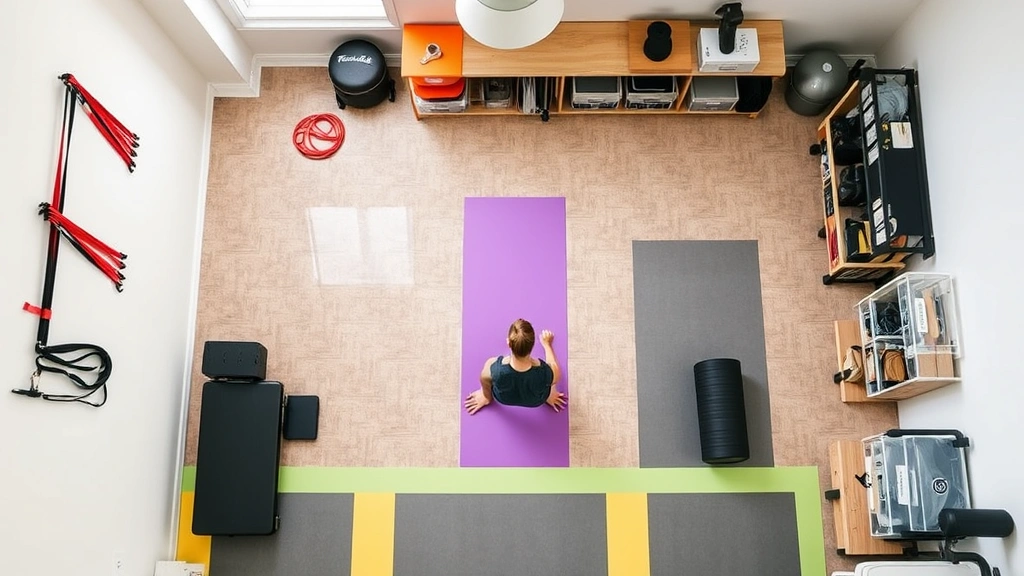
Create distinct zones within your room: a warm-up area, main exercise zone, cool-down/stretching area, and equipment storage zone. This zoning helps your brain transition between different rehabilitation phases and maximizes space efficiency. Use colored tape or rug borders to delineate zones visually.
The warm-up zone should have space for light cardio or mobility work. A 4×6 foot area is sufficient for marching, arm circles, and gentle movements. Keep resistance bands and light dumbbells immediately accessible here.
Your main exercise zone requires the most space—at least 6×8 feet for functional movement patterns. This area should accommodate your largest equipment and allow full-body movement without obstruction. Position mirrors here for form feedback. Ensure adequate space for lateral movements, which are often overlooked but essential for comprehensive rehabilitation.
Cool-down areas need the mat and props for stretching. Position this near a wall where you can use grab bars for supported stretching. Keep foam rollers, blocks, and bolsters organized here for easy access.
Equipment storage should be visible but organized. Transparent bins help you see what’s available without opening containers. Label everything clearly, and store frequently-used items at eye level. Heavy items go lower, lighter items higher, following ergonomic principles that reduce injury risk.
Consider traffic flow carefully. Your path from the door to each zone should be clear and logical. Many therapists recommend a figure-eight traffic pattern that naturally guides you through different areas during a typical session.
Maintenance and Equipment Care
Proper maintenance ensures your equipment remains safe and effective. Certified therapists emphasize that worn or damaged equipment creates injury risk and reduces your rehabilitation quality.
Establish a monthly inspection routine. Check mats for tears or compression loss—worn mats reduce shock absorption and increase joint stress. Inspect resistance bands for small tears that could cause sudden breakage during exercise. Test all grab bars and stability equipment for secure mounting and structural integrity.
Clean equipment regularly with appropriate products. Rubber flooring requires gentle sweeping and occasional damp mopping; avoid harsh chemicals that degrade material. Foam mats wipe clean with mild soap and water. Metal equipment benefits from occasional light oiling to prevent rust. Resistance bands last longer when stored away from direct sunlight and heat.
For detailed equipment installation and storage solutions, consult resources like Home Depot’s professional installation guides for wall-mounted systems and Lowe’s storage solutions.
Document your maintenance schedule in a simple log. Note when equipment was checked, any issues found, and repairs completed. This documentation helps you identify patterns—if resistance bands consistently break at the same resistance level, you might need higher-quality alternatives.
Temperature and humidity control prevents deterioration. Rubber flooring and foam products degrade faster in high-humidity environments. Use a dehumidifier if your room tends toward moisture accumulation. Store equipment in climate-controlled areas, not in garages or unfinished spaces where temperature swings occur.
Replace worn equipment promptly. A worn resistance band that breaks during exercise can cause injury. A compressed mat that no longer cushions properly increases joint stress. Budget annually for equipment replacement—this is healthcare investment, not optional spending. Certified therapists recommend replacing mats every 2-3 years and resistance bands annually with regular use.
FAQ
How much does it cost to set up a home rehab room?
A functional home rehab room costs $800-$2,500 depending on your starting point and equipment choices. Basic setup with mat, resistance bands, dumbbells, and mirror runs $800-$1,200. Adding equipment like stationary bikes or advanced storage brings costs to $2,000-$2,500. Many insurance plans cover home rehabilitation equipment—consult your provider about reimbursement options.
Do I need professional installation for grab bars and equipment?
Grab bars must be installed into wall studs for safety; professional installation costs $100-$300 per bar but ensures proper weight-bearing capacity. Most other equipment (mats, mirrors, shelving) can be DIY-installed following manufacturer instructions. If you’re unsure about wall construction or studs, hire a professional—proper installation prevents serious injury.
What size room do I actually need for home rehabilitation?
A minimum of 100 square feet works for basic rehabilitation, though 150-200 square feet is ideal. This provides space for equipment, movement, and psychological comfort. Smaller spaces require creative organization and multi-functional equipment; larger spaces allow better zoning and equipment variety.
How do I progress my rehabilitation program at home?
Work closely with your physical therapist to establish a progression timeline. Generally, you advance when you complete your current program without pain or difficulty for 1-2 weeks. Progressions might include increased repetitions, heavier weights, reduced stability support, or more complex movement patterns. Never self-advance—therapist guidance prevents re-injury.
Should I invest in expensive rehabilitation equipment immediately?
No. Start with versatile, affordable basics and add specialized equipment only after your therapist recommends it. Many expensive machines prove unnecessary once you understand your actual rehabilitation needs. This approach also allows your space to evolve with your recovery, maximizing your investment over time.
How often should I use my home rehab room?
Most therapists recommend 5-6 days weekly for active rehabilitation, with 1-2 rest days. Sessions typically last 30-45 minutes depending on your stage. Consistency matters more than duration—daily practice in a well-designed space produces better outcomes than sporadic longer sessions.
Can I use my home gym equipment for regular fitness after rehabilitation?
Absolutely. Home rehab rooms transition beautifully into fitness spaces once rehabilitation concludes. This dual-purpose approach justifies your investment and maintains the healthy habits you developed during recovery. Many patients continue using their rehab spaces for maintenance exercise and fitness goals.
Related Posts

Superscript in Google Docs: Expert Tips

Strikethrough in Excel: Easy Steps for Beginners
