

Add a Signature in Google Docs? Easy Steps Here!
How to Add a Signature in Google Docs: Easy Steps Here!
Adding a signature to your Google Docs documents is one of the most practical skills you can master for professional communication. Whether you’re finalizing business contracts, sending formal letters, or signing off on important agreements, knowing how to insert a signature transforms your documents from digital to officially authenticated. Google Docs offers multiple straightforward methods to add your signature, and we’ll walk you through each one so you can choose the approach that works best for your needs.
The beauty of Google Docs is its flexibility. You’re not limited to a single signature method—you can draw your signature directly in the document, upload an image of your handwritten signature, use a typed signature with special formatting, or even insert a signature line for others to sign. Each method has distinct advantages depending on your situation, whether you’re working solo or collaborating with team members who need to provide their own signatures on shared documents.
Method 1: Draw Your Signature Directly
The most authentic way to sign a Google Docs document is by drawing your signature directly into the file. This method is perfect when you want a handwritten appearance without needing to print and scan documents. Here’s how to do it:
- Open your Google Docs document and position your cursor where you want the signature to appear
- Click on the Insert menu at the top of the screen
- Select Drawing from the dropdown menu
- Choose New to open the drawing canvas
- In the drawing toolbar, click the Scribble tool (the pen icon)
- Use your mouse or touchpad to draw your signature in the canvas area
- If you make a mistake, click Undo or use Ctrl+Z to correct it
- Once satisfied, click Save and Close button
- Your signature will now appear in your document
This method works wonderfully on tablets and touchscreen devices where you can use a stylus for more natural handwriting. If you’re using a regular computer with a mouse, the signature may look less refined, but it still maintains that personal touch that typed signatures lack. You can resize and reposition your drawn signature by clicking on it and using the corner handles.
One advantage of drawing directly is that your signature remains editable within Google Docs. If you need to adjust it later, simply double-click the signature image to re-enter the drawing editor and make modifications. This flexibility makes it ideal for documents you’re still refining before final submission.
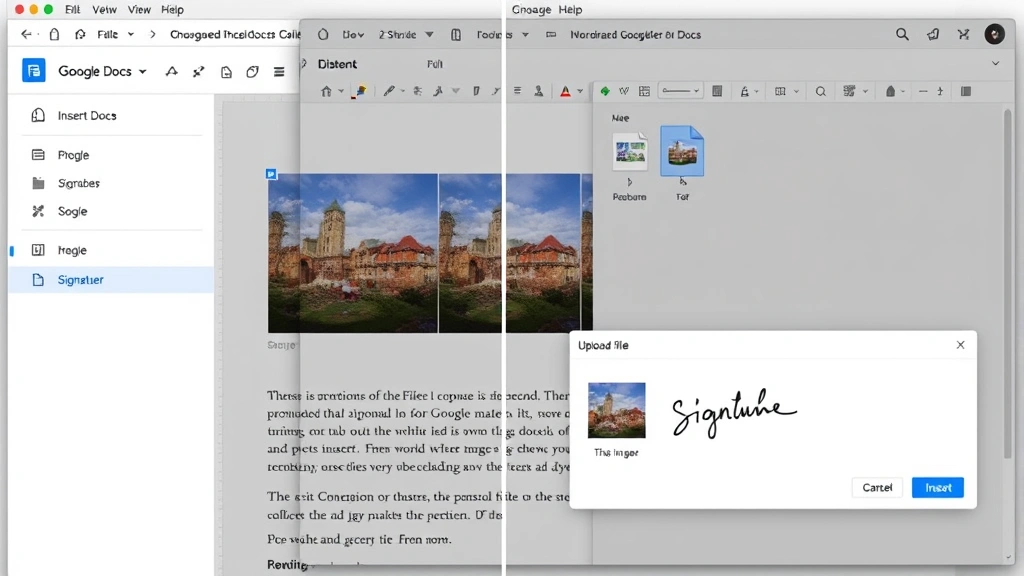
Method 2: Upload a Signature Image
If you already have a digital image of your signature—perhaps from scanning a handwritten signature or creating one in another application—uploading it is the quickest method. This approach ensures consistency across all your documents and looks more professional than a hastily drawn signature.
- Position your cursor in the document where you want your signature
- Navigate to Insert menu and select Image
- Choose Upload from computer option
- Browse your files and select your signature image file
- Click Open to insert the image
- Resize the image by dragging the corner handles to make it appropriately sized
- Right-click the image to adjust text wrapping if needed
Before uploading, ensure your signature image has a transparent background for the most professional appearance. You can create this using free tools like remove.bg or image editing software. A transparent background allows your signature to blend seamlessly with your document text without a white box surrounding it.
When preparing your signature image, aim for a resolution of at least 300 DPI if you plan to print the document. This ensures your signature remains crisp and clear on paper. Store your signature image file in an easily accessible location—many professionals keep a dedicated folder for frequently used signature files.
Method 3: Insert a Signature Line
For documents that multiple people need to sign, inserting a signature line is the professional approach. This method is particularly useful when creating templates for contracts, agreements, or approval documents. A signature line clearly indicates where each person should add their signature.
- Click where you want the signature line to appear
- Go to Insert menu and select Special characters
- Search for “underscore” or simply type “_” to find line characters
- Select an appropriate line character and insert it
- Add text above or below the line indicating who should sign
- Press Enter to create space between the line and the printed name
- Type the signer’s name and title below the signature line
Alternatively, you can create a more sophisticated signature line by inserting a table with one row and one column, then formatting it to display just the bottom border. This creates a clean, professional signature block. To do this, go to Insert > Table, create a 1×1 table, then right-click and adjust the borders to show only the bottom line.
When using FixWiseHub’s how-to guides, you’ll find that professional document formatting follows consistent standards. Signature lines should be approximately 2-3 inches long and positioned about 1 inch from the bottom of the page in traditional business letter format.
Method 4: Create a Typed Signature
While less formal than handwritten or image signatures, a typed signature is perfectly acceptable for many business communications, emails forwarded as documents, and informal agreements. This method is the fastest and works consistently across all devices.
- Position your cursor where you want the signature
- Type your full name in a professional font
- Consider adding your title, company name, and contact information
- Format the text using italics or a script font for a signature-like appearance
- You can use fonts like Brush Script, Lucida Handwriting, or Segoe Print for a more signature-like look
- Adjust the font size to 12-14 points for professional appearance
Creating a typed signature block is especially useful when you need to learn how to write professional business documents. Include relevant information such as your full name, job title, company name, phone number, and email address. This transforms a simple signature into a complete professional signature block that recipients can easily reference.
Many professionals save their typed signature block as a Google Docs template or in the AutoCorrect settings for quick insertion. You can create a shortcut so that typing a specific code automatically expands to your full signature block, saving time when signing multiple documents.
Best Practices for Document Signatures
Regardless of which signature method you choose, following best practices ensures your documents look professional and maintain proper formatting. Here are essential guidelines for working with signatures in Google Docs:
Placement and Positioning: Always place signatures near the end of your document, typically on the right side of the page or centered below your closing statement. Leave adequate space between your final paragraph and the signature area. In formal business letters, position the signature approximately 1 inch from the bottom of the page.
Consistency Across Documents: Use the same signature format across all your professional documents. Whether you choose a drawn, image, or typed signature, maintaining consistency helps recipients recognize your documents immediately and reinforces your professional brand.
File Naming and Organization: If you’re creating signature images, name them clearly (such as “John_Smith_Signature.png”) and store them in a dedicated folder. This organization becomes invaluable when managing multiple signature versions for different roles or purposes.
Digital Security: When sharing documents with signatures, be aware that digital signatures in Google Docs are not legally binding unless created through Google’s official digital signature feature. For legally binding agreements, consult DocuSign or similar services that provide certified digital signatures.
Mobile Compatibility: Test your document on mobile devices to ensure signatures display correctly. Some signature formats may not render perfectly on smaller screens, so preview your document across different devices before finalizing.
When preparing documents for printing, ensure your signature maintains proper size and clarity. A signature that looks good on screen might appear too small or too large when printed. Always do a test print before distributing final documents.
Troubleshooting Common Issues
Signature Appears Blurry or Low Quality: If your drawn or uploaded signature looks fuzzy, try increasing the image size. For uploaded images, ensure you’re using a high-resolution file (at least 300 DPI). For drawn signatures, use a steady hand or stylus rather than a mouse.
Signature Won’t Stay in Place: Use the text wrapping options to anchor your signature. Right-click the signature and select “Arrange,” then choose “Inline” to keep it fixed within the document flow. This prevents it from shifting when you edit other parts of the document.
Signature Image Has White Background: Remove the background using online tools or image editing software. Alternatively, insert the image and then go to Image options > Recolor to adjust transparency settings.
Can’t Find the Drawing Tool: Ensure you’re using a supported browser (Chrome, Firefox, Safari, or Edge). Some older browsers or mobile apps may have limited access to Google Docs’ drawing features. Try accessing Google Docs through a web browser rather than the mobile app if you experience issues.
Signature Formatting Changes After Sharing: When sharing documents, fonts might not display correctly if recipients don’t have the same fonts installed. For important documents, consider how to format professional documents using standard fonts like Arial, Times New Roman, or Calibri that are universally available.
If you’re creating formal documents that require authentication, remember that Google Docs signatures are visual representations only. For legally binding signatures, explore HelloSign or similar digital signature platforms that provide proper legal documentation and verification.
FAQ
Can I create multiple signature styles in Google Docs?
Yes, absolutely. You can create different signature variations for different purposes. Save formal signatures for business contracts and casual signatures for internal communications. Create separate images or templates for each signature style you use regularly.
Is a typed signature legally binding in Google Docs?
Typed signatures in standard Google Docs are not legally binding. For documents requiring legal authentication, use certified digital signature services. However, typed or image signatures are perfectly acceptable for most business communications and informal agreements.
How do I make my drawn signature look more professional?
Use a stylus or touchscreen device for better control. Practice your signature in a separate document first. Keep it simple and consistent. If it still doesn’t look right, consider uploading a scanned image of your actual handwritten signature instead.
Can I save my signature as a template in Google Docs?
Yes. Create a document with your signature formatted exactly how you want it, then click File > Save as template. Name it clearly (such as “Business Letter with Signature”) so you can easily find and use it for future documents.
What’s the best format for signature images?
PNG format with a transparent background is ideal for professional appearance. JPEG works too but may include a white background. Keep file size under 1 MB for optimal document performance and faster loading times.
Can multiple people sign the same Google Docs document?
Yes. Create separate signature lines for each person and share the document with edit permissions. Each person can then add their own signature in their designated area. Use different colors or initials to distinguish between signers if needed.
How do I remove or edit a signature after inserting it?
Click on the signature to select it and press Delete. For drawn signatures, double-click to re-enter the drawing editor and make adjustments. For image signatures, you’ll need to delete and re-insert with modifications.
Adding a signature to your Google Docs documents is straightforward once you understand the available methods. Whether you choose to draw, upload, or type your signature, the key is selecting the approach that best matches your document’s formality level and your personal preference. With these comprehensive steps and best practices, you’re now equipped to professionally sign any document in Google Docs. For additional guidance on document formatting and professional writing, explore more writing techniques and document preparation strategies to elevate all your professional communications.
Related Posts

Roast Pecans at Home: Easy & Delicious Guide

Rinse Rice Properly? Expert Tips & Steps
