
Remove Gel Nail Polish at Home? Expert Tips Here!
How to Remove Gel Nail Polish at Home: Expert Tips and Complete Guide
Gel nail polish offers a beautiful, long-lasting finish that can keep your nails looking salon-perfect for weeks. However, when it’s time for a change or a fresh application, removing gel polish at home doesn’t have to be a costly trip to the salon. With the right techniques, tools, and a bit of patience, you can safely remove gel nail polish in the comfort of your own home while maintaining healthy, strong nails.
Many people believe that gel removal requires professional expertise, but the truth is that the process is straightforward and can be accomplished with materials you may already have on hand. Whether you’re looking to save money, prefer the convenience of at-home care, or simply want to understand the process better, this comprehensive guide will walk you through every step of safely removing gel nail polish without damaging your natural nails.
Understanding Gel Nail Polish and Why Removal Matters
Gel nail polish is a hybrid product that combines the pigmentation of traditional nail polish with the durability of acrylic nails. The formula requires UV or LED light curing to harden and bond to the nail surface, creating a glossy, chip-resistant finish that typically lasts two to three weeks. Unlike regular polish, gel adheres strongly to the nail plate, which is why improper removal can cause significant damage.
Understanding the composition of gel polish is crucial before attempting removal. The gel formula creates a semi-permanent bond that requires solvents to break down properly. Attempting to peel, pick, or scrape off gel polish forcefully can remove layers of the nail plate itself, leading to brittleness, thinning, and weakened nails that may take months to recover. This is why learning the correct removal technique is just as important as applying the polish itself.
The primary concern with at-home gel removal is ensuring you use adequate protection for your skin and nails while effectively dissolving the gel without causing damage. When you follow proper procedures, you’ll find that removing gel nail polish at home is not only cost-effective but also safer than rushing through a salon appointment or resorting to damaging removal methods.
Essential Tools and Materials You’ll Need
Before you begin the gel removal process, gather all necessary supplies to ensure a smooth, efficient experience. Having everything within reach prevents interruptions and helps maintain the effectiveness of your removal session.
- Pure Acetone: This is the most critical component. Look for 100% acetone at beauty supply stores, drugstores, or online retailers. Regular nail polish remover typically contains only 20-50% acetone and won’t effectively dissolve gel polish. Family Handyman recommends checking product labels carefully to ensure you’re purchasing pure acetone.
- Glass or Ceramic Bowls: Acetone can damage plastic, so use heat-safe glass or ceramic containers for soaking. Avoid plastic bowls, cups, or containers as the acetone will dissolve them.
- Aluminum Foil: This wraps around your fingers to keep the acetone-soaked cotton pads in direct contact with your nails during the soak.
- Cotton Pads or Rounds: High-quality, lint-free cotton pads work best. Cut them to fit your nails if using full-size rounds.
- Nail File: A medium-grit nail file helps break the seal of the gel polish by buffing the shiny top coat.
- Cuticle Pusher or Orange Stick: This gently lifts and removes loosened gel polish without scratching the nail plate.
- Moisturizer and Cuticle Oil: Essential for post-removal care to restore hydration to nails and surrounding skin.
- Protective Gloves: Latex or nitrile gloves protect your skin from acetone exposure and drying effects.
- Nail Buffer: For smoothing the nail surface after gel removal.
- Hand Towel or Paper Towels: For cleanup and drying.
If you want to learn more about maintaining healthy nails, you might also find our guide on FixWiseHub’s how-to guides and tutorials helpful for general nail care information.
Preparation Steps Before Removal
Proper preparation significantly impacts the success of your gel removal process. Taking time to prepare prevents frustration and ensures the acetone works as effectively as possible.
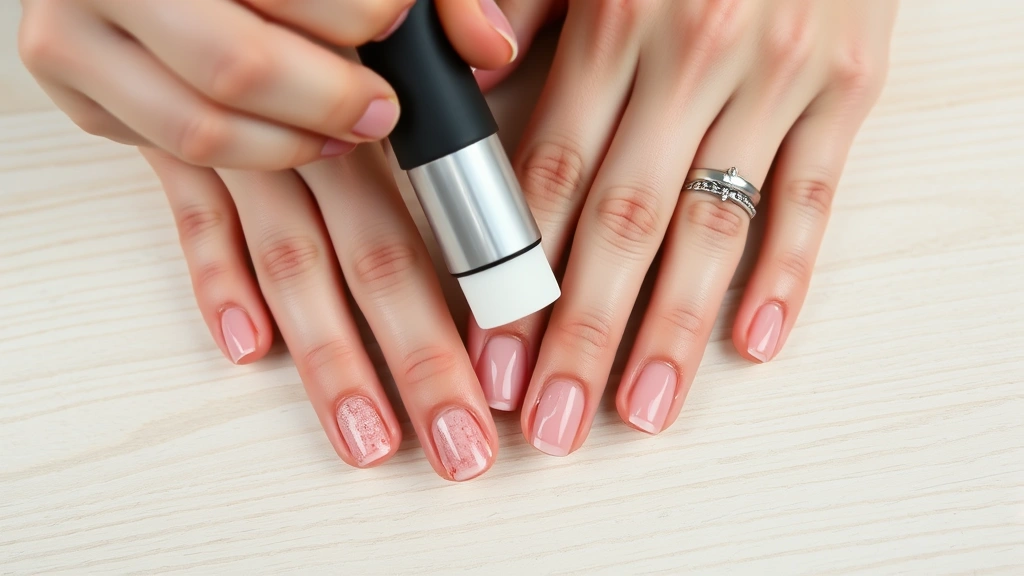
Step 1: File the Top Coat – Use your nail file to gently buff away the shiny top layer of the gel polish. This glossy seal prevents acetone from penetrating the gel effectively. File in one direction across the nail surface, applying light to medium pressure. You don’t need to remove all the color, just the protective shine. This step typically takes 2-3 minutes per hand.
Step 2: Trim and Shape Your Nails – Cut your nails to a manageable length before starting the soak. Shorter nails make the removal process easier and reduce the risk of the foil wraps shifting during soaking. Use nail clippers to trim straight across, then file the edges smooth.
Step 3: Push Back Cuticles – Gently push back your cuticles using a cuticle pusher or orange stick. This helps you see where the gel polish ends and your nail plate begins, making removal more precise. Be gentle to avoid damaging the delicate cuticle area.
Step 4: Protect Your Skin – Apply a thick moisturizer, cuticle oil, or petroleum jelly around the nail beds and cuticle area. This barrier protects your skin from the drying effects of acetone. Don’t apply it directly on the nail surface where the acetone will be working.
Step 5: Ensure Proper Ventilation – Set up your workspace in a well-ventilated area. Open windows, use a fan, or work near an open door. Acetone fumes can be strong, so good air circulation is essential for your health and comfort.
The Acetone Soak Method: Most Effective Approach
The acetone soak method is the gold standard for removing gel nail polish at home. This technique is gentle on nails when done correctly and highly effective at dissolving gel polish completely.
Method Overview: The acetone soak method involves wrapping acetone-soaked cotton pads around your nails and keeping them in place for 15-20 minutes, allowing the solvent to break down the gel polish bond.
Detailed Steps:
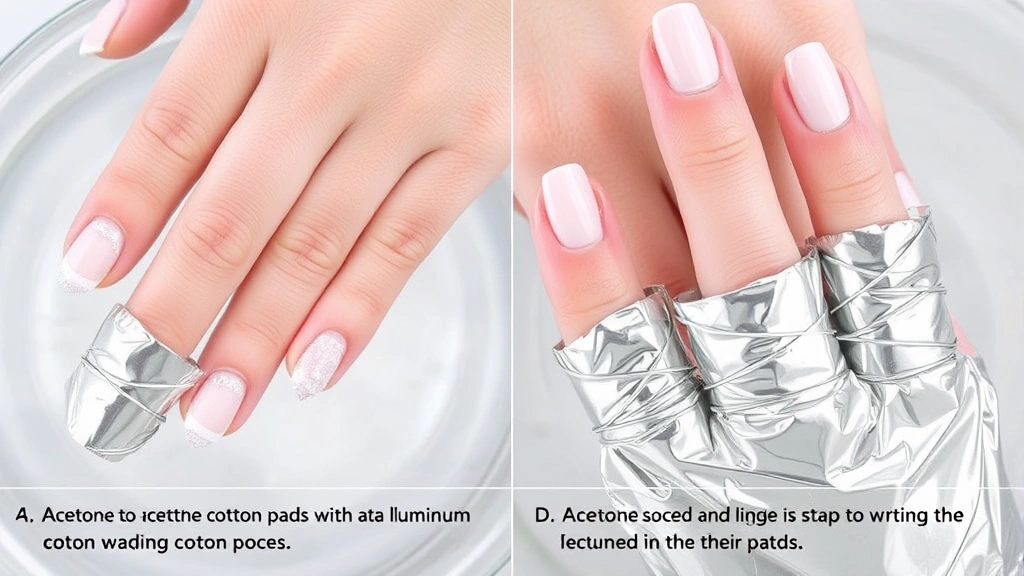
- Pour Acetone Into Bowls: Fill your glass or ceramic bowls with enough pure acetone to submerge your fingertips completely, approximately 1-2 inches deep. You can do both hands simultaneously if you have two bowls, or one hand at a time if using a single bowl.
- Soak Cotton Pads: Saturate your cotton pads or rounds with pure acetone. They should be wet but not dripping excessively. If using full-size cotton rounds, cut them in half or into quarters to fit your nails.
- Apply Cotton Pads to Nails: Place one acetone-soaked cotton pad directly on top of each nail, ensuring complete coverage of the gel polish area.
- Wrap With Aluminum Foil: Tear off small pieces of aluminum foil (approximately 2×2 inches) and wrap each finger, securing the cotton pad in place. Wrap snugly but not so tight that you cut off circulation. The foil creates a seal that prevents the acetone from evaporating and keeps it in contact with the gel.
- Set a Timer: Let your nails soak for 15-20 minutes. Check at the 10-minute mark to see how the gel is softening. You may need slightly more or less time depending on the gel brand and thickness of application.
- Remove Foil Wraps: After the soak time, carefully unwrap the foil and remove the cotton pads. You should see the gel polish beginning to lift and peel at the edges.
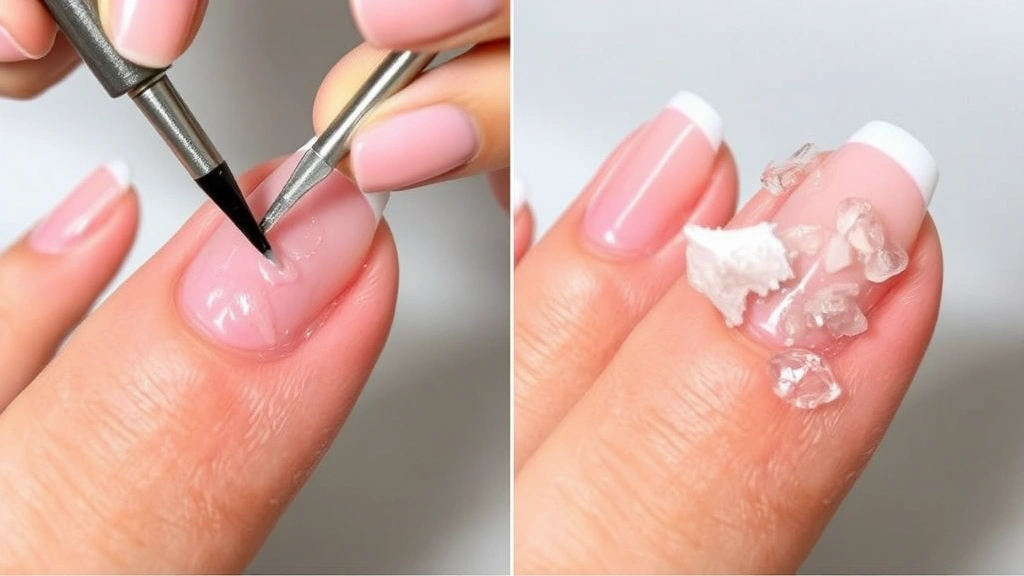
- Gently Scrape Away Gel: Using your cuticle pusher or orange stick, gently push and scrape away the softened gel polish. Start at the cuticle area and work toward the tip of the nail. The gel should come off in chunks or flakes relatively easily. If it’s not coming off smoothly, soak for another 3-5 minutes.
- Repeat if Necessary: If any gel remains after the first soak, repeat the process. Some thick applications or gel brands may require two soaking sessions.
- Remove Residue: Once all visible gel is removed, use a nail buffer to gently smooth away any remaining sticky residue or rough spots on the nail surface.
- Cleanse and Dry: Wash your hands thoroughly with soap and water to remove all acetone residue, then pat dry completely.
The key to success with this method is patience. Rushing the process by scraping too aggressively before the gel is fully softened will damage your nails. If the gel isn’t coming off easily, additional soaking time is always better than excessive scraping.
Alternative Removal Methods
While the acetone soak method is most effective, several alternatives exist if you prefer different approaches or need variations based on your specific situation.
Acetone Bowl Soak Method: Instead of wrapping individual nails, you can place your fingertips directly into a bowl of pure acetone for 15-20 minutes. This method works well for both hands simultaneously but requires more acetone. Submerge only your fingertips, keeping your hands relaxed in the bowl. Remove your hands periodically to check progress and gently rub away loosened gel.
Gel Removal Products: Some manufacturers create specialized gel removal solutions designed to be less harsh than pure acetone. These products often contain acetone plus conditioning ingredients. While slightly gentler, they may require longer soaking times (20-30 minutes) and aren’t always as effective as pure acetone.
Warm Acetone Soak: Warming the acetone slightly increases its effectiveness. Fill a larger bowl with warm water, then place your glass bowl of acetone in the warm water (like a double boiler). Warm acetone works faster, potentially reducing soak time to 10-15 minutes. Be careful not to overheat, as acetone is flammable.
Acetone Paste Method: Mix acetone with a thickening agent like baking soda to create a paste. Apply this paste directly to each nail, cover with foil, and let sit for 15-20 minutes. This method uses less acetone and is good if you’re concerned about the amount of solvent exposure.
For additional guidance on home maintenance and care techniques, check out our resources on how to remove deodorant stains, which demonstrates similar careful removal principles.
Post-Removal Nail Care and Recovery
The period immediately following gel removal is critical for nail health. Gel polish removal can leave nails temporarily weakened, dry, and sensitive, so proper aftercare is essential.
Immediate Post-Removal Care: After removing all gel polish and cleaning your hands thoroughly, apply a rich moisturizer or hand cream to your hands and nails. The acetone will have removed natural oils from your skin and nails, leaving them dry. Massage the moisturizer into your cuticles and nail beds, paying special attention to areas that feel particularly dry.
Hydration is Key: For the next 24-48 hours, apply cuticle oil or nail strengthening serum multiple times daily. Look for products containing jojoba oil, vitamin E, or keratin. These ingredients help restore moisture and strengthen the nail plate. Apply oil before bed and whenever your nails feel dry.
Avoid Immediate Re-Application: Resist the urge to immediately apply new gel polish. Give your nails at least 3-5 days of recovery time, preferably a full week. This allows the nail plate to rehydrate, harden, and regain its strength. During this break, you can wear traditional nail polish or leave nails bare.
Nail Strengthening Routine: During your recovery period, use a nail strengthening treatment or hardener. Apply these products according to package directions, typically once or twice daily. These treatments often contain nylon fibers or resins that reinforce the nail structure.
Protective Measures: Minimize exposure to water and harsh chemicals during the recovery period. Wear gloves when washing dishes, cleaning, or doing laundry. Prolonged water exposure can further weaken temporarily compromised nails. Also avoid excessive filing or buffing during this time.
Nutritional Support: Healthy nails start from within. Ensure you’re consuming adequate protein, biotin, iron, and zinc. These nutrients are essential for keratin production and nail strength. If your diet is lacking, consider a biotin supplement (consult your healthcare provider first).
Moisturize Your Hands: Don’t neglect your hands during this recovery period. The acetone exposure affects skin as well as nails. Apply hand cream regularly, and consider using a hydrating hand mask once or twice during your recovery week.
Common Mistakes to Avoid
Understanding what not to do is just as important as knowing the correct procedure. These common mistakes can undermine your efforts and damage your nails.
Using Regular Nail Polish Remover: This is the most frequent mistake. Regular nail polish remover contains only 20-50% acetone and won’t effectively dissolve gel polish. You’ll waste time and effort without results. Always verify you’re using 100% pure acetone.
Peeling or Picking at Gel: Forcefully peeling or picking away gel polish causes severe damage to the nail plate. This removes layers of keratin, leading to brittleness, peeling, and weakened nails that may take months to recover fully. Patience during soaking is crucial.
Insufficient Soaking Time: Rushing the process by removing foil wraps too early results in incomplete gel removal. This often leads to excessive scraping to remove remaining gel, which damages nails. If gel isn’t coming off easily after 15 minutes, soak longer rather than scrape harder.
Using Plastic Containers: Acetone dissolves plastic, which can leach chemicals into your acetone and contaminate your nails. Always use glass or ceramic bowls exclusively.
Neglecting Skin Protection: Acetone is extremely drying to skin. Failing to apply protective moisturizer or petroleum jelly before soaking can result in irritated, cracked skin around your nails. Some people experience contact dermatitis from prolonged acetone exposure without proper protection.
Poor Ventilation: Working in an enclosed space with acetone fumes can cause headaches, dizziness, and respiratory irritation. Always ensure adequate airflow and take breaks if you feel uncomfortable.
Skipping Recovery Time: Immediately reapplying gel polish after removal doesn’t allow your nails to recover. This causes cumulative damage and significantly weakens your nails over time. Always wait at least 3-5 days, ideally a full week, before the next application.
Over-Buffing Nails: While some buffing is necessary to remove residue, excessive buffing during or after removal further damages the nail surface. Use gentle, light pressure and buff only as much as needed.
Ignoring Signs of Damage: If your nails show signs of severe damage, thinning, or peeling after removal, give them extended recovery time before reapplying gel. Continuing to apply gel to damaged nails compounds the problem.
For more information on home care and maintenance techniques, explore This Old House‘s comprehensive guides on various maintenance topics.
FAQ
How long does it take to remove gel nail polish at home?
The typical process takes 30-45 minutes total, including preparation and the actual removal. The soaking portion alone requires 15-20 minutes. If your nails need a second soak or have thick gel application, it may take closer to an hour.
Can I use regular acetone from a hardware store?
Yes, hardware store acetone (used for cleaning and paint thinning) is 100% pure acetone and works effectively for gel removal. However, ensure it’s specifically labeled as pure acetone. Some hardware store products may contain additives, so read labels carefully. Beauty supply acetone is formulated similarly but may be slightly more refined.
What should I do if my nails are damaged after gel removal?
If you notice brittleness, peeling, or thinning, immediately begin a recovery routine. Apply cuticle oil multiple times daily, use a nail strengthening treatment, avoid water exposure, and wait at least two weeks before applying new gel polish. Consider wearing regular polish or leaving nails bare during this recovery period. If damage is severe, consult a dermatologist.
Is acetone safe to use regularly?
While acetone is safe for occasional use with proper precautions, frequent exposure can cause skin irritation and dryness. Always protect your skin with moisturizer or petroleum jelly before soaking. Limit your gel polish applications to every 3-4 weeks with adequate recovery time between removals. If you notice persistent skin irritation, consult a dermatologist.
Can I remove gel nail polish without acetone?
Pure acetone is the most effective solvent for gel removal. While some people claim alternative methods work (like using vinegar or rubbing alcohol), these are significantly less effective and require much longer soaking times. For optimal results and nail health, acetone is the recommended approach. Some specialized gel removal products exist, but they typically contain acetone as the primary ingredient.
Why does my gel polish feel sticky after removal?
Sticky residue remaining after removal indicates incomplete gel dissolution. This can happen with thick applications or certain gel brands. Simply buff away the sticky residue gently with a nail buffer, or do another quick 5-10 minute acetone soak if buffing doesn’t fully remove it.
How often can I safely apply gel polish?
With proper removal and recovery time, you can safely apply gel polish every 3-4 weeks. This schedule allows adequate recovery time between applications, preventing cumulative nail damage. If your nails show any signs of weakness or damage, extend the gap between applications to 5-6 weeks.
What’s the difference between gel polish and acrylics?
Gel polish is a hybrid formula that requires UV or LED light curing and adheres directly to the natural nail plate. Acrylics are a separate product applied over the nail as an extension. Gel removal is gentler than acrylic removal since you’re not removing artificial extensions. The acetone soak method works specifically for gel polish removal.
For additional home care resources and step-by-step guides, you can visit FixWiseHub’s comprehensive how-to guides for various maintenance topics. You might also find our article on removing formatting in Word useful if you need to document your nail care routine or create reminders.
Learning how to remove gel nail polish at home is an excellent skill that saves money, time, and provides convenience. By following these expert techniques and prioritizing proper aftercare, you can safely maintain beautiful nails while protecting their health and strength. Remember that patience during the removal process and diligent recovery care afterward are the keys to maintaining strong, healthy nails for the long term.
Related Posts

Superscript in Google Docs: Expert Tips

Strikethrough in Excel: Easy Steps for Beginners
