
Charcuterie Board DIY: Easy Steps & Expert Tips
Charcuterie Board DIY: Easy Steps & Expert Tips
Creating a stunning charcuterie board is one of the easiest entertaining projects you can tackle at home. Whether you’re hosting a dinner party, planning a casual gathering, or simply want to impress your guests with an elegant spread, assembling a charcuterie board requires minimal effort but delivers maximum visual impact. The beauty of this DIY approach is that you control every element—from the meats and cheeses to the presentation style and aesthetic appeal.
Before you start arranging, let’s address the elephant in the room: how to pronounce charcuterie. It’s pronounced “shar-KOO-tuh-ree” (with the emphasis on the second syllable), derived from French culinary tradition. Understanding this term helps you appreciate the art form itself—charcuterie refers to the craft of preparing and assembling cured meats, and a charcuterie board is your canvas for showcasing these delicacies alongside complementary ingredients.
This comprehensive guide walks you through everything you need to know about building your own charcuterie board, from selecting quality ingredients to arranging them like a professional. You’ll learn insider tips that transform a simple meat-and-cheese platter into an Instagram-worthy centerpiece that tastes as good as it looks.
Understanding Your Board Foundation
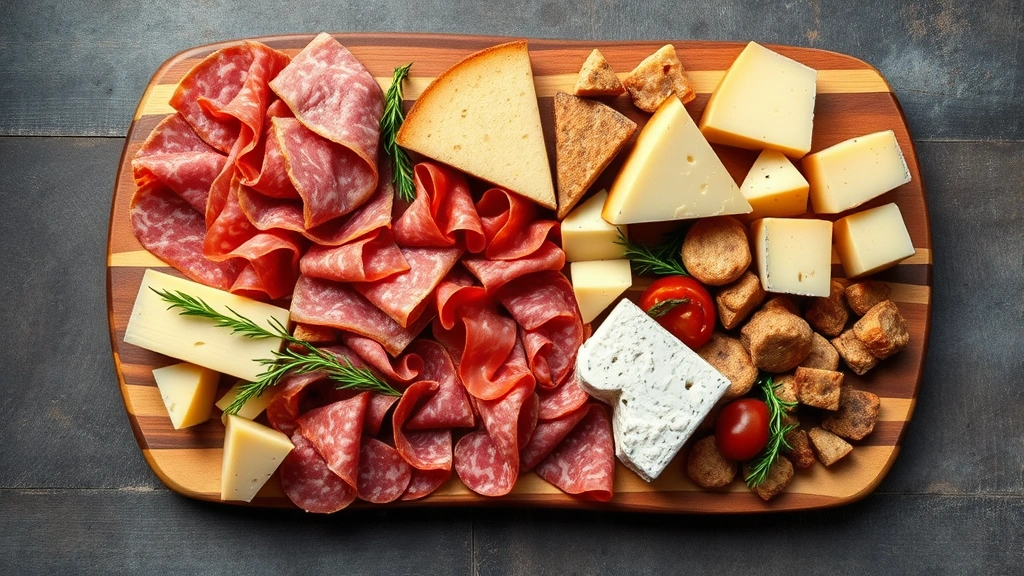
The foundation of any great charcuterie board starts with selecting the right surface. You have numerous options, each contributing to the overall aesthetic and functionality of your spread. Wooden boards remain the classic choice—they’re warm, traditional, and photograph beautifully. Look for hardwood options like oak, walnut, or maple that won’t splinter and can withstand moisture from the various ingredients.
Marble and slate boards offer a more modern, sophisticated look and provide excellent temperature control for keeping items cool. Ceramic platters work wonderfully for smaller gatherings, while oversized cutting boards can accommodate more generous spreads. The key consideration is size: aim for a board that’s at least 12 inches in diameter or 12×18 inches for rectangular options. This gives you adequate space to arrange ingredients without crowding.
Consider your board’s rim and any built-in features. Some boards include grooves or wells that can hold liquids like honey or jam, preventing them from spreading across your other items. If your board doesn’t have these features, you can use small bowls or ramekins to contain wet ingredients. Always wash and dry your board thoroughly before use, and consider a light coating of food-safe mineral oil if using wood to prevent staining.
The color and finish of your board matter more than you might think. Lighter boards showcase darker meats and cheeses beautifully, while darker boards make lighter cheeses and fruits pop visually. Think about your home’s décor and the occasion when selecting your serving surface. You want the board itself to complement rather than compete with the ingredients you’re arranging on it.
Selecting Quality Meats and Cured Products
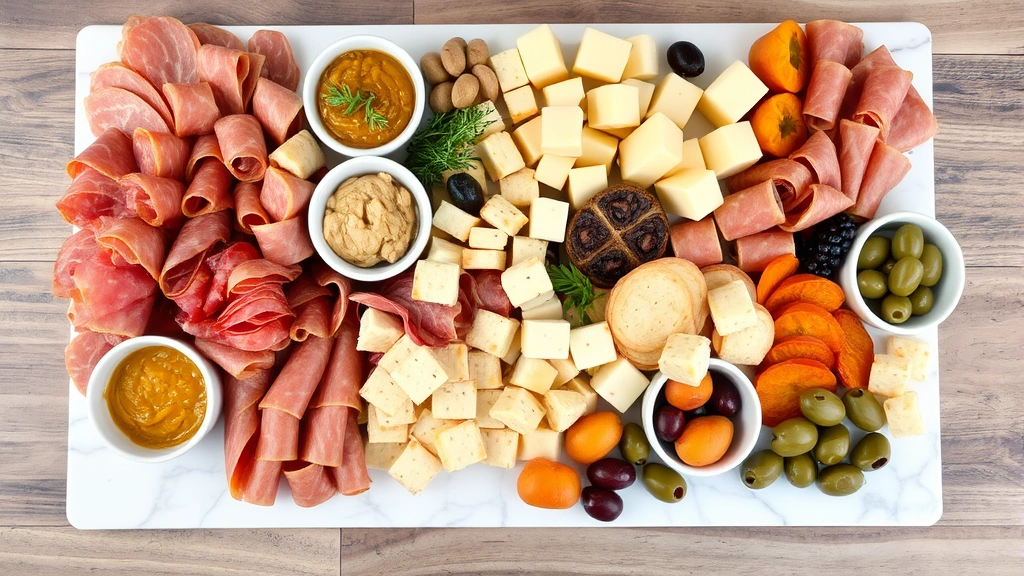
The meats and cured products form the backbone of your charcuterie board, so quality matters significantly. Rather than buying pre-packaged sliced meats from the grocery store, visit the deli counter or a specialty butcher shop. This allows you to request specific cuts and thicknesses while supporting local businesses that source premium products.
Aim for variety in texture, flavor, and appearance. Include at least three different types of cured meats: a mild option like prosciutto or serrano ham, a medium-intensity choice such as soppressata or chorizo, and something bolder like pâté or a heavily spiced salami. This range ensures every guest finds something they enjoy.
Prosciutto di Parma offers delicate, slightly sweet notes and thin slices that drape elegantly. Soppressata provides a firmer texture with peppery undertones. Chorizo brings vibrant color and spiced heat. Pâté (whether chicken liver, duck, or pork) adds a creamy, luxurious element that contrasts beautifully with firmer items. Don’t overlook bresaola, a air-dried beef that’s tender and subtly flavored.
Quantity guidelines suggest approximately 2-3 ounces of meat per person. For a board serving 8-10 people, prepare 1-1.5 pounds total of mixed cured meats. Arrange meats in loose rolls or folds rather than flat stacks—this creates visual interest and makes them easier to grab. Leave some meats slightly folded to show their interior color and texture.
Consider dietary restrictions and preferences when selecting meats. Having one vegetarian-friendly protein option (like marinated mushrooms or roasted chickpeas) ensures inclusivity. Store all meats in the refrigerator until the last possible moment before serving, removing them only 15-20 minutes before guests arrive so they’re at optimal flavor.
Choosing the Perfect Cheeses
Cheese selection is equally important as meat selection, and the goal is to create contrast in texture, flavor intensity, and appearance. Professional charcuterie boards typically feature four to six different cheeses representing different categories: hard, semi-hard, soft, and blue varieties.
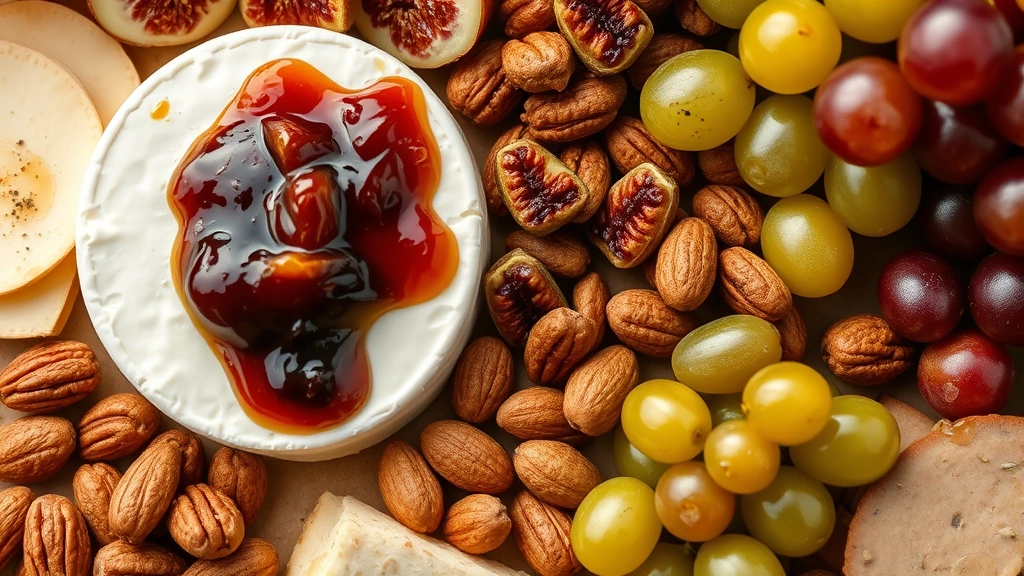
A hard cheese like aged Gouda or Parmigiano-Reggiano provides sharp, complex flavors and interesting crystalline texture. Semi-hard cheeses such as Gruyère or Manchego offer versatility and approachability. Soft cheeses like Brie, Camembert, or fresh goat cheese add creamy richness that balances firmer items. Including a blue cheese (Gorgonzola, Roquefort, or Stilton) adds pungent depth for adventurous palates.
Cut cheeses into varying shapes and sizes: thin slices for hard cheeses, cubes for semi-hard varieties, and wedges for soft cheeses that are easier to spread. Leave some cheeses whole or in large wedges to show their natural form and appeal. This variety in cutting style creates visual interest and accommodates different eating preferences.
Temperature affects cheese flavor significantly. Remove cheeses from the refrigerator 30-45 minutes before serving, allowing them to reach room temperature where their flavors fully develop. This is one of the most important professional tips many home entertainers overlook. Cold cheese tastes muted and lacks the complexity that makes quality cheese worthwhile.
Budget approximately 2-3 ounces of cheese per person. For a board serving 10 people, aim for 1.5-2 pounds total cheese distributed across your selected varieties. This ensures adequate sampling without excessive waste. Label cheeses with small cards indicating their name and origin—this educational element enhances the experience and helps guests identify their favorites.
Adding Supporting Players: Fruits, Nuts, and Spreads
While meats and cheeses are the stars, supporting ingredients create balance, provide textural contrast, and offer palate-cleansing elements between bites. Fresh fruits bring sweetness and acidity that complement rich, salty meats and cheeses beautifully.
Grapes (both red and green) are classic choices that offer refreshing sweetness and easy grabbing. Sliced fresh figs provide elegant appearance and subtle honey notes. Apple and pear slices add crispness and mild sweetness—toss these with lemon juice to prevent browning. Dried fruits like apricots, cranberries, and dates offer concentrated sweetness and chewy texture. Stone fruits in season (peaches, plums, nectarines) provide juicy refreshment and vibrant color.
Nuts add crucial textural contrast and healthy fats. Raw or roasted almonds, candied pecans, toasted walnuts, and marcona almonds all work beautifully. Include nuts in small piles or contained in small bowls to prevent them from scattering. Marcona almonds, with their buttery richness, pair particularly well with soft cheeses and cured meats.
Spreads and condiments elevate your board from simple to sophisticated. Include whole grain mustard for its tangy bite, fig jam for sweetness and elegance, hot pepper jelly for heat, and honey for drizzling over soft cheeses. Roasted garlic or truffle paste adds luxury and depth. Store spreads in small bowls or ramekins rather than leaving jars on the board—this looks more refined and prevents contamination.
Crackers and bread deserve careful consideration. Choose at least two varieties: a neutral option like water crackers that don’t overpower delicate cheeses, and something with more personality like rosemary crisps or seeded crackers. Avoid overly flavored crackers that compete with your carefully selected ingredients. Breadsticks (grissini) add height and visual interest. Place crackers in piles or small bowls arranged around the board rather than covering the entire surface.
Vegetables add freshness and provide healthy options. Cherry tomatoes, cucumber slices, celery sticks, radishes, and bell pepper strips contribute color and crunch. Marinated olives (green, kalamata, or mixed varieties) add briny sophistication. Cornichons (small pickles) provide acidic contrast that cleanses the palate between rich bites.
Arrangement Techniques and Layout Strategies
Arrangement is where your charcuterie board transforms from a collection of ingredients into an artistic presentation. Start by placing larger items first—these act as anchor points around which you build your design. Position cheese wedges and larger meat folds strategically across the board, leaving space between them for smaller items.
Follow the principle of odd numbers: arrange items in groups of three or five rather than even numbers. This creates visual rhythm and feels more intentional than symmetrical placement. Create height variation by stacking some items and laying others flat. Use small bowls or ramekins for spreads, nuts, and wet ingredients, positioning them at different heights to add dimension.
Work in sections, filling the board methodically. Start with the largest items, then add medium-sized elements like cheese cubes and folded meats, then fill gaps with smaller items like nuts and dried fruits. Leave some negative space—a completely crowded board looks chaotic rather than abundant. Your eye should be able to rest on small areas of the board itself.
Color distribution matters enormously. Scatter colorful items throughout rather than grouping all reds together or clustering all greens. Alternate warm and cool tones. The vibrant orange of apricots contrasts beautifully with deep purple grapes. Golden honey contrasts with dark fig jam. This intentional color distribution creates visual harmony.
Create focal points by grouping complementary items together: a soft cheese with fig jam and candied pecans, for example. These natural pairings guide guests toward flavor combinations that work beautifully together. Arrange meats in loose rolls or folds rather than stacking them flat—this creates visual interest and makes individual slices accessible.
Symmetry versus asymmetry is a personal choice, but most designers favor asymmetrical arrangements that feel more natural and interesting. Imagine your board divided into thirds rather than halves, and distribute elements unevenly across these sections. This approach feels more sophisticated and less formal than perfectly symmetrical placement.
Consider the direction guests will approach your board. If it’s positioned against a wall, arrange taller items in the back and lower items in front. If it’s a centerpiece accessible from all sides, create interest from every angle with strategic height variation throughout.
Pro Tips for Storage and Serving
Timing is critical for charcuterie board success. Assemble your board no more than 2-3 hours before serving. Meats and cheeses begin drying out when exposed to air, and fruits start oxidizing or releasing moisture. If you must prepare ahead, cover the board loosely with plastic wrap and refrigerate, removing it 15-20 minutes before guests arrive.
Temperature management ensures optimal flavor and food safety. Keep your board in the coolest part of your home or on a table away from direct sunlight and heat sources. For outdoor entertaining, consider using a board with a built-in ice pack or placing your serving board on another board filled with ice underneath.
Provide small appetizer plates, napkins, and small spreaders or cheese knives. Guests appreciate having tools to navigate your creation without creating a mess. Place napkins strategically around the board and have extra stacks nearby. Small forks or picks make grabbing items like olives and pickles easier and more hygienic.
Beverage pairing enhances the experience significantly. White wines complement soft cheeses and lighter meats beautifully. Red wines pair wonderfully with aged cheeses and spiced cured meats. Sparkling wine works universally across the board. Non-alcoholic options like sparkling water with fruit or herbal teas also complement charcuterie nicely. Consider your guest list when selecting beverages.
For larger gatherings, you might create multiple smaller boards rather than one enormous one. This prevents guests from clustering in one area and ensures items remain at optimal temperature longer. It also looks more elegant and is easier to manage throughout your event.
When learning how-to guides and tutorials for entertaining, remember that the goal is enjoyment—yours and your guests’. Don’t stress about perfection; focus on quality ingredients and thoughtful arrangement. Your genuine effort and care shine through in the final presentation.
After your gathering, proper storage of leftovers extends their life. Wrap unused meats and cheeses separately in parchment paper or food-safe containers, storing them in the coldest part of your refrigerator. Most cured meats keep 3-5 days when properly wrapped, while cheeses can last 1-2 weeks. Crackers should be stored in airtight containers to maintain crispness. Nuts keep best in sealed containers in cool, dry conditions.
FAQ
How do you pronounce charcuterie correctly?
Charcuterie is pronounced “shar-KOO-tuh-ree” with the emphasis on the second syllable. The term comes from French culinary tradition and refers to the craft of preparing cured meats and the board that showcases them.
How much food should I prepare per person?
Plan for approximately 3-4 ounces of total charcuterie items per person. This includes 2-3 ounces of combined meats and cheeses plus supporting ingredients like fruits, nuts, and crackers. For a 10-person gathering, prepare 1.5-2 pounds of meats, 1.5-2 pounds of cheeses, and adequate supporting items.
Can I prepare a charcuterie board the night before?
It’s not ideal to assemble the complete board the night before, as ingredients dry out and fruits oxidize. Instead, prep individual components: cut cheeses, slice meats, prepare fruits (with lemon juice to prevent browning), and measure nuts into bowls. Assemble everything 2-3 hours before serving for optimal freshness and appearance.
What’s the best board size for different group sizes?
For 4-6 people, use a 12-inch round or 10×14-inch rectangular board. For 8-10 people, select a 14-16-inch round or 12×18-inch rectangular board. For larger gatherings of 12+ people, create two medium boards rather than one oversized board, which becomes difficult to navigate and maintain proper temperature.
How do I prevent cheese from drying out?
Remove cheese from the refrigerator 30-45 minutes before serving, allowing it to reach room temperature where flavors develop fully. Keep the board in the coolest area available and avoid direct sunlight. If preparing hours ahead, cover loosely with plastic wrap and refrigerate until 15-20 minutes before serving.
What are the best wine pairings for charcuterie boards?
White wines pair beautifully with soft cheeses and lighter cured meats. Red wines complement aged cheeses and spiced or heavily flavored meats. Sparkling wines work universally across all board elements. Consider your guest preferences and select 2-3 options to accommodate different tastes.
Should I label the cheeses on my board?
Yes, small cards identifying each cheese enhance the experience and help guests navigate unfamiliar varieties. Include the cheese name and origin. This educational element shows thoughtfulness and helps guests identify favorites for future reference.
How do I arrange items for visual appeal?
Use odd numbers (groups of 3 or 5), create height variation, distribute colors throughout rather than grouping them, and leave some negative space. Work in sections starting with larger items, then medium, then small. Asymmetrical arrangements feel more natural and sophisticated than perfectly symmetrical layouts.
Related Posts

Superscript in Google Docs: Expert Tips

Strikethrough in Excel: Easy Steps for Beginners
