
Master Over Easy Eggs: Chef’s Proven Tips
Master Over Easy Eggs: Chef’s Proven Tips for Perfect Results Every Time
Over easy eggs represent the gold standard of breakfast cooking—a delicate balance between a set white and a gloriously runny yolk that spills across your plate. Whether you’re preparing breakfast for yourself or impressing guests at a weekend brunch, mastering this technique elevates your culinary skills and transforms a simple meal into a restaurant-quality experience. The beauty of over easy eggs lies in their simplicity, yet achieving that perfect consistency requires understanding heat control, timing, and technique.
This comprehensive guide walks you through everything you need to know about cooking over easy eggs like a professional chef. From selecting the right equipment to troubleshooting common mistakes, you’ll discover proven methods that guarantee success. Whether you’re a kitchen novice or an experienced home cook looking to refine your technique, these expert-backed strategies will help you achieve perfect over easy eggs every single time.
Understanding Over Easy Eggs: What Makes Them Special
Over easy eggs occupy a unique position in the breakfast world. Unlike sunny-side up eggs where the yolk remains completely uncooked, over easy eggs feature a fully set white with a yolk that’s warm but still liquid in the center. The cooking process involves flipping the egg briefly, allowing just enough heat to set the white while preserving the yolk’s delicate, runny consistency.
The appeal of over easy eggs extends beyond their visual appeal. The combination of textures—the slightly firm but tender white contrasting with the rich, flowing yolk—creates a superior eating experience. When you break into a perfectly cooked over easy egg, that yolk should flow freely across your plate, ready to soak into toast, hash browns, or other breakfast accompaniments. This technique has been perfected by professional chefs and short-order cooks for decades, and now you can master it in your own kitchen.
Understanding the science behind cooking eggs helps you achieve consistent results. Egg whites set at approximately 140-149°F (60-65°C), while yolks require temperatures around 158-160°F (70-71°C) to fully solidify. For over easy eggs, you want the whites fully cooked while keeping the yolk below that threshold, requiring precise temperature control and timing.

Essential Equipment and Ingredients
Success in cooking over easy eggs begins with having the right tools and quality ingredients. Your equipment selection directly impacts your ability to control heat and achieve consistent results. Here’s what you’ll need:
- Non-stick skillet or cast iron pan: An 8-10 inch non-stick skillet provides ideal surface area and heat distribution. Cast iron works equally well if properly seasoned, offering superior heat retention.
- Spatula: A thin, flexible metal or silicone spatula allows you to slide under the egg without breaking the yolk. Avoid thick, rigid spatulas that can damage the delicate egg.
- Butter or cooking oil: Use high-quality butter for flavor or neutral oil like canola for higher heat tolerance. Some chefs prefer a combination of both.
- Lid or cover: A glass lid or even a baking sheet can trap steam, helping the whites cook while protecting the yolk.
- Thermometer: An instant-read thermometer helps you monitor pan temperature, especially when learning.
For ingredients, always prioritize fresh eggs from reputable sources. Farm-fresh or pasture-raised eggs offer superior flavor and more vibrant yolks. Room-temperature eggs cook more evenly than cold ones straight from the refrigerator, so remove them 5-10 minutes before cooking. Season simply with salt and pepper, allowing the egg’s natural flavor to shine.
Step-by-Step Guide to Perfect Over Easy Eggs
Follow this proven method to achieve over easy eggs with professional-quality results:
Step 1: Prepare Your Pan and Heat
Place your skillet over medium heat and allow it to warm for 2-3 minutes. The pan should be hot enough that a drop of water sizzles immediately but not so hot that it evaporates in a flash. This medium heat is crucial—high heat will cause the whites to brown before the yolk cooks properly, while low heat results in an overcooked yolk.
Step 2: Add Fat and Let It Heat
Add approximately 1 tablespoon of butter or oil to the pan, tilting it to coat the surface evenly. Let the butter melt and foam slightly, which indicates it’s reached the right temperature. The fat layer should shimmer and move freely across the pan surface.
Step 3: Crack and Cook the Egg
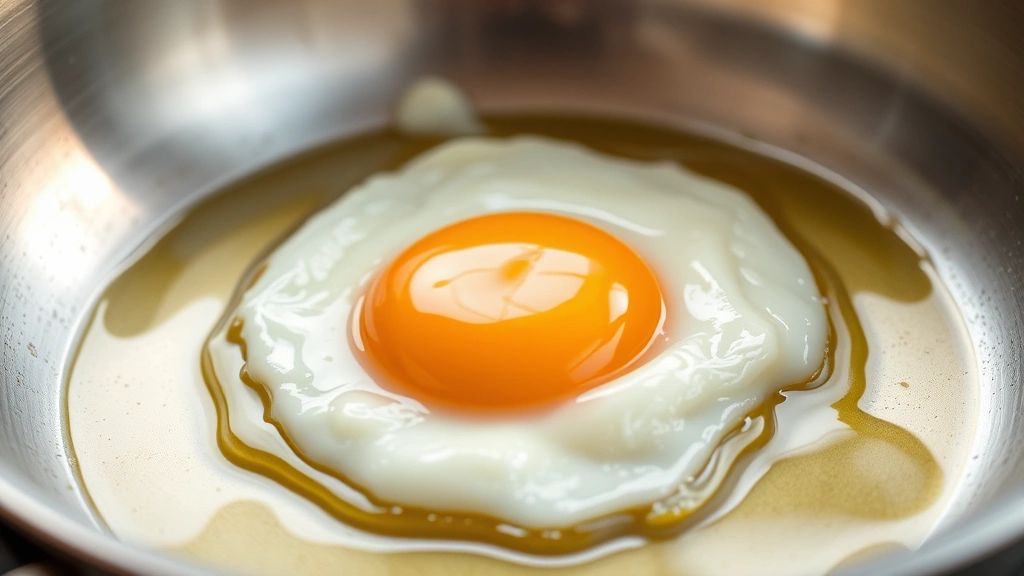
Crack your egg into a small bowl first to avoid shell fragments. This also allows you to assess the egg’s quality before committing it to the pan. Gently slide the egg from the bowl into the center of the hot pan. You should hear a gentle sizzle—not a violent pop. The egg white should immediately begin setting around the yolk.
Step 4: Monitor the White Setting
Watch carefully as the white cooks. It will transition from clear and runny to opaque and set. This typically takes 3-4 minutes on medium heat. The white should be completely set before you flip, with no translucent areas remaining. You can gently push the white toward the yolk to check for doneness without breaking the yolk.
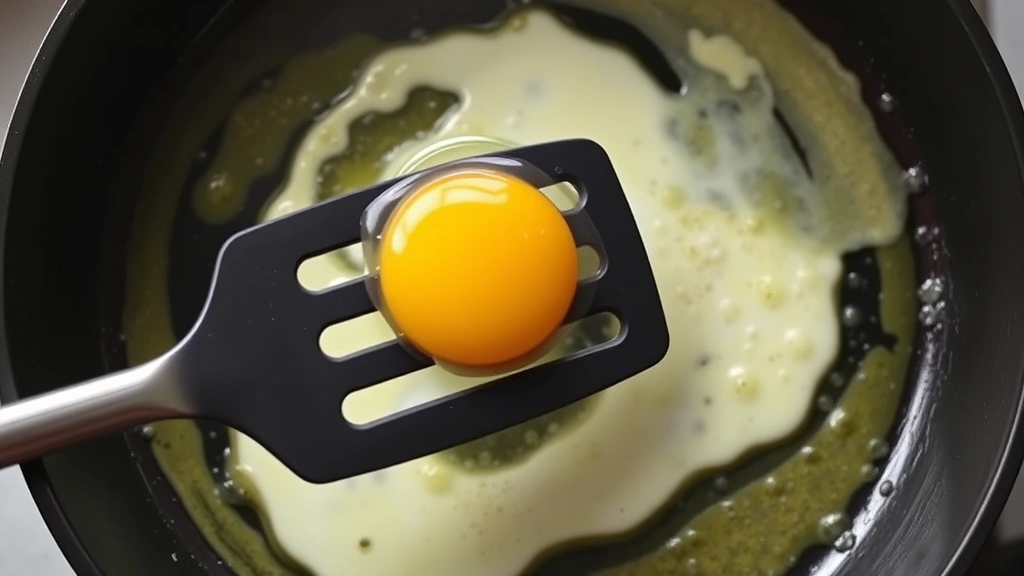
Step 5: The Flip
Once the white is nearly set with just a thin layer of barely-set white around the yolk, it’s time to flip. Slide your thin spatula completely under the egg, supporting it fully. In one confident motion, flip the egg quickly and smoothly. The less time the yolk spends face-down in the pan, the better.
Step 6: Cook the Other Side
After flipping, cook for just 20-30 seconds—literally a quick kiss of heat on the yolk side. This brief exposure sets the very bottom layer of the white while leaving the yolk perfectly runny. Some chefs count to 15-20 to ensure consistency.
Step 7: Transfer to Plate
Slide the egg onto your waiting plate immediately. Any additional time in the pan will continue cooking the yolk. Serve immediately while the whites are still warm and the yolk maintains its perfect consistency.
Heat Control and Temperature Management
Heat control represents the most critical factor in mastering over easy eggs. Many home cooks struggle because they don’t understand how dramatically heat affects the final product. Professional kitchens maintain strict temperature standards, and you should too.
Pan Temperature Basics
Medium heat on a standard stovetop typically produces the best results for over easy eggs. However, different stoves vary significantly. Electric coils, gas burners, and induction cooktops all distribute heat differently. Spend time getting to know your specific stove. If you consistently overcook yolks, you’re likely running too hot. If whites remain undercooked, increase heat slightly.
Using a Thermometer for Consistency
Professional chefs often use infrared thermometers to check pan temperature. Aim for 325-350°F (163-177°C) for the pan surface. This range provides enough heat to cook the whites properly without browning them excessively or cooking the yolk too much. Once you understand how your stove behaves at these temperatures, you can cook by feel and sound.
The Role of Resting Time
After flipping, residual heat continues cooking the egg even after you remove it from the pan. Account for this carryover cooking by removing the egg from heat when the yolk still feels slightly soft to the touch. The egg will continue cooking for another 10-15 seconds after plating.
Many chefs prefer using detailed cooking guides to understand heat dynamics, similar to how you’d approach other kitchen techniques like making a latte at home where precise temperatures matter.
Common Mistakes and How to Avoid Them
Mistake 1: Starting with Cold Eggs
Cold eggs straight from the refrigerator take longer to cook and cook unevenly. The white near the yolk may still be runny while outer edges overcook. Remove eggs from the refrigerator 5-10 minutes before cooking. This simple step dramatically improves consistency and reduces cooking time.
Mistake 2: Using Too Much Heat
Excessive heat is the most common reason for overcooked yolks. High heat cooks eggs too quickly, setting the yolk before the white finishes cooking. Medium heat allows proper white development while maintaining yolk liquidity. Patience is essential—rushing the process guarantees failure.
Mistake 3: Insufficient Fat in the Pan
Skimping on butter or oil causes sticking and prevents even heat distribution. Use at least 1 tablespoon per egg. Adequate fat also creates the gentle sizzle that indicates proper pan temperature. This is as important as proper technique when making a seafood boil where fat carries flavor and heat.
Mistake 4: Flipping Too Early or Too Late
Flipping before the white is fully set results in a broken yolk and unevenly cooked whites. Waiting too long means the yolk begins cooking before you flip. The sweet spot is when the white is completely opaque but still glistens slightly—usually around the 3-4 minute mark.
Mistake 5: Overcooking After the Flip
The most frequent error occurs after flipping. Chefs leave the egg in the pan too long, cooking the yolk excessively. Remember: 20-30 seconds is all you need. Many home cooks count to 15 to ensure precision. Set a mental timer if necessary.
Mistake 6: Using Damaged or Low-Quality Eggs
Eggs with thin shells or watery whites don’t produce attractive over easy results. Purchase fresh eggs from reliable sources. Check the “pack date” on the carton—eggs less than two weeks old perform best. Higher-quality eggs have thicker, more viscous whites that hold together better during cooking.
Pro Chef Tips and Advanced Techniques
The Basting Method
Professional short-order cooks often use the basting technique instead of flipping. After cracking the egg into the hot pan, they continuously spoon the hot fat over the yolk, cooking it gently without flipping. This method offers superior control over yolk doneness. To baste: tilt the pan slightly, gather some hot fat with a spoon, and drizzle it over the yolk repeatedly until the white is set and yolk is still runny. This technique requires practice but produces exceptional results.
The Lid Method
Using a lid or cover accelerates white cooking through steam. Crack the egg into the hot pan, immediately cover with a glass lid or metal baking sheet, and reduce heat to low. The trapped steam cooks the white from above while the pan heat works from below. This method reduces flipping altogether and minimizes yolk overcooking. Cook for 4-5 minutes until the white is set.
Temperature Staging
Some advanced cooks use temperature staging: start on high heat for 10 seconds to set the bottom white layer, then immediately reduce to medium for the remaining cooking. This creates a slight crust on the bottom while maintaining a tender top. Experiment with this technique once you’ve mastered the basic method.
Seasoning Timing
Add salt and pepper after cooking rather than before. Pre-salting can damage the delicate egg white structure. Season immediately after plating while the egg is still hot, ensuring flavors fully develop.
The Pre-Warming Plate
Slide your serving plate into a warm oven for 1-2 minutes before cooking. A warm plate keeps your over easy eggs at optimal temperature longer, preventing the yolk from setting too quickly. This professional technique makes a noticeable difference in the final result.
Pairing Your Over Easy Eggs
Over easy eggs shine when paired thoughtfully with complementary sides. The runny yolk serves as a natural sauce, making it perfect for absorbing flavors from other breakfast components.
Toast and Bread
Crusty toast, sourdough, or buttered English muffins provide ideal vehicles for dipping into the yolk. The bread soaks up the rich yolk, creating a satisfying textural contrast. Avoid soft breads that fall apart too easily.
Potatoes and Root Vegetables
Crispy hash browns, roasted potatoes, or home fries pair beautifully with over easy eggs. The yolk coats the potatoes, adding richness and flavor. Season potatoes lightly to avoid competing with the egg’s delicate taste.
Cured Meats
Bacon, sausage, or ham complement over easy eggs perfectly. The salty, smoky flavors enhance the egg without overpowering it. Cook meat first, then use the rendered fat for cooking eggs.
Fresh Vegetables
Sautéed spinach, roasted tomatoes, or grilled asparagus add nutritional balance and visual appeal. The yolk creates a light sauce that brings vegetables and eggs together harmoniously.
Grains and Legumes
For non-traditional pairings, try over easy eggs over grains like quinoa or rice, or with beans. This approach works well for lunch or dinner applications, transforming over easy eggs into a complete meal.
Similar to how you’d carefully prepare cleaning a coffee maker to maintain quality beverages, taking care with egg preparation and pairing ensures excellent breakfast experiences.
FAQ
How long should I cook an over easy egg?
Total cooking time is typically 4-5 minutes: approximately 3-4 minutes for the initial cook on the first side, then 20-30 seconds after flipping. Exact timing depends on pan temperature, egg size, and your stove type. Medium heat provides the most consistent results.
Can I make over easy eggs in the oven?
Yes, though it’s less common. Preheat your oven to 350°F (177°C), place eggs in a buttered baking dish, and bake for 12-15 minutes until whites are set. This method works better for cooking multiple eggs simultaneously. However, traditional stovetop cooking provides better yolk control.
Why does my yolk always break when I flip?
Broken yolks typically result from flipping too early before the white is completely set, using insufficient fat, or flipping too aggressively. Ensure the white is fully opaque before flipping, use adequate butter or oil, and flip with one smooth, confident motion. Consider trying the basting method instead.
What’s the difference between over easy, over medium, and over hard?
Over easy has a runny yolk with fully set whites. Over medium has a yolk that’s mostly set with a slightly runny center. Over hard has a completely cooked yolk. All require flipping, but cooking time after the flip varies: 20-30 seconds for over easy, 40-60 seconds for over medium, and 60+ seconds for over hard.
Can I use oil instead of butter?
Absolutely. Neutral oils like canola, vegetable, or avocado oil work well. Butter provides superior flavor but has a lower smoke point. Many chefs use a combination of both for optimal flavor and heat tolerance. Avoid extra virgin olive oil, which has a low smoke point and strong flavor that can overpower eggs.
How do I know when the white is fully set?
The white should be completely opaque with no clear or translucent areas. You can gently push the white with your spatula—it should move as a cohesive unit without flowing. The white should also have a slight sheen from the cooking fat but not appear wet or runny.
Should I cover the pan with a lid?
Covering isn’t necessary for traditional over easy eggs, but it accelerates cooking and reduces the need to flip. If using a lid, reduce heat to low after covering and cook for 4-5 minutes. This method produces excellent results with minimal intervention.
Why is my pan smoking when I cook eggs?
Smoking indicates the pan or fat is too hot. Reduce heat immediately. Medium heat should produce a gentle sizzle, not smoke. If smoke continues, your oil’s smoke point may be too low—switch to a higher-heat oil or use butter at slightly lower temperatures.
Related Posts

Superscript in Google Docs: Expert Tips

Strikethrough in Excel: Easy Steps for Beginners
