
Remove Gel Polish at Home? Expert Tips Inside
Gel polish provides a long-lasting, high-shine finish that regular nail polish simply cannot match. However, the durability that makes gel polish so appealing also makes removal challenging. Many people rush to their nail salons for professional removal, but the good news is that you can safely remove gel polish at home with the right techniques and materials. This comprehensive guide walks you through expert-approved methods to remove gel polish without damaging your natural nails.
Removing gel polish at home not only saves you money but also gives you control over the process and timeline. Whether you’re dealing with a fresh manicure or growth at the base of your nails, understanding the proper removal techniques is essential. We’ll cover everything from the acetone soak method to alternative approaches, plus what to avoid and how to care for your nails afterward.
Understanding Gel Polish and Why It’s Hard to Remove
Gel polish is fundamentally different from traditional nail polish. It’s a hybrid formula that combines the pigments of regular polish with the binding properties of acrylic polymers. When exposed to UV or LED light, the gel undergoes a chemical process called polymerization, creating cross-linked polymer chains that harden into an incredibly durable coating. This is why gel polish can last two to three weeks without chipping, compared to regular polish which typically lasts five to seven days.
The strength of this chemical bond is precisely what makes removal so challenging. You cannot simply peel off gel polish like you might with regular polish. The coating adheres tightly to your natural nail plate, and attempting to force it off can cause severe damage including peeling, brittleness, and nail thinning. Understanding this chemistry helps explain why the acetone soak method, which dissolves the polymer chains, is the most effective approach. The same principles apply whether you’re removing gel polish or learning about how to remove gel varnish.
Essential Supplies for Home Removal
Before you begin the removal process, gather all necessary supplies. Having everything prepared ensures you won’t need to leave your nails soaking unattended while searching for a missing item.
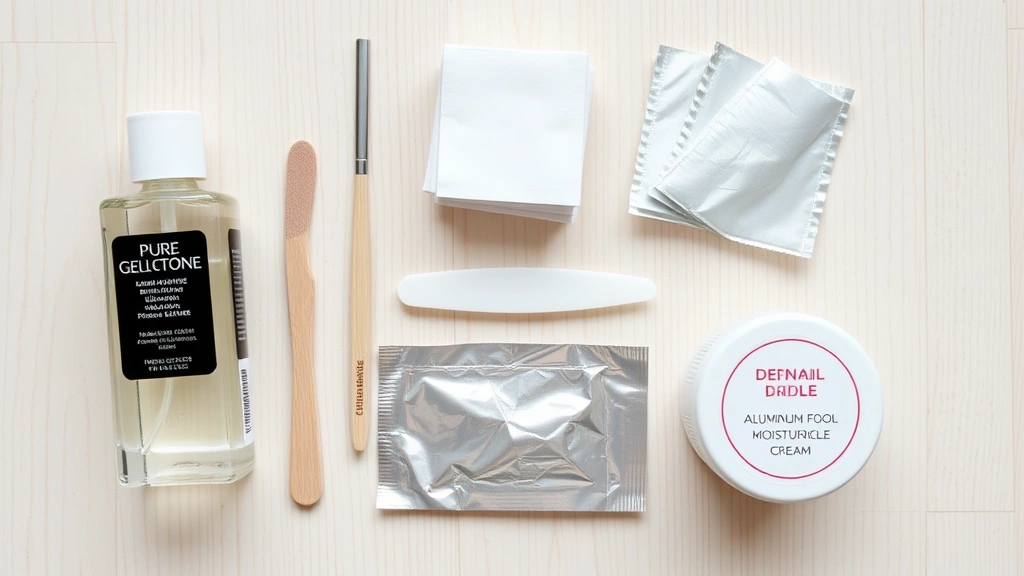
- Pure acetone – This is non-negotiable. Regular nail polish remover contains only 30-50% acetone and won’t effectively remove gel polish. Look for 100% pure acetone at beauty supply stores, drugstores, or online retailers like Sally Beauty.
- Nail file – A coarse-grit file (180-240 grit) helps break the gel polish seal by roughing up the shiny surface.
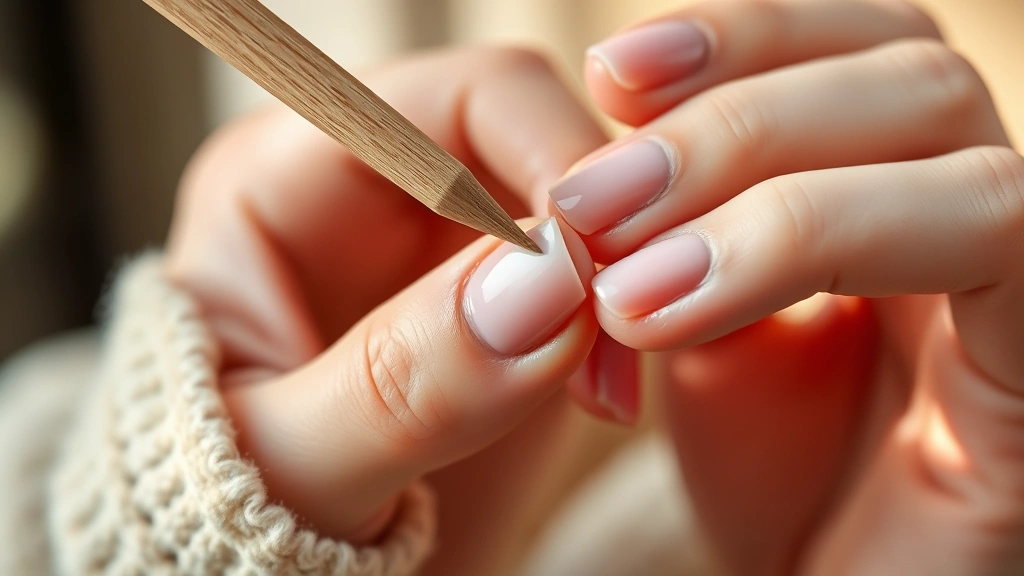
- Cuticle pusher or wooden stick – Metal tools can be too harsh. A wooden cuticle pusher or orange stick gently lifts softened gel without damaging the nail plate.
- Cotton pads or lint-free wipes – Regular cotton balls leave fibers behind. Opt for makeup remover pads or coffee filters.
- Aluminum foil – Cut into small squares to wrap around each finger for the soak method.
- Small bowl or container – Something shallow enough to submerge your fingertips comfortably.
- Moisturizing cream or cuticle oil – Essential for aftercare following the removal process.
- Hand towel – Keep this nearby for drying hands between steps.
- Protective gloves – Optional but recommended since acetone is harsh on skin.
Quality matters when purchasing acetone. Brands from Sally Beauty Supply and similar professional beauty suppliers offer consistent, reliable products. Avoid using acetone that’s been open for extended periods, as it evaporates and becomes less effective.
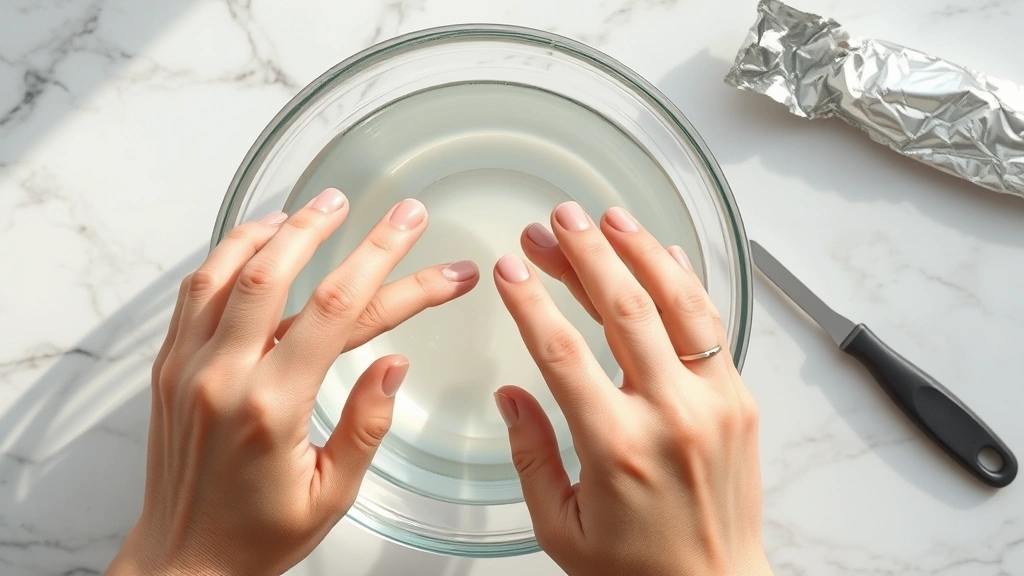
The Acetone Soak Method
The acetone soak is the gold standard for gel polish removal and is used by most professional nail technicians. This method works by dissolving the polymer structure of the gel, allowing it to separate from the natural nail plate. The process typically takes 15-20 minutes and requires patience and attention to detail.
The acetone soak method is superior to other techniques because it minimizes mechanical damage to your nails. Rather than scraping and filing, you’re allowing chemistry to do the work. This approach is similar in principle to how professionals handle other delicate removal tasks, much like the techniques discussed in our guide on how to remove eyelash extensions, where gentleness is paramount.
Before starting, file the shiny surface of your gel polish. This step is crucial because the glossy top coat acts as a barrier that prevents acetone from penetrating the gel layers beneath. Use gentle, even strokes rather than aggressive filing. You’re not trying to remove all the polish at this stage—just break the seal. Spend about one minute per nail filing lightly.
Alternative Removal Techniques
While the acetone soak is most effective, several alternative methods exist for removing gel polish, each with advantages and disadvantages.
The Foil Wrap Method with Acetone Pads involves soaking acetone-saturated cotton pads directly against your nails. Wrap each finger tightly with aluminum foil to hold the pad in place and prevent acetone from evaporating. This method concentrates acetone directly on the nail and typically works faster than a full soak, taking 10-15 minutes.
Gel Polish Remover Products specifically formulated for gel removal are available commercially. These products often contain acetone plus conditioning agents designed to minimize drying. Brands like Zoya Remove+ and CND Soak-Off are gentler alternatives, though slightly less powerful than pure acetone. Follow product instructions carefully, as formulations vary.
The Peel-Off Base Coat Method is a preventative approach rather than a removal technique. If you apply a specialized peel-off base coat before your gel polish, removal becomes significantly easier later. The gel polish adheres to this base coat rather than directly to your nail, allowing you to peel it off more easily. This method is worth considering for future manicures.
Mechanical Removal with Drill Bits is used by professionals but not recommended for home use. Electric nail drills require skill to avoid damaging the nail plate and can cause serious injury if mishandled. Leave this method to trained technicians.
Step-by-Step Process for Safe Removal
Follow this detailed process for safe, effective gel polish removal at home.
- File the surface gently. Using a coarse-grit nail file, file the shiny top coat of your gel polish using light, even pressure. Work on one nail at a time, filing in one direction rather than sawing back and forth. Continue until the surface looks dull and matte, which indicates the seal is broken. This should take about 30 seconds to one minute per nail.
- Prepare your acetone station. Pour pure acetone into your small bowl to a depth of about one inch. If using the foil wrap method, soak cotton pads thoroughly in acetone instead. Have all your tools organized and within reach.
- Soak your fingertips. Submerge all ten fingertips into the acetone. If using the foil method, place a soaked cotton pad against each nail and wrap tightly with foil. The foil acts as an insulator, keeping the acetone warm and preventing evaporation.
- Wait patiently. Set a timer for 15 minutes. Resist the urge to check frequently or pick at the polish. Patience is essential for effective dissolution. Some nails may soften faster than others, which is normal.
- Check softness. After 15 minutes, remove one finger and gently test the polish with your cuticle pusher. It should feel soft and pliable. If it’s still hard, return your fingers to the acetone for another 5 minutes.
- Gently lift the gel. Once softened, use your wooden cuticle pusher or orange stick to gently lift and separate the gel from your nail plate. Work slowly and carefully, supporting your nail plate with your other hand to prevent bending or breaking. If you encounter resistance, soak for another minute rather than forcing it.
- Remove remaining residue. After the bulk of the gel is removed, you may have a thin layer remaining. Use an acetone-soaked cotton pad to gently rub away this residue. Do not scrape aggressively.
- Wash thoroughly. Once all gel polish is removed, wash your hands with soap and warm water to remove all acetone. Pat dry with a clean towel.
- Moisturize immediately. Apply cuticle oil and hand cream generously. Acetone is very drying, and your nails and skin need immediate hydration.
This methodical approach prioritizes nail health throughout the removal process. For additional information about how to get rid of nail varnish using various techniques, check out our comprehensive guide.
Common Mistakes to Avoid
Understanding what not to do is just as important as knowing the proper technique. Many people damage their nails by making these preventable errors.
Using regular nail polish remover is the most common mistake. Regular remover contains only 30-50% acetone, which is insufficient to dissolve gel polish. You’ll waste time and money while your nails sit in inadequate solution. Invest in pure acetone from the start.
Skipping the file step significantly extends the removal process. The shiny top coat of gel polish is specifically designed to resist moisture and chemicals. Breaking this seal with a file allows acetone to penetrate the layers beneath. Without this step, you could soak for 30+ minutes with minimal results.
Scraping aggressively causes peeling and damage to your natural nail. The goal is to gently lift softened gel, not to force it off with tools. If you’re meeting resistance, your nails need more soaking time, not more pressure.
Leaving acetone on too long can over-dry your nails and skin. While soaking for 15-20 minutes is fine, don’t leave your fingers in acetone for 30+ minutes. Extended exposure increases dryness and irritation.
Neglecting aftercare leaves your nails weakened and brittle. The removal process strips moisture and oils from your nails. Immediate and consistent moisturizing is not optional—it’s essential for nail recovery.
Using acetone near eyes or on sensitive skin can cause irritation. Acetone is a powerful solvent and should not contact eyes or broken skin. Wear gloves if you have sensitive skin or open wounds on your hands.
Aftercare and Nail Recovery
The removal process is just the beginning. Proper aftercare determines whether your nails recover quickly or suffer long-term damage.
Immediate moisturizing should begin the moment you finish removal. Apply cuticle oil to the nail bed and surrounding skin, then follow with a rich hand cream. Repeat this process three times daily for the first week. Your nails have been stripped of natural oils and need intensive hydration.
Avoid water exposure for at least 24 hours after removal. Water can further dry out your nails during the recovery period. When you do wash your hands, apply moisturizer immediately afterward.
Take a break from polish for at least one week. Your nails need time to recover and regain their natural strength and flexibility. This is an ideal time to focus on nail health rather than aesthetics.
Trim and file carefully. Your nails may be temporarily brittle and prone to breaking. Trim them shorter than usual and file gently with a fine-grit file. Avoid harsh buffing or aggressive shaping.
Consider nail strengthening treatments during your recovery period. Products containing biotin, keratin, or calcium can support nail health. Additionally, a diet rich in protein, iron, and B vitamins supports nail growth from within. Learn more about nail care by visiting our article on how to clean jewelry, which discusses similar gentle care principles.
Watch for signs of damage. Mild peeling or slight whitening at the nail tips is normal and temporary. However, if you notice deep peeling, persistent brittleness, or signs of infection, consult a dermatologist. Severe nail damage requires professional evaluation.
Prevent future damage by using a peel-off base coat with your next gel manicure. This simple step makes future removal significantly easier and gentler on your nails. Additionally, spacing out gel manicures by at least two weeks gives your nails recovery time.
FAQ
How long does it take to remove gel polish at home?
The acetone soak method typically takes 15-20 minutes from start to finish. The foil wrap method may be slightly faster, taking 10-15 minutes. However, individual variation exists—some nails soften faster than others. Patience is more important than speed; rushing the process risks nail damage.
Can I remove gel polish without acetone?
While pure acetone is most effective, you can use commercial gel polish removers that contain acetone as a primary ingredient. These may work slightly slower but are gentler on skin and nails. Avoid regular nail polish remover, which is insufficient for gel polish removal.
Will removing gel polish damage my nails?
When done correctly, gel polish removal causes minimal damage. However, improper technique—scraping aggressively, using inadequate remover, or neglecting aftercare—can cause peeling, brittleness, and thinning. Follow the proper technique and prioritize aftercare to minimize risk.
How often can I safely remove and reapply gel polish?
Most nail professionals recommend spacing gel manicures at least two weeks apart. This gives your nails time to recover between applications. Frequent gel polish use without adequate recovery time can permanently weaken your nails.
What should I do if my nails are damaged after removal?
Mild damage typically resolves within 2-4 weeks with proper care. Focus on moisturizing, avoid polish and water exposure, and trim nails short to prevent breakage. If damage is severe or doesn’t improve, consult a dermatologist. For related removal techniques and care, explore our FixWiseHub Blog for additional helpful guides.
Is it safe to use acetone regularly?
While acetone is safe for occasional use (monthly gel removals), frequent exposure can dry skin and nails excessively. Wear gloves during removal and moisturize thoroughly afterward. If you get gel manicures frequently, consider professional removal every other time to reduce your personal acetone exposure.
Can I remove gel polish while pregnant?
The acetone fumes during removal are generally considered safe in well-ventilated areas, but many pregnant women prefer to be cautious. If pregnant, ensure excellent ventilation, wear gloves, and consider having a professional remove your gel polish instead. Consult your healthcare provider about your specific situation.
Why is my gel polish not softening during the soak?
The most common cause is inadequate acetone concentration. Verify you’re using 100% pure acetone, not regular nail polish remover. Additionally, ensure you filed the top coat thoroughly—the glossy seal prevents acetone penetration. If the polish still won’t soften after 20 minutes, the acetone may have evaporated; try the foil wrap method instead.
Related Posts

Superscript in Google Docs: Expert Tips

Strikethrough in Excel: Easy Steps for Beginners
