
Remove a Bathtub Drain? Expert Tips Inside
How to Remove a Bathtub Drain: Expert Tips Inside
A clogged or damaged bathtub drain can quickly turn your relaxing soak into a frustrating plumbing problem. Whether you’re dealing with a slow drain, rust buildup, or need to replace the entire drain assembly, knowing how to remove a bathtub drain is an essential skill for any homeowner. This comprehensive guide walks you through the process step-by-step, from identifying your drain type to safely extracting it without damaging your tub.
Removing a bathtub drain might seem intimidating, but with the right tools and knowledge, it’s a manageable DIY project that can save you hundreds in plumbing fees. We’ll cover everything you need to know, including the different drain types you might encounter, the tools you’ll need, and troubleshooting tips for stubborn drains.
Types of Bathtub Drains
Before you start removing your bathtub drain, it’s important to identify which type you have. Different drain styles require different removal techniques, and using the wrong approach could damage your tub or plumbing system. The main bathtub drain types include trip-lever drains, push-pull drains, pop-up drains, and screw-in drains. Understanding your drain configuration will make the removal process much smoother and more efficient.
Trip-Lever Drains are among the most common in older homes. These drains have a lever on the overflow plate that controls water flow. The entire drain assembly, including the overflow tube, is typically one interconnected unit that removes from inside the tub wall.
Push-Pull Drains feature a stopper that you push down to close and pull up to open. These are relatively straightforward to remove since the stopper separates from the drain body, and the drain body itself unthreads from the drain pipe.
Pop-Up Drains use a mechanical linkage system where the stopper pops up and down with a foot lever or handle. The rocker arm mechanism connects to the overflow, making removal more complex than push-pull models.
Screw-In Drains are the simplest design, with a drain body that threads directly into the drain pipe. These are common in modern installations and are often the easiest to remove.
For more detailed guidance on home repairs, check out our comprehensive how-to guides and tutorials on FixWiseHub.
Tools and Materials You’ll Need
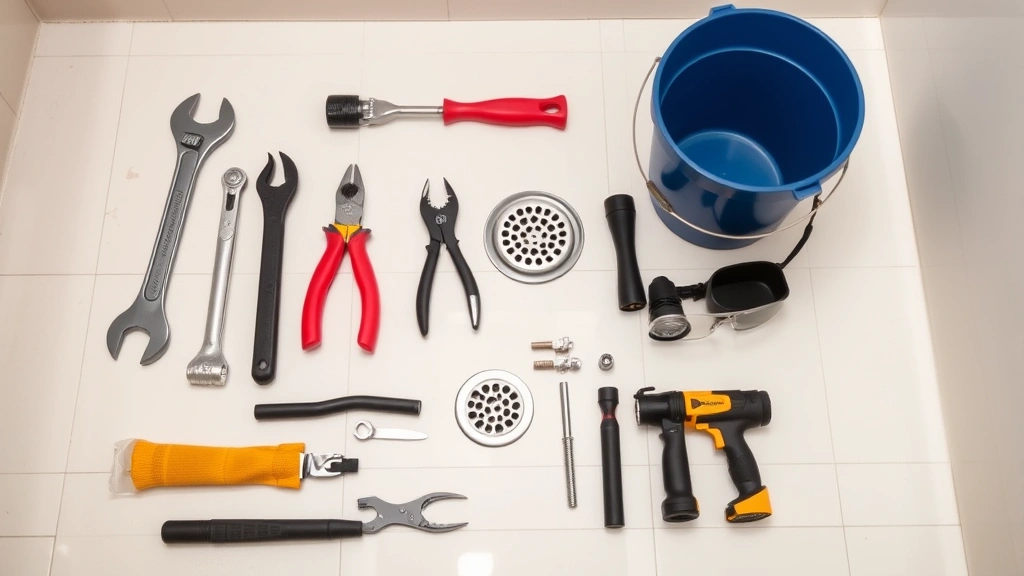
Having the right tools before you start will save you time and frustration. You don’t need an extensive collection of specialized equipment—most homeowners already have these items in their toolbox. However, a few specialty tools designed specifically for drain removal can make the job significantly easier.
Essential Tools:
- Adjustable wrench or slip-joint pliers
- Screwdrivers (both Phillips and flathead)
- Bathtub drain wrench or socket wrench
- Needle-nose pliers
- Flashlight or headlamp
- Shop towels or rags
- Bucket for catching water and debris
- Putty knife or scraper
Optional but Helpful:
- Drain removal tool (specialized for your drain type)
- Penetrating oil (like WD-40 or similar)
- Hacksaw for cutting stubborn drain bodies
- Plumber’s snake for clearing clogs first
- Safety glasses to protect your eyes from debris
Visit Family Handyman for additional tool recommendations and plumbing insights.
Preparation Steps
Proper preparation is crucial before you attempt to remove your bathtub drain. Taking time to prepare will prevent water damage, protect your plumbing, and make the actual removal process go smoothly. Start by turning off the water supply to your bathroom if possible, or at least make sure the tub is completely empty and dry.
Clear the Area: Remove any bath mats, toys, or items around the tub. You’ll need clear access to the drain and overflow area. If you have a trip-lever drain, you’ll need space to work with the overflow plate on the tub’s side.
Drain the Tub Completely: Even if you’ve emptied the tub, water may still be trapped in the p-trap beneath. Place a bucket under the drain area to catch any residual water or debris that will spill when you break the seal.
Remove the Stopper: For push-pull and pop-up drains, remove the stopper assembly first. This usually involves unscrewing it or lifting it straight out. Set these pieces aside in a safe location where you won’t lose them.
Inspect the Drain: Use your flashlight to look into the drain opening. Check for corrosion, mineral buildup, or debris that might make removal difficult. If you see a significant clog, consider learning about proper cleaning techniques to clear it before removal.
Apply Penetrating Oil: If the drain appears corroded or hasn’t been serviced in years, apply penetrating oil around the drain body where it meets the tub. Let it sit for 15-30 minutes to help loosen rust and mineral deposits. This step is particularly important for older homes.
Removal Process
The actual removal process varies depending on your drain type, but the general principle remains the same: you’re working to unthread or unscrew the drain body from the drain pipe below. Take your time with this step, as forcing a stuck drain can crack your tub or break the plumbing underneath.
For Push-Pull and Screw-In Drains:
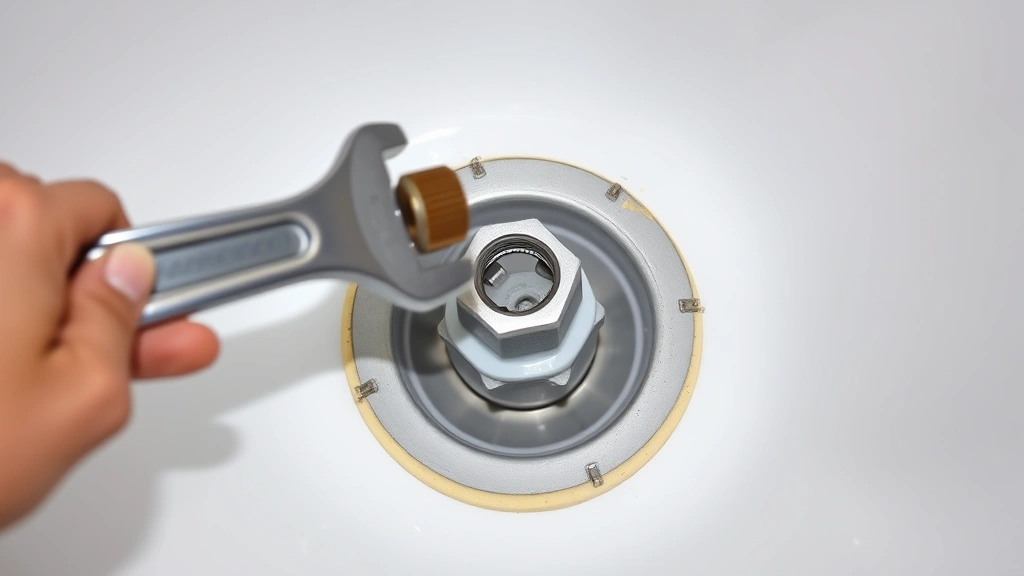
Position your bathtub drain wrench or adjustable wrench around the drain body, just below where it meets the tub surface. The wrench should grip the hexagonal or octagonal nut firmly. Turn counterclockwise slowly and steadily. If the drain resists, don’t force it—apply more penetrating oil and wait another 15 minutes. Once you’ve broken the initial resistance, continue turning until the entire drain body comes free. You may feel some resistance as you unthread it, which is normal. Keep turning until it comes completely out, then remove any remaining putty or caulk with your putty knife.
For Trip-Lever Drains:
These require removing the overflow plate first. Unscrew the overflow plate from the tub’s side using your screwdriver. Once removed, you’ll see the overflow tube and the linkage that connects to the trip lever. You’ll need to access the drain from underneath the tub if possible, or work from above by removing the entire overflow assembly. This type often requires removing the drain body and overflow tube as one unit. If you’re working from below, use your wrench to grip the drain body while someone helps hold the overflow tube steady. Turn counterclockwise to unthread the assembly.
For Pop-Up Drains:
Start by removing the stopper and rocker arm assembly. Look underneath the tub for the linkage rod connected to the overflow. You may need to disconnect this rod from the rocker arm. Once the linkage is disconnected, use your wrench to remove the drain body itself by turning counterclockwise. These drains are more complex, so take photos during disassembly to help with reassembly or when ordering replacement parts.
Breaking the Seal:
Bathtub drains are sealed with plumber’s putty or caulk to prevent leaks. As you remove the drain, this seal will break. You may hear a slight cracking sound or feel additional resistance. This is normal and expected. Once the drain is completely removed, scrape away all old putty and caulk using your putty knife. This is important because old sealant can prevent a proper seal on your new drain.

Troubleshooting Stuck Drains
Sometimes bathtub drains refuse to budge, no matter how much force you apply. Before you resort to drastic measures, try these troubleshooting techniques that often work on stubborn drains.
Heat Application: If your drain is stuck due to mineral buildup or corrosion, applying heat can help expand the metal and break the seal. Use a heat gun or hair dryer set to high heat, directing it at the drain body for 2-3 minutes. Let it cool slightly, then try turning the wrench again.
Penetrating Oil Soak: Sometimes you need to be more patient. Apply penetrating oil, let it soak for several hours or even overnight, then try again. Reapply oil if needed and wait longer. This is especially effective for drains in homes built before the 1980s.
Tap and Loosen Method: Gently tap the wrench with a hammer to help break the corrosion bond. Use light taps, not heavy blows, as heavy impact can crack your tub. The vibration often helps loosen stubborn connections.
Two-Wrench Technique: Use one wrench to hold the drain body steady while using another wrench to turn the connecting nut. This prevents the drain from spinning in place without unscrewing.
Cutting as a Last Resort: If the drain absolutely won’t budge and you’re replacing it anyway, you can carefully cut through the drain body using a hacksaw. Cut just deep enough to split the body, then use a flathead screwdriver to pry it apart. Be extremely careful not to damage the tub itself. This method should only be used when all other options have failed.
For additional plumbing insights and professional standards, consult This Old House, which offers comprehensive plumbing guidance.
Installation Tips for Replacement
Once you’ve successfully removed the old drain, you’ll likely want to install a new one. Understanding proper installation ensures your new drain will function correctly and last for years without leaking.
Choosing Your Replacement Drain:
Bring your old drain to a home improvement store, or take clear photos and measurements. You need to match the drain type and size. The drain opening diameter is typically 1.5 inches, but verify this with your measurements. Consider upgrading to a higher-quality drain body made from brass or stainless steel rather than cheap chrome-plated steel, which corrodes more easily.
Cleaning the Drain Opening:
Before installing the new drain, thoroughly clean the drain opening in your tub. Remove all old putty, caulk, and debris. Use your putty knife and a rag to scrape and wipe until the surface is clean and smooth. Any remaining old sealant will prevent a watertight seal on your new drain.
Applying Sealant:
Roll plumber’s putty into a rope approximately the thickness of a pencil. Press it around the underside of the new drain’s flange, creating a continuous seal. Don’t use too much—excess putty will squeeze out and be difficult to clean. Insert the drain body into the opening and thread it clockwise until snug. Don’t over-tighten, as this can crack the tub.
Securing from Underneath:
If you have access from underneath the tub, use the locknut and washer to secure the drain. Thread these clockwise until the drain is held firmly in place. Wipe away excess putty that squeezes out around the flange using a damp rag.
Common Mistakes to Avoid
Learning what not to do is just as important as learning the correct procedure. These common mistakes can damage your tub, plumbing, or result in leaks that cause water damage.
Over-Tightening: The most common mistake is applying too much force when removing or installing drains. Bathtubs, especially acrylic ones, can crack under excessive torque. Apply steady, moderate pressure rather than sudden, forceful turns.
Skipping the Penetrating Oil Step: Impatient homeowners often skip waiting for penetrating oil to work, then force the drain and damage something. Give the oil time to do its job—it’s worth the wait.
Using Wrong Tools: Attempting to remove a drain with an adjustable wrench that doesn’t fit properly will strip the drain body, making removal impossible. Invest in the proper bathtub drain wrench or socket for your specific drain type.
Forgetting to Catch Water: Failing to place a bucket under the drain results in water spilling across your bathroom floor. This water can damage subfloors and create mold problems.
Not Removing Old Sealant: Installing a new drain over old putty or caulk will result in leaks. Take time to completely remove all old sealant material before installing the replacement.
Ignoring the Overflow: On trip-lever and pop-up drains, the overflow and drain are connected. Removing just the drain without addressing the overflow can result in improper function or leaks.
For comprehensive home improvement guidance, explore more DIY tutorials and how-to guides on FixWiseHub to expand your skills.
FAQ
How long does it take to remove a bathtub drain?
A straightforward drain removal typically takes 30 minutes to an hour. However, if the drain is stuck, corroded, or you’re unfamiliar with the process, allow 2-3 hours. Patience is more important than speed when dealing with plumbing.
Do I need to turn off the water to remove a bathtub drain?
You don’t necessarily need to turn off the main water supply, but you should ensure the tub is completely empty and dry. If you’re uncomfortable working with the water on, turning it off provides extra peace of mind.
Can I remove a bathtub drain myself, or do I need a plumber?
Most homeowners can remove a bathtub drain themselves with basic tools and patience. You only need a plumber if the drain is severely damaged, your tub is cracked, or you’re uncomfortable working with plumbing components.
What should I do if my drain is completely stuck?
Try penetrating oil, heat application, and the tap-and-loosen method before resorting to cutting. If these fail, you can carefully cut the drain body with a hacksaw as a last resort. Call a professional if you damage the tub in the process.
How do I know which drain type I have?
Look at your drain mechanism. If there’s a lever on the overflow plate, you have a trip-lever drain. If you push and pull a stopper, it’s a push-pull drain. If a foot lever controls a popping mechanism, it’s a pop-up drain. If it’s simply a threaded drain body with no moving parts, it’s a screw-in drain.
Can I replace my old drain with a different type?
You can switch drain types, but you may need to modify your plumbing or overflow system. It’s generally easier and safer to replace your drain with the same type. Consult with a plumber if you want to change drain types.
What’s the best sealant for bathtub drains?
Plumber’s putty is the traditional choice and works well for most applications. Some modern alternatives include silicone caulk or specialized drain sealants. Plumber’s putty is easier to work with and remove if needed in the future.
How often should bathtub drains be replaced?
With proper maintenance, a quality bathtub drain can last 20-30 years or longer. Replace it sooner if you notice leaks, corrosion, or functional problems. Regular cleaning and maintenance extend the drain’s lifespan significantly.
Related Posts

Superscript in Google Docs: Expert Tips

Strikethrough in Excel: Easy Steps for Beginners
