

Unlock Samsung Phone? Expert Tips Inside
How to Open a Samsung Phone: Expert Tips for Safe Disassembly
Opening a Samsung phone requires careful planning, proper tools, and patience. Whether you’re replacing a battery, fixing water damage, or performing routine maintenance, understanding the correct procedure ensures you won’t damage valuable components. This comprehensive guide walks you through every step of safely opening your Samsung device, from preparation to reassembly.
Samsung phones are engineered with precision, and their internal components are delicate. Before you begin, assess whether opening your phone is truly necessary. Many issues can be resolved through software troubleshooting or professional service. However, if you’re confident in your repair abilities, this guide provides the expertise needed to open your device without causing permanent damage.

Tools You’ll Need for Samsung Phone Disassembly
Gathering the correct tools before starting prevents frustration and protects your device. Invest in quality equipment rather than improvising with household items, which can slip and damage sensitive components.
Essential Tools:
- Precision screwdriver set – Samsung phones use extremely small screws, typically Phillips or T5 Torx heads. A dedicated phone repair kit ensures proper fit without stripping screws.
- Plastic pry tools – Metal tools can scratch and damage the phone’s exterior and internal circuits. Plastic spudgers and opening picks are designed specifically for phone repair.
- Suction cup – High-quality suction cups help separate the back panel from the frame without applying excessive force that could crack the glass.
- Tweezers – Fine-point tweezers help manipulate tiny components and connectors inside the device.
- Anti-static wrist strap – Static electricity can permanently damage phone circuits. An anti-static strap grounds you while working on internal components.
- Heat gun or hair dryer – Adhesive holding modern Samsung phones together requires gentle heat to soften. Never use direct flame, which can damage plastic components.
- Adhesive strips or double-sided tape – You’ll need replacement adhesive when reassembling, as original adhesive loses effectiveness after removal.
- Small containers – Organize screws by location in labeled containers so you can reinstall them correctly.
Consider purchasing a complete phone repair toolkit from reputable retailers like iFixit or Amazon. These kits cost $20-40 and include everything needed for most Samsung repairs.
Preparing Your Workspace and Device
Proper preparation prevents lost screws, damaged components, and incomplete repairs. Your environment directly affects your success rate.
Workspace Setup:
- Clean, flat surface – Choose a well-lit table with a non-reflective surface. Avoid carpeted areas where tiny screws disappear easily. A white towel provides good contrast for spotting small parts.
- Adequate lighting – Use a desk lamp or headlamp to illuminate the phone’s interior. Poor lighting causes missed connectors and misaligned components during reassembly.
- Organized screw tracking – Create a diagram showing where each screw belongs. Different screw lengths go in specific locations; mixing them up prevents proper reassembly.
- Static-free environment – Turn off ceiling fans and avoid synthetic clothing that generates static. Wear your anti-static wrist strap throughout the process.
Device Preparation:
- Power off completely – Never open a powered-on phone. Wait 30 seconds after shutdown before beginning work.
- Remove SIM card tray – Use the SIM ejector tool to safely remove the SIM card before disassembly.
- Document your device – Take photos of your phone from multiple angles before opening. These reference photos help during reassembly.
- Check warranty status – Opening your Samsung phone may void remaining warranty coverage. Verify your warranty terms beforehand.
- Back up your data – Connect your phone to a computer and perform a complete backup in case something goes wrong during repairs.
Temperature matters significantly when opening Samsung phones. Work in an environment between 65-75°F. Cold temperatures make adhesive brittle and prone to cracking, while heat softens components prematurely.
Removing the Back Panel Safely
The back panel is your first major obstacle. Modern Samsung phones use strong adhesive, so patience and proper technique prevent cracking the glass or damaging the frame.
Heat Application Method:
- Set your heat gun to low setting (around 300°F) or use a hair dryer on high heat. Hold it 3-4 inches from the phone’s back panel.
- Apply heat evenly across the entire back surface for 2-3 minutes. This softens the adhesive without damaging internal components.
- Test adhesion by gently pressing on the panel. If it feels loose, proceed to the next step. If still firmly attached, apply additional heat for 1-2 minutes.
- Position your suction cup in the center of the back panel, away from any curves or edges.
- Pull gently on the suction cup while using a plastic pry tool at the phone’s edge to create a small gap.
- Once you’ve created a gap, insert your plastic pry tool further and slowly work around the entire perimeter.
- Apply steady, even pressure rather than sudden force. Rushing this step cracks the glass panel.
Critical Warnings:
- Never use a metal tool on the back panel. Metal scratches glass and can puncture internal components if the tool slips.
- Avoid excessive force. If the panel won’t budge after proper heating, apply more heat rather than forcing it.
- Watch for ribbon cables. Some Samsung models route cables near the edges. Prying too aggressively can tear these delicate connectors.
- If your phone has a curved back, work extra carefully near the edges where the curve is most pronounced.
Once the back panel is removed, set it aside on a clean cloth. Don’t place it on a hard surface where it might crack.
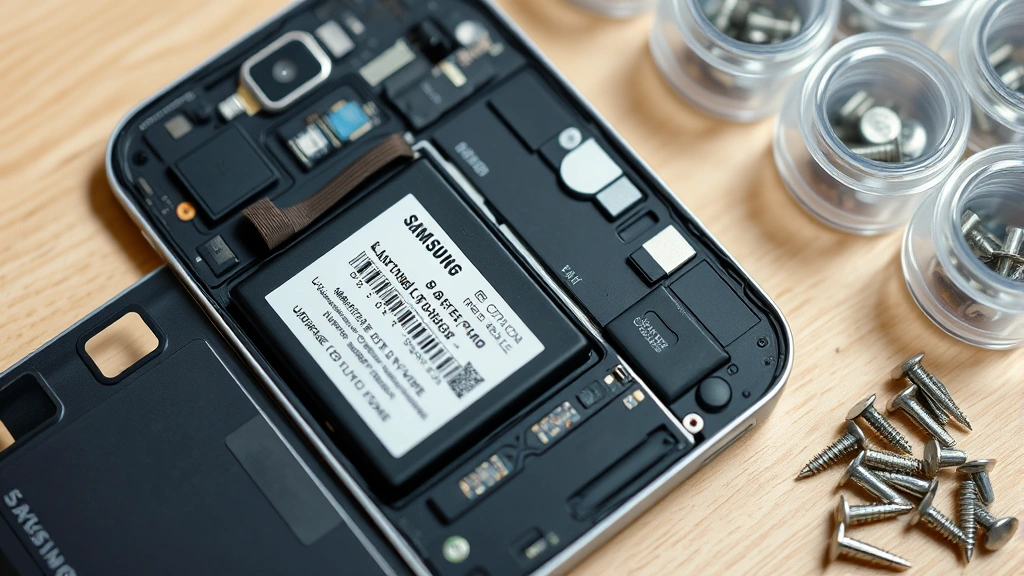
Disconnecting Battery and Components
Safely disconnecting the battery is crucial before touching any internal components. This prevents accidental short circuits that could damage the phone or injure you.
Battery Disconnection Process:
- Locate the battery connector on the motherboard. It’s usually a white or black rectangular connector near the battery.
- Use your tweezers to gently lift the connector’s retention clip if present. Don’t force it; these clips are delicate.
- Carefully pull the connector straight out from its socket. Pulling at an angle can damage the socket or connector pins.
- If the battery is glued down, apply gentle heat and use a plastic pry tool to lift it. Never pry aggressively.
- Once disconnected, place the battery aside on a non-conductive surface.
Other Component Disconnections:
Before removing major components, document and disconnect any ribbon cables. These typically include display connectors, camera cables, and sensor ribbons. Photograph each connector before removal. Most ribbon connectors slide out horizontally rather than pulling straight up—check your specific model’s design.
For more detailed guidance on component organization, refer to our guide on organizing complex systems, which covers similar detailed documentation principles.
Accessing Internal Parts
With the back panel removed and battery disconnected, you can now access internal components. Different Samsung models have varying internal layouts, so consult your device’s specific repair manual from iFixit or the manufacturer.
General Internal Access:
- Remove protective tape – Kapton tape covers some connectors and components. Carefully peel this away, noting its original position for reassembly.
- Locate target components – Whether replacing the battery, fixing water damage, or replacing the screen, identify your target component’s location.
- Document ribbon cable routing – Take photos showing how cables are routed and secured. This prevents pinching cables during reassembly.
- Note screw locations – Different screws may have different lengths. Keep them organized by location.
- Identify adhesive areas – Modern Samsung phones use adhesive in multiple locations. Mark these areas for replacement adhesive application during reassembly.
If you’re replacing the battery, you’ll appreciate the detailed planning. The same organizational principles apply whether you’re working with intricate mechanisms or delicate electronics—documentation prevents costly mistakes.
When accessing the display or other major components, work methodically. Remove one screw, then photograph before removing the next. This prevents confusion about which screws belong where.
Reassembly and Testing
Reassembly requires reversing your disassembly steps in exact reverse order. This is where your documentation truly pays off.
Reassembly Sequence:
- Reconnect internal components – Start with the battery connector. Push it straight into its socket until you hear a click or feel it seat fully.
- Reattach ribbon cables – Reconnect display, camera, and sensor cables in reverse order from removal. Ensure each connector seats completely before moving to the next.
- Replace protective tape – Reapply Kapton tape exactly where it was originally positioned.
- Install screws – Replace all internal screws in their correct locations. Use your labeled containers to ensure proper placement.
- Apply new adhesive – Clean the back panel and frame of old adhesive using isopropyl alcohol on a lint-free cloth. Apply new adhesive strips or double-sided tape along the frame’s edges.
- Carefully position back panel – Align the back panel with the frame, then press firmly around all edges. Apply pressure for 30 seconds to ensure proper adhesion.
- Allow adhesive to cure – Wait 24 hours before using the phone if you applied liquid adhesive. Pre-cut adhesive strips set faster, typically within 2-3 hours.
Testing Your Repair:
- Power on the device – Press the power button and wait for the Samsung logo to appear. This indicates successful reassembly.
- Check all functions – Test the display, buttons, speakers, microphone, and any components you worked on.
- Monitor for heat – If the phone becomes hot during startup, immediately power it off. This indicates a potential short circuit.
- Inspect for gaps – Look for any gaps between the back panel and frame. These indicate improper reassembly or insufficient adhesive.
- Test water resistance – If your phone was water-resistant before opening, it likely isn’t anymore. Avoid water exposure until you’ve had it professionally resealed.
If issues occur during testing, power off immediately and review your work. Consult repair guides specific to your Samsung model for troubleshooting assistance. External resources like This Old House’s technology section and Family Handyman provide general repair guidance applicable to electronics.
FAQ
Is opening my Samsung phone legal?
Yes, opening your own phone for repairs is legal in most countries. However, opening it may void your warranty. Check your warranty terms before proceeding. Additionally, some repairs require specialized equipment or expertise—if you’re uncertain, professional repair services are available.
What if I break a ribbon cable during opening?
Broken ribbon cables typically require replacement. Order the specific cable for your Samsung model from electronics retailers. You can then reinstall it following the same procedure as original cable removal and installation. This adds cost but is usually cheaper than professional repair.
Can I reuse the original adhesive?
No. Once removed, adhesive strips lose their stickiness and won’t provide adequate sealing. Always use new adhesive strips or double-sided tape designed for phone repair. Original adhesive was applied during manufacturing under controlled conditions that can’t be replicated at home.
How long should I wait before using my phone after reassembly?
If using pre-cut adhesive strips, you can use your phone after 2-3 hours. If using liquid adhesive, wait 24 hours for complete curing. During the curing period, avoid dropping or stressing the adhesive joints.
What if my phone won’t turn on after reassembly?
First, check that the battery connector is fully seated. Power off completely, wait 30 seconds, then power back on. If still unresponsive, you may have accidentally disconnected another essential connector. Carefully reopen the phone and verify all connectors are properly seated. If problems persist, consult professional repair services.
Should I use heat during reassembly?
No. Heat is only used during disassembly to soften adhesive. During reassembly, allow adhesive to set naturally at room temperature. Applying heat during reassembly can damage components or cause improper adhesive curing.
Can I open a Samsung phone that’s been water-damaged?
Yes, but with caution. Power off immediately and don’t attempt to power on. Let the phone dry completely before opening—at least 48 hours in a warm, dry environment. When opening, look for corrosion on the motherboard. If extensive corrosion is visible, professional service is recommended rather than DIY repair.
Related Posts

Superscript in Google Docs: Expert Tips

Strikethrough in Excel: Easy Steps for Beginners
