
Install a Garburator: Expert DIY Steps
How to Install a Garburator: Expert DIY Steps for Kitchen Success
A garburator (also called a garbage disposal) is one of the most convenient additions to any kitchen sink. This powerful appliance grinds food waste into small particles that flow safely through your plumbing, reducing landfill waste and keeping your trash can fresher longer. Whether you’re replacing an old unit or installing one for the first time, this comprehensive guide walks you through every step of the installation process with professional-level detail.
Installing a garburator is an achievable DIY project for homeowners with basic plumbing knowledge and the right tools. Unlike some kitchen upgrades that require specialized expertise, a garburator installation combines straightforward mechanical assembly with simple electrical work. This guide covers everything from shutting off power to testing your new unit, ensuring you can tackle this project confidently and safely.
Tools and Materials You’ll Need
Before you begin your garburator installation, gather all necessary tools and materials. Having everything on hand prevents frustrating mid-project trips to the hardware store and keeps your workflow smooth. Here’s what you’ll need:
Essential Tools:
- Adjustable wrench or socket set
- Screwdrivers (both Phillips and flathead)
- Plumber’s putty or silicone sealant
- Flashlight or headlamp
- Bucket or towels for catching water
- Slip-joint pliers
- Hex wrench (usually included with disposal)
- Voltage tester (non-contact preferred)
- Measuring tape
Materials and Parts:
- New garburator unit (sized for your sink and household needs)
- Mounting ring and rubber seal (often included)
- Discharge elbow and coupling nuts
- Plumber’s tape (for P-trap connections)
- Electrical wire (if hardwiring; typically 12-gauge)
- Wire nuts and electrical tape
- Optional: air switch or sink switch kit for wireless control
Quality matters when selecting your garburator. Check out our guide on how to install a garbage disposal for detailed product recommendations and capacity guidelines based on household size.
Safety Precautions and Preparation
Safety is paramount when working with electrical appliances and plumbing. Before touching any part of your garburator system, follow these critical safety steps:
Electrical Safety:
- Turn off power at the circuit breaker for the outlet or switch controlling the disposal
- Test the outlet with a voltage tester to confirm power is off
- If hardwiring, ensure the circuit is completely de-energized before beginning
- Never attempt electrical work if you’re uncomfortable—call a licensed electrician
Physical Safety:
- Wear safety glasses to protect against debris and water spray
- Use work gloves to protect your hands from sharp edges
- Place a bucket under the P-trap to catch residual water
- Never reach into the disposal chamber, even with power off
- Keep your workspace dry to prevent slipping
Preparation Steps:
- Clear the area under your sink completely
- Turn off the water supply valve (usually located under the sink)
- Plug the sink drain with a wet cloth to prevent debris from falling
- Notify household members that you’re working on the plumbing
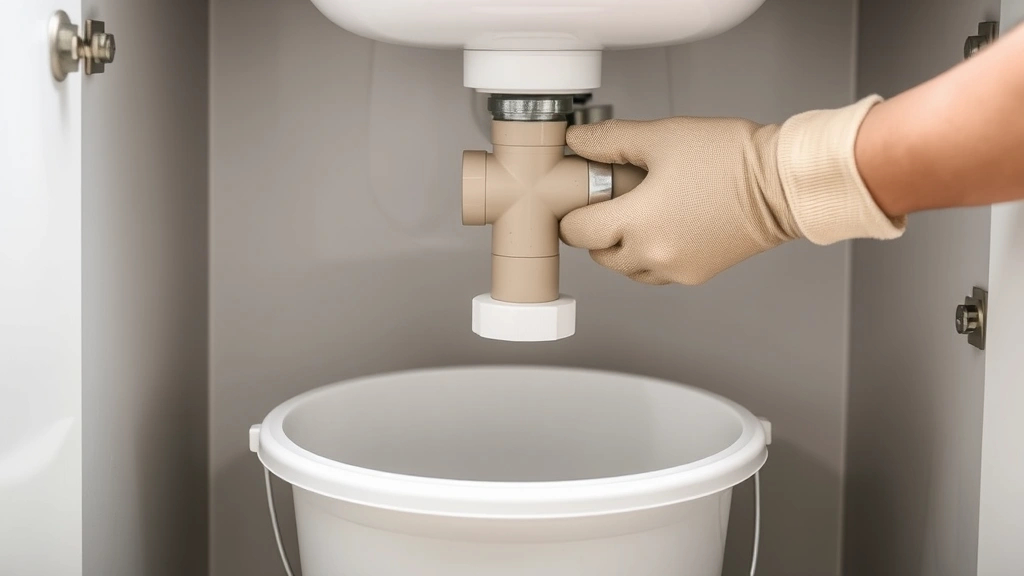
Removing Your Old Disposal (If Applicable)
If you’re replacing an existing garburator, you’ll need to remove it first. This process is straightforward but requires patience:
Step 1: Disconnect Electrical Power
Unplug the unit from the outlet beneath the sink. If it’s hardwired, turn off the breaker and test for power with a voltage tester before disconnecting any wires.
Step 2: Disconnect the Discharge Pipe
Locate where the discharge pipe connects to your P-trap or drain line. Use slip-joint pliers to loosen the coupling nut. Have your bucket ready to catch water. Once loosened, twist the elbow by hand and remove it completely.
Step 3: Remove the Mounting Ring
Most disposals mount using a three-bolt ring system. Look for the three mounting bolts around the sink opening. Loosen each bolt evenly (don’t remove one completely before starting the others) to prevent binding. Once all three are loose, turn them counterclockwise until the mounting ring separates from the sink flange.
Step 4: Lower and Remove the Old Unit
Support the disposal with one hand while loosening mounting bolts. Once fully loosened, carefully lower the unit and set it aside. You may need to wiggle it slightly to free it from the sink opening.
Installing the Mounting Assembly
The mounting assembly is the critical foundation for your new garburator. Proper installation here ensures a watertight seal and stable operation.
Step 1: Prepare the Sink Flange
Remove the old sink flange if you’re replacing a disposal. Clean the sink opening thoroughly with a damp cloth and let it dry completely. Any old plumber’s putty or sealant should be scraped away.
Step 2: Install New Plumber’s Putty
Roll a rope of plumber’s putty about the thickness of a pencil. Create a ring around the sink opening’s underside (from below). This creates a watertight seal. Press firmly to ensure good contact with the sink surface. Some modern installations use silicone caulk instead—follow your disposal manufacturer’s instructions.
Step 3: Install the Sink Flange
Insert the new sink flange through the drain opening from above. From below, you’ll see the flange protruding through. The rubber seal and mounting ring should be positioned beneath the sink opening. Ensure the flange sits flush with the sink surface.
Step 4: Secure the Mounting Ring
Place the rubber seal over the sink flange threads. Position the mounting ring (the metal ring with three bolts) over the flange. Insert all three mounting bolts but don’t tighten fully yet. This allows for adjustment. Tighten each bolt a quarter turn at a time, working around the ring in a star pattern (bolt 1, then bolt 3, then bolt 2) to ensure even pressure. Continue until snug—don’t overtighten, as this can crack the sink or strip threads.
The mounting assembly should now be rock-solid with no movement when you apply moderate downward pressure.
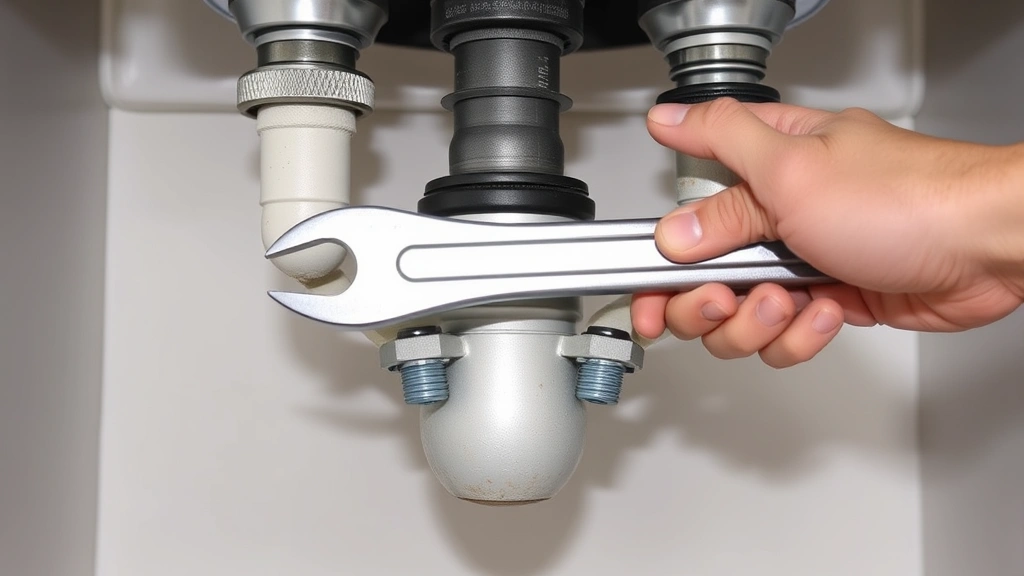
Connecting the Discharge Pipe
The discharge pipe carries ground food waste from the disposal to your drain system. Proper connection prevents leaks and backups.
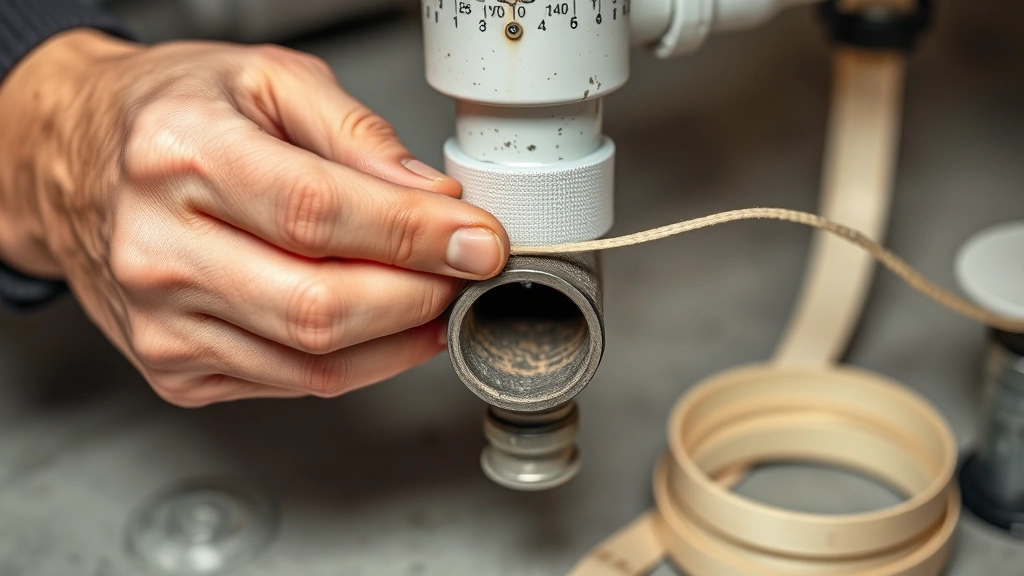
Step 1: Attach the Discharge Elbow
Most disposals come with a discharge elbow that screws onto the outlet port. Apply plumber’s tape (thread seal tape) around the male threads by wrapping it clockwise 3-4 times. Screw the elbow onto the disposal outlet by hand first, then tighten with a wrench. Don’t overtighten—hand-tight plus a quarter turn with the wrench is usually sufficient.
Step 2: Connect to the P-Trap or Drain Line
Position the discharge elbow to align with your existing P-trap or drain connection. The elbow should angle downward slightly (no upward angles that could trap water). Measure and mark where the coupling nut will sit, then cut your discharge pipe to length if needed.
Slide the coupling nut onto the discharge pipe first, then insert the pipe into the P-trap tailpiece. Hand-tighten the coupling nut, then use slip-joint pliers to tighten an additional quarter turn. Check for leaks by running water (we’ll do this after electrical connection).
Step 3: Ensure Proper Slope
The entire discharge system should slope slightly downward from the disposal to the drain. This prevents standing water and food particle accumulation. Adjust as needed before final tightening.
Wiring and Electrical Connection
Electrical work requires careful attention to safety. If you’re uncomfortable with wiring, consult a licensed electrician—this step isn’t worth risking electrical hazards.
Option 1: Plug-In Installation (Easiest)
If your disposal has a standard plug and there’s an outlet beneath the sink, simply plug it in. This is the simplest method and requires no wiring knowledge. Ensure the outlet is grounded (three-prong) and in good condition.
Option 2: Hardwiring (More Permanent)
For hardwired installations, you’ll need to run electrical wire from a dedicated circuit breaker to the disposal. This requires shutting off the breaker, running 12-gauge wire through conduit, and making connections at both ends.
At the disposal end: Strip approximately 6 inches of sheathing from the electrical wire. Connect the black (hot) wire to the black terminal, the white (neutral) wire to the white terminal, and the green or bare copper (ground) wire to the ground terminal. Use wire nuts to secure connections, wrapping with electrical tape for extra security.
At the breaker panel: This step should be performed by a licensed electrician unless you have experience with electrical panels. The circuit should be dedicated to the disposal (15-20 amps) and properly labeled.
Optional: Install an Air Switch
Many homeowners prefer an air switch mounted on the sink countertop for hands-free operation. This wireless system uses air pressure instead of electrical current. Installation involves running tubing from the switch to the disposal solenoid. Follow the manufacturer’s instructions carefully, as each brand differs slightly.
Testing and Troubleshooting
Before declaring your installation complete, thorough testing ensures everything works safely and efficiently.
Step 1: Visual Inspection
Check all connections under the sink. Look for any gaps in plumber’s putty, loose bolts, or misaligned pipes. Tighten anything that appears loose, but avoid over-tightening which can damage components.
Step 2: Water Test (Without Disposal Running)
Turn on the cold water faucet and let it run for 30 seconds. Watch for leaks around the sink flange, mounting ring, and discharge pipe connections. Catch any drips with a flashlight to identify exact leak locations. Small weeps are normal initially but should stop within a minute. If leaking persists, tighten the connection slightly or reapply plumber’s tape.
Step 3: Electrical Test
Flip the switch or plug in the disposal (confirm power is on). You should hear a humming sound. The motor shouldn’t spin freely—it should feel slightly resistant. If you hear nothing, check that power is actually reaching the unit with a voltage tester.
Step 4: Operational Test
With water running, turn on the disposal. Feed small amounts of soft food waste (banana peel, cooked vegetable scraps) down the drain. The grinding sound should be steady and smooth. Never force large items down or use your hands to push debris. Let the disposal run for 10-15 seconds after food is ground, then turn off.
Step 5: Check for Leaks Under Load
Run the disposal several times with water flowing. Check underneath for any new leaks. Water should flow freely from the discharge pipe into the drain system. Listen for unusual sounds like rattling or squealing, which indicate potential problems.
Common Issues and Solutions:
- Leaking from mounting ring: Tighten the three mounting bolts evenly in a star pattern. If leaking continues, the rubber seal may be damaged and need replacement.
- Leaking from discharge connection: Tighten the coupling nut a quarter turn. If still leaking, disconnect, reapply plumber’s tape, and reconnect.
- Slow draining: Ensure the discharge pipe slopes downward. Debris may be caught in the P-trap—remove and clean if necessary.
- Disposal won’t start: Verify power is reaching the unit. Check the reset button (usually a red button on the bottom of the unit). Press firmly to reset if tripped.
- Unusual noises: Small rattles are normal. Loud grinding or squealing indicates a mechanical issue—stop use and inspect for foreign objects or bearing problems.
FAQ
Can I install a garburator if I don’t have one currently?
Yes, absolutely. If your sink drain opening is the standard 3.5 inches, you can install a garburator even if one wasn’t there before. You’ll need to remove the existing drain basket and strainer, then follow the full installation process. Ensure your plumbing can handle the discharge (most modern homes can), and check local building codes for any restrictions.
What size garburator do I need?
Garburators range from 0.5 to 1.5 horsepower. For most households, 0.75 to 1 horsepower is adequate. Larger families or those who produce significant food waste benefit from 1.5 HP units. More powerful units grind faster and handle tougher materials better, but they cost more and use more electricity.
How long does installation typically take?
A straightforward plug-in installation takes 1-2 hours. Hardwiring adds 1-2 additional hours if you’re comfortable with electrical work. Replacing an old unit is usually faster (30-45 minutes) than a new installation since the plumbing rough-in is already in place. Budget extra time if you encounter complications like stuck bolts or unexpected plumbing issues.
Do I need a dedicated circuit for my garburator?
Yes, if hardwiring. A dedicated 15-20 amp circuit is recommended for safety and to prevent breaker trips. Plugging into an existing outlet is acceptable if that outlet is on a dedicated circuit. Avoid sharing circuits with other high-draw appliances like garbage disposals and dishwashers.
What foods should I avoid putting down a garburator?
Never grind bones, shells, pits, fibrous vegetables (like celery or corn husks), grease, or non-food items. These can jam the motor, dull blades, or clog pipes. Stick to soft food scraps and cooked vegetables. Our article on plumbing maintenance covers drain care in detail.
Can I install a garburator myself or should I hire a plumber?
Most homeowners can handle the mechanical and plumbing aspects. The electrical portion is where many prefer professional help. If you’re uncomfortable with any step, hiring a plumber ensures proper installation and eliminates liability. Professional installation typically costs $150-300 plus the unit price.
How do I maintain my new garburator?
Run cold water while operating, then for 15 seconds after shutting off to flush debris. Monthly, grind ice cubes and citrus peels to clean the chamber. Never pour grease or put hard objects down the drain. If it starts backing up or smelling, you may need professional drain cleaning.
Is a garburator worth the installation effort?
Most homeowners find the convenience worthwhile. Garburators reduce trash volume, eliminate food waste odors, and decrease landfill burden. They’re particularly valuable in apartments or homes with limited outdoor space. The initial installation investment (usually $300-600 total) pays dividends through reduced trash service needs over time.
Related Posts

Superscript in Google Docs: Expert Tips

Strikethrough in Excel: Easy Steps for Beginners
