

How to Hold a Plectrum? Guitarist Tips Here
How to Hold a Plectrum: Essential Guitarist Tips for Better Playing
Mastering the proper plectrum grip is one of the most fundamental skills every guitarist must develop, yet many beginners overlook its importance. Whether you’re picking up an acoustic or electric guitar, the way you hold your pick directly impacts your tone quality, playing speed, accuracy, and overall comfort during practice sessions. A correct grip prevents hand fatigue, reduces tension in your wrist and fingers, and allows you to execute techniques with precision and control.
The plectrum—commonly called a pick—is a small, triangular or teardrop-shaped tool made from materials like plastic, nylon, or metal. Its size might seem insignificant, but improper handling can lead to poor strumming patterns, inconsistent tone production, and even repetitive strain injuries. This comprehensive guide will walk you through everything you need to know about holding a plectrum correctly, from basic grip techniques to advanced methods used by professional musicians.
Understanding the Standard Plectrum Grip
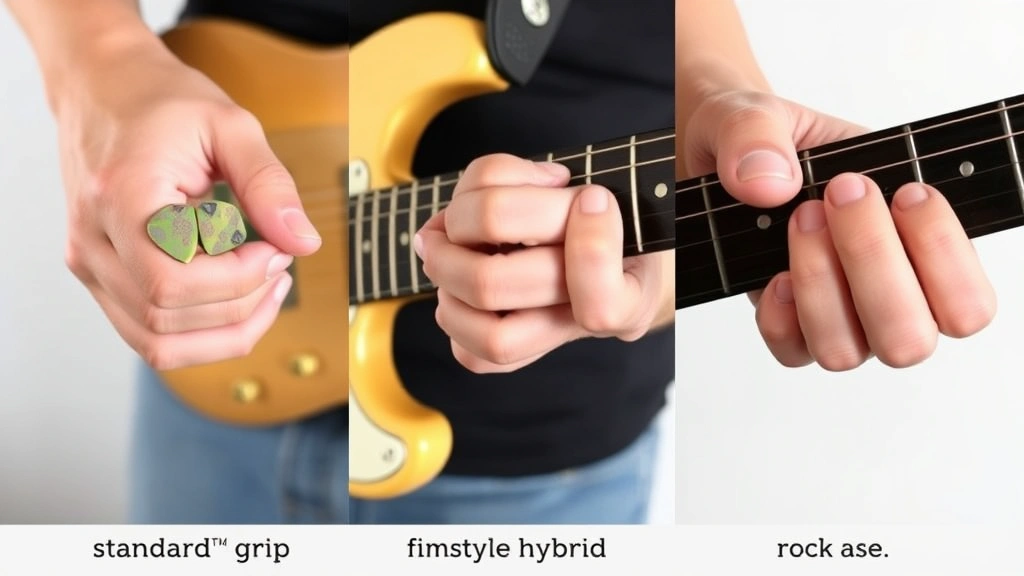
The standard plectrum grip, also known as the tripod grip, is the most widely recommended technique for both beginners and experienced players. This method involves using three points of contact on your hand to secure the pick firmly while maintaining flexibility for dynamic playing. Understanding the mechanics of this grip is essential before attempting any advanced variations.
In the standard grip, your thumb and index finger form the primary control points, while your middle finger provides additional stability and support. The pick should be held at a slight angle, typically between 45 and 90 degrees to the strings, allowing for optimal contact and tone production. This positioning creates what musicians call the “sweet spot”—the ideal angle that produces clear, resonant notes without excessive string noise or muting.
The distance between your hand and the guitar’s body matters significantly. Most guitarists maintain approximately 2-3 inches of space between their hand and the strings when in playing position. This distance allows for proper wrist movement and prevents accidental muting of adjacent strings. Your wrist should remain relatively straight but not rigid, creating a natural extension of your arm that facilitates smooth picking motion.
One critical aspect of the standard grip is the pressure you apply to the pick. Many beginners grip too tightly, creating unnecessary tension that spreads through the hand, wrist, and arm. A firm but relaxed grip—similar to holding a knife with controlled precision—allows for better control and reduces fatigue during extended playing sessions. The pick should feel secure in your hand without feeling like you’re gripping it for dear life.
Step-by-Step Guide to Holding Your Pick
Step 1: Position Your Thumb and Index Finger
Start by extending your right hand (or left if you’re left-handed) in front of you with your palm facing downward. Your thumb and index finger should form a loose, relaxed “V” shape. Place the pick between these two fingers so that approximately one-quarter inch of the pointed tip extends beyond your fingertips. This exposure is crucial—too much exposed pick creates an unstable, fluttery sound, while too little prevents proper string contact.
Step 2: Secure with Your Middle Finger
While maintaining the thumb and index finger position, gently rest your middle finger against the back of the pick. This creates a three-point contact system that stabilizes the pick without restricting movement. Your middle finger should apply light pressure—just enough to prevent the pick from rotating or slipping during playing. This tripod configuration is the foundation of professional-grade pick control.
Step 3: Maintain Proper Angle
Angle the pick so it approaches the strings at approximately 45 to 75 degrees. This angle creates optimal string contact for both strumming and single-note playing. If the pick is too perpendicular to the strings, you’ll experience excessive friction and a scratchy tone. If it’s too parallel, the pick won’t engage the strings properly and will produce a weak, muted sound. Experiment within this range to find your personal sweet spot.
Step 4: Establish Wrist Position
Keep your wrist relatively straight and aligned with your forearm, neither bent upward nor downward excessively. Your wrist should act as a hinge that allows for smooth, controlled picking motions. Avoid cocking your wrist backward or forward, as this creates tension and limits your picking speed and accuracy. A neutral wrist position distributes force evenly and prevents repetitive strain injuries that plague many guitarists.
Step 5: Practice the Holding Motion
Before you even touch the guitar, practice holding the pick in this position repeatedly. Hold it for 30 seconds, relax, and repeat 10 times. This builds muscle memory and helps your hand develop the proper tension levels automatically. Once this position feels natural and comfortable, you’re ready to transition to the strings.

Common Mistakes and How to Fix Them
Gripping Too Tightly
The most prevalent mistake among beginner guitarists is over-gripping the pick. Excessive tension travels through your hand, wrist, and entire arm, causing rapid fatigue and limiting your playing duration. If you notice your hand cramping after 15-20 minutes of practice, you’re likely gripping too hard. Solution: Consciously relax your grip throughout your practice session. Your pick should feel secure but not strangled. A helpful mental image is holding something delicate that you don’t want to drop but also don’t want to crush.
Holding the Pick Too Flat or Too Steep
Beginners often hold the pick either too parallel or too perpendicular to the strings. A flat angle produces a scratchy, uncontrolled tone with excessive pick noise, while a steep angle creates a weak, muted sound that lacks definition. The ideal angle—approximately 45 to 75 degrees—requires conscious adjustment during your early practice stages. Record yourself playing and listen for pick scrape sounds or muted tones, then adjust your angle accordingly.
Incorrect Finger Positioning
Some players position their index finger too far from their thumb, creating an unstable V-shape that allows the pick to rotate. Others rest their middle finger improperly, applying too much or too little pressure. The key is maintaining consistent finger spacing with your thumb and index finger roughly one-half inch apart at their closest points. Your middle finger should contact the pick at approximately its midpoint, providing balanced support.
Moving Your Wrist Instead of Your Arm
Many beginners attempt to execute all picking motions using only their wrist, creating tension and limiting their picking speed. Proper picking technique involves smooth coordination between your wrist and forearm. Your forearm provides the primary motion for strumming and faster picking passages, while your wrist remains relatively stable with slight flexibility for accent and dynamics. This integrated approach prevents fatigue and enables faster, more controlled playing.
Inconsistent Grip Pressure
Varying your grip pressure throughout a practice session creates inconsistent tone and control. Some notes sound bright and clear while others sound muted or dull, even though you’re playing the same strings. Develop awareness of your grip pressure and maintain consistent, moderate tension throughout your playing. Your grip should feel identical whether you’re playing a soft, gentle passage or a hard, aggressive section.
Grip Variations for Different Playing Styles
Classical Fingerstyle Approach
While classical guitarists traditionally don’t use picks, some modern players adopt a hybrid approach combining pick and fingerstyle techniques. If you’re exploring this method, you might hold the pick slightly differently—with a looser grip and more angle variation depending on the musical passage. The pick becomes more of a supplementary tool rather than your primary striking mechanism, allowing for greater tonal variety and expression.
Heavy Metal and Rock Shredding
Rock and metal guitarists often employ a slightly tighter grip than classical or folk musicians, allowing for more aggressive picking and faster execution of complex passages. The pick angle remains fairly consistent, typically closer to 60-70 degrees, to maintain clarity during rapid picking sequences. Many shredders also use thicker picks (1.0mm or greater) to provide additional control and a more defined tone when playing at extreme speeds.
Blues and Jazz Picking
Blues and jazz players frequently use a slightly looser grip with more dynamic angle variation. This flexibility allows for subtle tonal changes and the expressive bending techniques characteristic of these genres. The pick angle might shift from nearly parallel to the strings during soft passages to more perpendicular during aggressive sections, creating tonal variety that enhances musical expression. This approach requires more hand awareness and control than the rigid standard grip.
Strumming-Focused Technique
Acoustic and folk guitarists who focus primarily on strumming patterns might hold the pick with slightly more angle variation than single-note players. A looser grip and more dynamic wrist motion create the flowing, rhythmic patterns essential to these genres. The pick angle might range from nearly perpendicular to 45 degrees depending on the strumming pattern and desired tone. This variation creates the dynamic, natural sound characteristic of acoustic music.
Fingerpicking with a Pick
Some players combine pick and fingerpicking by holding the pick between their thumb and index finger while using their remaining fingers to pluck other strings. This hybrid approach requires a slightly modified grip—often with the pick held at a steeper angle to allow your fingers room to work independently. Developing this technique takes additional practice but opens creative possibilities for complex arrangements.
Building Hand Strength and Flexibility
Developing proper pick-holding technique isn’t just about positioning—it’s also about building the hand strength and flexibility necessary to maintain correct form during extended playing sessions. Like any physical skill, guitar playing requires conditioning and targeted exercises to prevent injury and maximize performance.
Tension Release Exercises
Before and after practice sessions, perform simple hand stretches to release tension. Extend your right arm straight forward with your palm facing up. Using your left hand, gently press your right hand’s fingers backward, creating a stretch along your forearm. Hold this position for 15-20 seconds and repeat 3-4 times. This stretches the flexor muscles that work intensively during picking. Similarly, reverse the stretch by pressing your palm downward to stretch the extensor muscles on top of your forearm.
Grip Strength Development
Implement hand exercises into your daily routine to build picking hand strength. A simple exercise involves squeezing a soft stress ball or hand gripper for 10-15 seconds, relaxing, and repeating 10 times. This builds the intrinsic hand muscles that control pick stability without creating the tension problems associated with over-gripping during actual playing. Perform these exercises 3-4 times weekly for noticeable improvement within 2-3 weeks.
Wrist Flexibility Drills
Develop wrist flexibility through controlled rotation exercises. Hold your arm extended in front of you with your elbow bent at 90 degrees. Slowly rotate your wrist in circular motions, moving through the full range of motion in both directions. Perform 10 circles in each direction, then repeat in the opposite direction. This exercise develops the wrist mobility necessary for smooth picking motion and prevents the stiffness that limits playing speed.
Controlled Picking Exercises
Dedicate practice time to slow, controlled picking on open strings. Start with a single string and execute 20 consecutive downstrokes at a comfortable tempo, focusing entirely on maintaining consistent grip pressure and pick angle. Progress to alternating downstrokes and upstrokes, maintaining the same level of control. Gradually increase tempo while maintaining perfect form. This exercise builds the muscle memory necessary for automatic, effortless proper technique.
Progressive Practice Routines
Structure your practice sessions to gradually increase intensity and duration. Begin with 15-minute sessions focused entirely on proper technique, using light finger pressure and controlled movements. After mastering proper form at this duration, extend to 20 minutes, then 30 minutes. Only increase intensity (tempo, dynamics, complexity) after your hand comfortably maintains proper technique throughout the entire session. This progressive approach prevents injury while building lasting technique.
Choosing the Right Pick for Your Grip
The relationship between your grip and pick selection is symbiotic—the right pick enhances your technique while the wrong pick makes proper gripping difficult. Understanding pick characteristics helps you select tools that complement your natural hand position and playing style.
Pick Thickness and Stiffness
Picks range from extremely thin (0.46mm) to very thick (2.0mm or greater). Thin picks provide flexibility and work well for strumming, creating a natural, warm tone. However, they require a lighter grip and are more prone to bending, making them challenging for precise single-note playing. Thicker picks provide excellent control for lead playing and fast passages but require more finger strength to hold them securely. Most intermediate guitarists find 0.73mm to 1.0mm picks offer an ideal balance between control and tone.
Pick Shape and Size
Standard teardrop-shaped picks work well for most players, but variations exist. Some picks feature sharper points for more aggressive picking, while others have rounded tips for smoother tone. Larger picks provide more surface area for gripping, making them easier to hold securely, while smaller picks allow more precise control in tight playing situations. Experiment with different shapes and sizes to discover what feels most natural in your hand and produces your preferred tone.
Material Composition
Most picks are made from celluloid or nylon plastic, offering good durability and tone. Some premium picks use composite materials or even metal for specific tonal characteristics. Celluloid picks tend to be slightly more flexible and produce warmer tones, while nylon picks offer greater stiffness and durability. Metal picks create bright, aggressive tones but are difficult to control and can damage guitar strings. For developing proper grip technique, stick with standard celluloid or nylon picks until your technique is solid.
Grip Texture and Surface
Textured picks with ridged or dimpled surfaces provide enhanced grip, reducing the likelihood of the pick slipping during intense playing. If you struggle to maintain consistent grip pressure or find your pick rotating during play, a textured pick can help. Smooth picks require more precise grip control but provide cleaner string contact and less pick noise. As your technique develops, smooth picks often become preferable for their tonal clarity.
Experimenting with Pick Variety
Professional musicians often keep multiple pick types available for different situations. A thick, rigid pick might be ideal for fast lead passages, while a thinner, more flexible pick works better for rhythmic strumming. Keep a selection of picks in your gig bag or practice space, trying different options during practice to understand how each affects your technique and tone. This experimentation accelerates your development as a musician and helps you find your personal preferences.
The process of learning how to properly hold a plectrum combines physical positioning, muscle memory development, and careful equipment selection. By implementing the techniques outlined in this guide and practicing consistently, you’ll develop the muscle memory that makes proper grip feel completely natural and automatic. Your playing will become cleaner, faster, and more expressive as proper technique becomes second nature, allowing you to focus on musicality rather than mechanics.
FAQ
What is the correct angle to hold a plectrum?
The ideal plectrum angle ranges from 45 to 75 degrees relative to the strings. This angle provides optimal string contact and tone production. Experiment within this range to find your personal preference, as slight variations affect tone and playability based on your playing style and the guitar you’re using.
How much of the pick should extend from my fingers?
Approximately one-quarter inch (about 6mm) of the pick’s tip should extend beyond your fingertips. This exposure provides sufficient striking surface while maintaining control. Too much exposure creates a fluttery, unstable sound, while too little prevents proper string engagement and produces a weak tone.
Should my grip be tight or loose?
Your grip should be firm but relaxed—similar to holding a pencil comfortably while writing. You want the pick to feel secure and stable without creating tension that radiates through your hand and arm. If your hand cramps after 15-20 minutes of playing, you’re likely gripping too tightly.
Why does my pick keep rotating during playing?
Pick rotation typically indicates insufficient pressure from your middle finger or improper positioning of your thumb and index finger. Ensure your middle finger contacts the pick securely at approximately its midpoint, and verify that your thumb and index finger form a consistent V-shape. Using a textured pick can also help reduce rotation.
Can I hold a pick differently for different playing styles?
Yes, many professional musicians adjust their grip slightly for different genres and techniques. However, the fundamental three-point contact system remains consistent across all styles. Variations typically involve slight angle adjustments or grip pressure changes rather than completely different holding techniques.
How long does it take to develop proper picking technique?
Most guitarists develop solid picking technique within 4-8 weeks of consistent practice with proper focus on form. However, complete automaticity—where proper technique feels completely natural without conscious thought—typically requires 3-6 months of regular practice. The key is practicing with intention and maintaining awareness of your grip throughout your practice sessions.
What should I do if my hand hurts while holding a pick?
Hand pain while picking indicates improper technique, excessive tension, or inadequate warm-up. Stop playing immediately and assess your grip pressure, wrist position, and overall tension levels. Take a 5-10 minute break, perform stretching exercises, and resume playing with conscious attention to relaxation. If pain persists, consult a music teacher or healthcare provider to identify the specific issue.
Are there any exercises to improve my pick control?
Yes, several exercises develop pick control. Practice slow, controlled picking on open strings, focusing on maintaining consistent grip pressure and pick angle. Execute 20 consecutive downstrokes at a comfortable tempo, then progress to alternating downstrokes and upstrokes. Gradually increase tempo while maintaining perfect form. Additionally, perform hand strength and flexibility exercises 3-4 times weekly to build the physical foundation necessary for excellent control.
Related Posts

Superscript in Google Docs: Expert Tips

Strikethrough in Excel: Easy Steps for Beginners
