
Hem Jeans at Home: Tailor’s Tips and Tricks
How to Hem Jeans at Home: Tailor’s Tips and Tricks
Learning how to hem jeans is one of the most practical sewing skills you can master. Whether your new jeans are slightly too long, or you’ve found the perfect pair that just needs a small adjustment, hemming at home saves you money and time. Instead of paying $15-30 at a professional tailor, you can achieve professional-looking results in your own workspace with basic tools and patience.
This comprehensive guide walks you through multiple hemming methods, from hand-stitching to machine sewing, ensuring you’ll find a technique that matches your skill level and available equipment. By the end, you’ll understand how to measure properly, choose the right method, and execute a hem that will last through countless washes and wears. Let’s dive into the art of hemming jeans like a seasoned tailor.
Why Hemming Jeans Matters
Properly hemmed jeans make a significant difference in your overall appearance and comfort. Jeans that drag on the ground not only look sloppy but also wear out faster at the hem, creating fraying and damage that shortens the lifespan of your favorite pair. When you learn how to hem jeans, you’re investing in your wardrobe’s longevity and appearance.
Beyond aesthetics, hemming prevents tripping hazards and keeps your jeans from getting caught in shoe heels or bicycle chains. Professional tailors charge substantial fees for this simple alteration, making it financially sensible to handle it yourself. Plus, hemming is an excellent entry point into sewing if you’re interested in exploring other garment modifications. You can explore more practical skills by checking out our FixWiseHub Blog for more how-to guides.
The beauty of hemming jeans is that mistakes aren’t permanent—you can always rip out stitches and try again. This low-pressure environment makes it perfect for beginners who want to build confidence in their sewing abilities.
Tools and Materials You’ll Need
Before you start hemming, gather these essential supplies:
- Measuring tape: A flexible measuring tape is crucial for accurate measurements
- Pins or fabric clips: These hold your fold in place while you work
- Needle and thread: For hand stitching, use thread that matches your jeans color
- Sewing machine: Optional but highly recommended for durability
- Scissors: Sharp fabric scissors make clean cuts
- Iron: Essential for pressing creases and preparing fabric
- Chalk or fabric pencil: For marking measurements
- Hem tape or fusible webbing: If using the no-sew method
- Seam ripper: Helpful for undoing mistakes
You don’t need expensive equipment to achieve professional results. Even basic tools work well if they’re sharp and functional. Many sewers find that investing in a decent pair of fabric scissors pays dividends across multiple projects.

Measuring for the Perfect Hem
Accurate measurement is the foundation of a successful hem. This step determines whether your jeans will look professionally tailored or obviously amateur.
Step 1: Wear your shoes – Put on the exact shoes you’ll wear with these jeans. Different heel heights dramatically change where your hem should fall. You want the jeans to break slightly on top of your shoe, creating a small fold of fabric.
Step 2: Stand naturally – Have someone measure from the back of your heel to where you want the hem to end. Typically, jeans should reach about half an inch above your heel. Mark this point with chalk on both legs.
Step 3: Check both legs – Measure both pant legs separately. Most people have slight differences in leg length, and accounting for this prevents one leg from appearing shorter than the other.
Step 4: Add extra length – Add one-half to three-quarter inch to your measurement. This extra fabric becomes the actual hem fold, which you’ll stitch down. This buffer prevents your pants from becoming too short after washing.
For a more detailed approach to home projects and measurements, check out This Old House’s comprehensive guides, which emphasize precision in all home improvement tasks.
Once you’ve marked both legs with chalk, try on the jeans again to visually confirm the length looks right. This visual check catches measurement errors before you make any cuts.

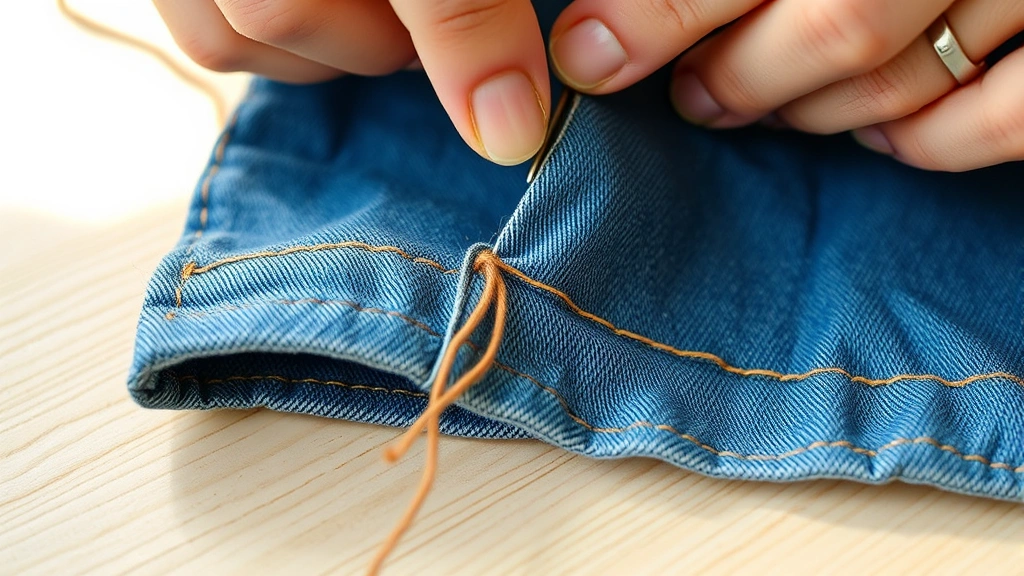
Hand Stitching Method
Hand stitching is the traditional tailor’s approach and produces invisible, professional-looking hems when done correctly.
Prepare the jeans: Start by turning your jeans inside out. Fold up the marked hem line and press it with an iron to create a sharp crease. This crease guides your stitching and ensures a straight hem.
Create the fold: Fold the raw edge up about one-half inch and press again. This creates a clean finished edge that won’t fray. Pin this fold in place along the entire leg.
Thread your needle: Use a needle that fits comfortably in your hand and thread that matches your jeans. A single strand of thread is sufficient—double strands can look thick and obvious.
The slip stitch technique: This is the professional tailor’s secret weapon. Start at an inside seam where your stitches will be less visible. Bring your needle up through the fold, then catch just two or three threads from the main pant leg fabric. Move your needle back into the fold and slide it about one-quarter inch, then bring it back out. This creates a nearly invisible stitch.
Maintain even spacing: Keep stitches roughly one-quarter inch apart and maintain consistent tension. Too tight and the fabric will pucker; too loose and the hem will separate during wear.
Finish professionally: When you reach the end, tie off your thread securely inside the fold. Make several small stitches in the same spot, then weave your needle through the fold before cutting the thread.
Hand stitching takes longer than machine sewing—typically 30-45 minutes per pair—but produces results that last through many washes and maintain a refined appearance.
Machine Sewing Method
Machine sewing is faster and creates extremely durable hems that withstand heavy wear and frequent washing.
Setup: Turn your jeans inside out and fold your hem as described in the hand stitching section. Press thoroughly to maintain sharp creases throughout the process.
Thread selection: Use thread that matches your jeans in a standard sewing machine thread weight. Many sewers use navy or black thread for dark jeans, and tan or beige for lighter shades.
Stitch type: A straight stitch works perfectly for hemming. Set your machine to a medium stitch length—around 2.5 to 3.0 millimeters. This length provides good security without creating obvious stitching.
Sewing technique: Start sewing about one-half inch from where you want to begin the hem. This helps prevent thread tangles at the start. Sew slowly and steadily along the fold, keeping your needle line about one-eighth inch from the edge of the fold.
Corners and seams: Jeans have thick seams at the inseam and outseam. Slow down when approaching these areas, and consider using a walking foot if your machine has one. This specialized presser foot prevents fabric from bunching on thick seams.
Securing the end: When you reach the end of your hem, backstitch several times to lock the thread. This prevents the hem from unraveling during wear and washing.
Machine-sewn hems are incredibly strong and can last the lifetime of the jeans. Many professional tailors use this method because it’s reliable and quick.
Using Hem Tape and Fusibles
For those who want to avoid sewing entirely, fusible hem tape offers a no-sew solution that works surprisingly well on jeans.
What is fusible tape: Hem tape is a thin strip of adhesive-backed material that bonds fabric together when heated. It’s particularly useful for quick repairs or when you don’t have access to a sewing machine.
Application process: Measure and prepare your jeans as usual, then fold your hem. Cut strips of fusible tape to length and place them between the hem fold and the main pant leg. Using a hot iron, press firmly for 10-15 seconds, moving along the entire hem.
Limitations: While fusible tape works, it’s not as durable as stitching for frequently-worn jeans. The adhesive can weaken after multiple washings, especially if your jeans are washed in hot water. For best results, combine fusible tape with light hand stitching along the edges.
Best practices: Use medium to high heat on your iron for proper adhesion. If your hem starts to lift after washing, simply re-iron it. Some sewers prefer using both fusible tape and stitching for maximum durability—the tape holds everything in place while you sew.
For more guidance on using specialized tools properly, Family Handyman offers excellent tutorials on precision techniques applicable to many projects, including fabric work.
Common Mistakes to Avoid
Even experienced sewers make hemming mistakes. Learning to avoid these pitfalls saves time and frustration.
Measuring while sitting: Always measure while standing in your normal posture. Sitting changes leg length and creates inaccurate measurements that result in hems that are too short or too long.
Forgetting to account for shrinkage: Denim shrinks slightly after washing, especially the first few times. Always add an extra one-quarter inch to your measurement to compensate for this natural shrinkage.
Pressing without steam: A proper crease requires a well-pressed fold. Use steam and firm pressure—a dry iron won’t create the sharp crease that guides accurate stitching.
Uneven stitching tension: Inconsistent tension creates puckered or loose hems. Practice maintaining steady hand position and pressure before working on your best jeans.
Cutting threads too close: Always leave at least one-quarter inch of thread when trimming. Cutting too close to the knot risks the thread pulling free during wear.
Ignoring the inside seams: The inseam and outseam are thick and require extra care. Slow your machine speed when crossing these areas, and consider hand stitching them for added control.
Using low-quality thread: Cheap thread breaks easily and creates weak hems. Invest in quality polyester or cotton thread designed for garment sewing.
Related skills like those covered in our guide on how to clean a coffee maker emphasize the importance of using proper tools and techniques—the same principle applies to sewing.
Caring for Your Hemmed Jeans
Proper care extends the life of your hemmed jeans and prevents hem separation.
First washing: Wait at least 24 hours after hemming before washing your jeans. This allows stitches or adhesive to fully set.
Washing method: Turn jeans inside out before washing to reduce friction on the hem. Use cold water and gentle detergent to minimize stress on stitches.
Drying: Air dry whenever possible. Machine drying creates heat that can weaken thread and potentially melt fusible tape. Lay jeans flat or hang them to dry naturally.
Ironing: If you need to iron your hemmed jeans, iron the outside first, then turn inside out to iron the hem area. Use moderate heat and avoid direct pressure on the stitches.
Repairs: If you notice a few stitches coming loose, repair them immediately with a needle and thread. Small issues are easy to fix; waiting allows damage to spread.
Storing: Hang hemmed jeans or fold them carefully to avoid creating creases in the hem area. Improper storage can cause stitches to loosen over time.
FAQ
How much does it cost to hem jeans professionally?
Professional tailors typically charge $15-30 per pair of jeans, depending on location and tailor expertise. Learning to hem yourself quickly pays for the small tool investment.
Can I hem jeans without a sewing machine?
Absolutely. Hand stitching and fusible tape both work without a machine. Hand stitching produces excellent results and requires only needle, thread, and basic supplies you likely already have at home.
What thread color should I use?
Match your thread to your jeans color as closely as possible. For dark denim, use navy or black. For light denim, use tan or beige. This makes stitches nearly invisible.
How long does a hemmed pair of jeans last?
A properly hemmed pair of jeans can last the lifetime of the garment. Stitched hems are extremely durable, while fusible tape may need refreshing after 20-30 washes.
Can I hem jeans that have a raw edge finish?
Yes, but it’s trickier. Raw-edge jeans require careful handling to prevent excessive fraying. Finish the raw edge first with a serger or zigzag stitch, then follow standard hemming procedures.
What if one pant leg is shorter than the other after hemming?
This usually means you didn’t account for natural leg length differences. Simply measure each leg separately and hem them to different lengths. Most people have slight variations in leg length.
Is hand stitching or machine stitching better?
Both produce excellent results. Hand stitching creates invisible hems ideal for dress jeans, while machine stitching produces more durable hems for everyday wear. Choose based on your preference and available time.
Can I hem stretch jeans?
Yes, but be careful not to stretch the fabric while measuring or sewing. Use a walking foot on your machine if available, and maintain consistent tension. The slip stitch works well for hand stitching stretch denim.
How do I fix a hem that came undone?
Rip out any remaining stitches with a seam ripper, press the hem again, and re-stitch using your preferred method. If using fusible tape, clean off old adhesive before applying new tape.
What’s the best way to practice hemming?
Start with an old pair of jeans you don’t wear anymore. Practice your chosen technique without worrying about perfection. Once comfortable, move to your good jeans.
Related Posts

Superscript in Google Docs: Expert Tips

Strikethrough in Excel: Easy Steps for Beginners
