Drain Your Water Heater Safely: Expert Tips
Drain Your Water Heater Safely: Expert Tips
Draining your water heater is one of the most important maintenance tasks you can perform to extend its lifespan and maintain efficient operation. Over time, sediment accumulates at the bottom of your tank, reducing heating efficiency, increasing energy costs, and potentially damaging the heating element. Whether you own a traditional tank water heater or a newer model, learning how to drain it properly will save you money and prevent costly repairs down the road.
This comprehensive guide walks you through every step of the draining process, from preparation to completion. We’ll cover safety precautions, necessary tools, and troubleshooting tips that even experienced homeowners find valuable. By following these expert recommendations, you’ll ensure your water heater operates at peak performance for years to come.

Why Drain Your Water Heater
Water heaters accumulate sediment naturally as minerals in hard water settle at the bottom of the tank. This buildup creates several problems that affect performance and longevity. The sediment layer insulates the heating element, forcing it to work harder and longer to heat water. This increased workload raises your energy bills significantly—sometimes by 20-30% annually.
Beyond energy inefficiency, sediment buildup causes premature failure of critical components. The heating element deteriorates faster when covered in mineral deposits, and the tank itself becomes more susceptible to rust and corrosion. Regular maintenance through draining prevents these issues and can extend your water heater’s lifespan by several years.
Industry experts recommend draining your water heater annually, or more frequently if you have hard water. The process removes accumulated sediment and helps maintain consistent water temperature and pressure throughout your home. Most homeowners can complete this task in 30-45 minutes with basic tools.
Tools and Materials You’ll Need
Before starting, gather all necessary equipment to ensure a smooth, safe process:
- Garden hose (at least 25 feet long) – connects to the drain valve and directs water safely away
- Adjustable wrench or socket set – for loosening connections if needed
- Bucket – for catching initial water discharge to test temperature
- Flathead screwdriver – useful for adjusting valves or relief mechanisms
- Towels or rags – absorbs spills and prevents water damage
- Work gloves – protects hands from hot water and sharp edges
- Safety glasses – shields eyes from splashing water or sediment
- Thermometer (optional) – helps monitor water temperature during draining
- Wet/dry vacuum (optional) – useful for cleanup if water spreads
Having everything ready before you start prevents interruptions and keeps you safe throughout the procedure. Check that your garden hose doesn’t have leaks or damage before connecting it to your water heater.
Safety Precautions Before Starting
Safety must be your top priority when working with water heaters. The water inside reaches temperatures of 120-140°F (49-60°C), which can cause severe burns instantly. Taking proper precautions protects you from injury and prevents property damage.
Turn off the power supply first. For electric water heaters, switch off the breaker in your electrical panel. For gas units, turn the thermostat to the pilot setting or completely off. Wait at least two hours before draining to allow the water to cool to a safer temperature. This cooling period is non-negotiable—never drain hot water from your heater.
Open a hot water tap somewhere in your house to relieve pressure inside the tank. This simple step prevents water from rushing out violently when you open the drain valve. Leave the tap running during the entire draining process; it allows air into the system and ensures smooth water flow.
Position your garden hose before opening the drain valve. Direct it toward a safe location like a floor drain, driveway, or garden area where the water won’t cause damage. Never point it toward your home’s foundation or electrical systems. Test the hose connection before opening the valve to prevent leaks.
Wear appropriate protective gear throughout the process. Even cooled water can cause burns, and sediment may contain sharp particles. Safety glasses protect your eyes from splashing, while work gloves provide grip and protection. If you’re sensitive to water temperature, use a thermometer to verify the water has cooled sufficiently before proceeding.
Step-by-Step Draining Process
Now that you’ve prepared properly, follow these detailed steps to drain your water heater safely and effectively:
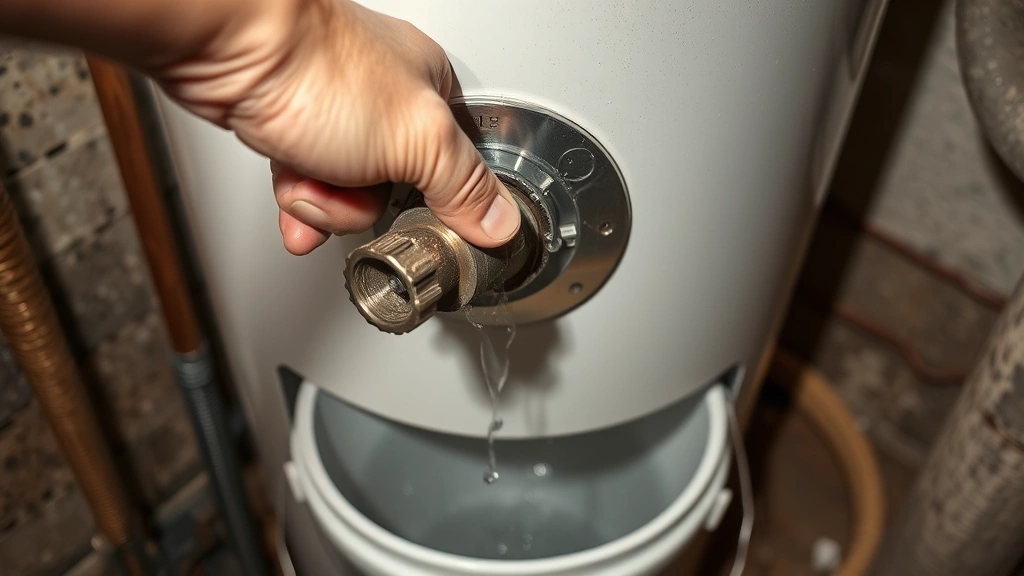
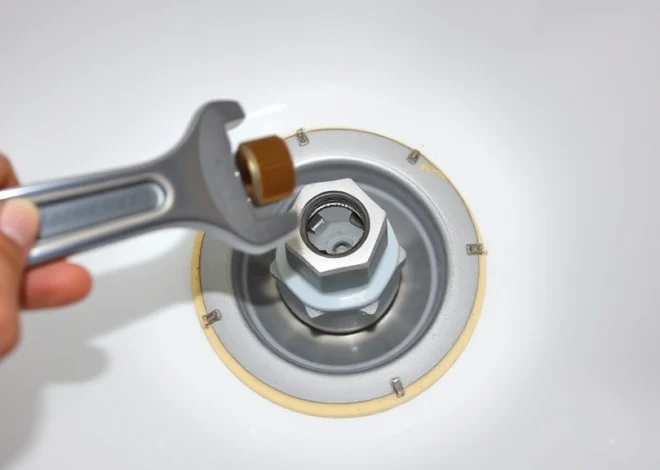
Step 1: Locate the drain valve. The drain valve is typically located near the bottom of your water heater tank. It looks like a small faucet or spigot and usually has a handle you can turn by hand. On some models, you may need an adjustable wrench to loosen it. Take a moment to familiarize yourself with this valve’s location and operation before proceeding.
Step 2: Test the valve with a bucket. Before connecting your garden hose, open the drain valve slightly and let a small amount of water flow into a bucket. This tests whether the valve operates properly and gives you a sense of water temperature. If the water is still hot, close the valve and wait longer. If sediment appears in the bucket, that’s exactly what we’re removing.
Step 3: Connect the garden hose. Once you’ve confirmed the valve works and water has cooled, attach your garden hose securely to the drain valve. Hand-tighten it first, then use an adjustable wrench if needed to ensure a tight seal. Position the hose so water flows safely away from your heater and home foundation.
Step 4: Open the drain valve completely. Turn the valve handle counterclockwise until it stops. Water should flow steadily through the hose. If flow is weak or stops, the valve may be clogged with sediment. Try opening the hot water tap in your home more fully to increase pressure, or see our troubleshooting section below.
Step 5: Monitor the water flow. Initially, the water will appear cloudy or discolored due to sediment. Continue draining until the water runs clear, which typically takes 10-20 minutes depending on sediment buildup. Watch the hose outlet to assess clarity. Some sediment may take longer to flush out, so patience is important here.
Step 6: Close the drain valve. Once water runs clear and sediment has stopped flowing, turn the drain valve clockwise to close it completely. Do not over-tighten—hand-tight plus a quarter turn is sufficient. Disconnect the garden hose carefully, as residual water may still be warm.
Flushing and Cleaning
After initial draining, flushing your water heater removes remaining sediment and prepares it for refilling. This extra step significantly improves heating efficiency and extends component lifespan.
Flush the tank thoroughly. Turn off the cold water supply to your heater. Attach the garden hose to the drain valve again and open it partially. Turn the cold water supply back on briefly—just 30 seconds—then turn it off again. This creates a flushing action that stirs up remaining sediment. Repeat this process 3-4 times until water runs completely clear.
Between each flush cycle, close the drain valve, allow sediment to settle for a minute, then reopen it. This settling period helps separate sediment from clean water, making each flush more effective. You may notice more discolored water emerge during these cycles—this indicates the flushing process is working.
For heavily sediment-filled tanks, consider using a water heater flush kit, which connects to both inlet and outlet ports and circulates water through the tank more effectively. These kits are inexpensive and available at most home improvement retailers.
Refilling Your Tank
Refilling your water heater requires careful attention to ensure proper operation and prevent air locks in your plumbing system.
Close the drain valve completely. Turn it clockwise until snug, then disconnect the garden hose. Ensure no water drips from the valve—if it does, tighten slightly more or consult the troubleshooting section.
Open the cold water supply. Turn the main cold water inlet valve counterclockwise to fully open it. You should hear water flowing into the tank. Leave the hot water tap open in your home—this allows air to escape from the system and prevents air locks. You’ll hear sputtering as air exits the line; this is normal.
Monitor the hot water tap. Once water flows steadily from the tap without sputtering or air sounds, close it. This indicates the tank is full and air has been purged from the system. The refilling process typically takes 5-10 minutes.
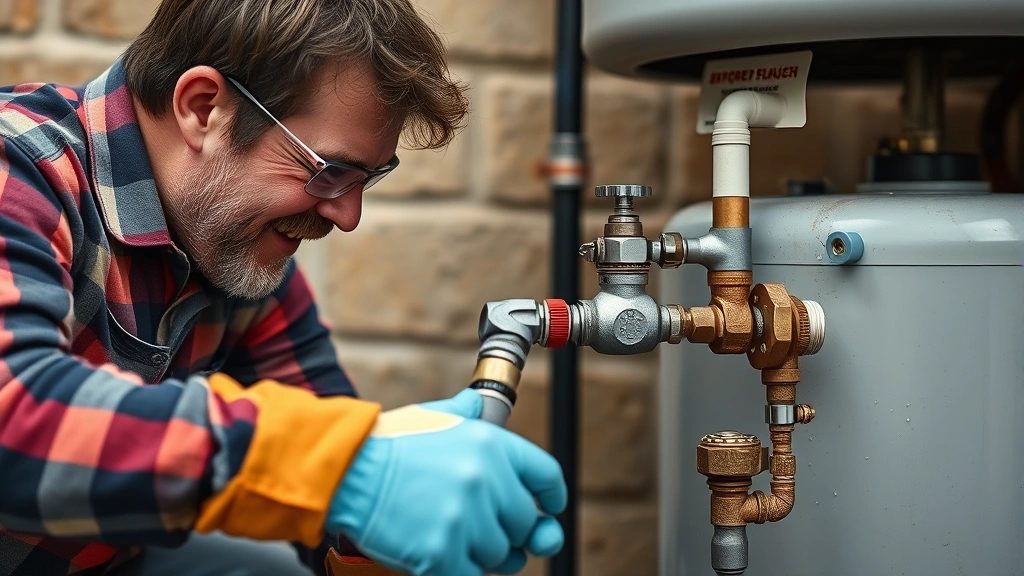
Check for leaks. Inspect the drain valve connection and all inlet/outlet connections for drips or leaks. Tighten any leaking connections slightly with an adjustable wrench. If leaks persist, the valve may need replacement—contact a professional plumber.
Restore power. For electric heaters, switch the breaker back on. For gas heaters, return the thermostat to your desired temperature setting. The heater will begin warming the tank immediately. Wait 30-60 minutes before using hot water to allow the tank to reach proper temperature.
Common Problems and Solutions
Drain valve won’t open. If the valve is stuck, try tightening it first—counterintuitively, this can break sediment loose. Then attempt opening it again. If still stuck, apply penetrating oil around the valve base and wait 15 minutes before trying again. Never force a stuck valve, as you may break it. If it remains stuck after these attempts, contact a professional plumber.
Water flows very slowly or not at all. This usually indicates sediment clogging the valve. Close the valve, disconnect the hose, and try flushing backward by opening the cold water supply briefly. Reconnect the hose and try draining again. If this doesn’t work, the valve may need replacement.
Water leaks from the drain valve connection. Ensure the hose is connected tightly—hand-tighten first, then use a wrench for an additional quarter turn. If leaking continues, the valve threads may be damaged. Turn off the water supply and contact a professional for valve replacement.
Drain valve leaks after closing. A small drip is normal as the valve settles, but continuous dripping indicates a faulty valve. These are inexpensive to replace and widely available at home improvement retailers. Replacement requires basic tools and takes about 30 minutes.
No hot water after refilling. Air may be trapped in the system. Open hot water taps throughout your home for 2-3 minutes to purge air. The heater needs 30-60 minutes to reheat the tank, so allow adequate time before concluding there’s a problem.
Understanding basic water heater maintenance helps you recognize when professional help is needed. If problems persist after trying these solutions, contact a licensed plumber.
FAQ
How often should I drain my water heater?
Most manufacturers recommend draining annually, or twice yearly if you have hard water. If you have very hard water or high mineral content, quarterly draining may be beneficial. Check your heater’s manual for specific recommendations based on your water type.
Can I drain my water heater myself, or should I hire a professional?
Most homeowners can safely drain their water heater using this guide. However, if your heater is old, the drain valve is stuck, or you’re uncomfortable with the process, hiring a professional is perfectly acceptable. Professional draining typically costs $100-200 and includes inspection of other components.
How long does draining take?
The complete process, including draining, flushing, and refilling, typically takes 45-90 minutes depending on sediment buildup. Initial draining takes 10-20 minutes, flushing takes 15-30 minutes, and refilling takes 5-10 minutes.
What temperature should the water be before draining?
Wait until the water cools to below 100°F (38°C). The safest approach is to wait at least two hours after turning off power. You can test temperature by carefully collecting a small sample in a bucket or using a thermometer inserted into the drain valve opening.
Will draining my water heater affect my water pressure?
No, draining shouldn’t affect water pressure. If you experience low pressure after draining, air may be trapped in your plumbing. Open hot water taps throughout your home for several minutes to purge air. If pressure remains low, contact a plumber.
What if my water heater doesn’t have a drain valve?
Older water heaters sometimes lack drain valves. If yours doesn’t have one, you may want to have a professional add one—it’s a relatively simple modification that makes future draining much easier. Alternatively, contact a plumber to drain your heater using specialized equipment.
Can I reuse the water drained from my heater?
The drained water contains sediment and minerals, making it unsuitable for drinking or cooking. However, you can safely use it for watering plants, washing vehicles, or other outdoor cleaning purposes. Avoid using it indoors where sediment might clog fixtures.
Should I drain my water heater if I’m leaving for an extended period?
No, you don’t need to drain it before leaving. However, lowering the thermostat to 120°F saves energy while you’re away. If you’re leaving for more than a month, consider draining it to prevent sediment buildup, especially if you have hard water. When you return, refill and allow adequate time for reheating.
What’s the difference between draining and flushing?
Draining simply removes water from the tank. Flushing involves draining and then refilling multiple times to remove remaining sediment. Flushing is more thorough and recommended for tanks with significant buildup. Both processes are part of comprehensive water heater maintenance.
Is it normal to see rust-colored water when draining?
Yes, rust-colored or brown water indicates iron oxidation and mineral accumulation—exactly what we’re removing. Continue draining until water runs clear. This discoloration is completely normal and doesn’t indicate tank failure, though heavy rust suggests the tank may be aging and nearing replacement.
Related Posts
Remove Security Tags at Home? Expert Tips Inside
Remove a Bathtub Drain? Expert Tips Inside