
Cutting Acrylic Sheet: Expert Tips & Techniques
Cutting Acrylic Sheet: Expert Tips & Techniques
Acrylic sheets are versatile materials used in countless DIY projects, from custom signage and display cases to protective barriers and decorative panels. Whether you’re a seasoned maker or tackling your first acrylic project, understanding how to cut acrylic sheet properly is essential for achieving clean edges, preventing cracks, and ensuring professional-looking results. This comprehensive guide walks you through the best methods, tools, and safety practices for cutting acrylic with confidence.
Cutting acrylic requires patience, the right equipment, and proper technique. Unlike wood or metal, acrylic is prone to chipping, stress fractures, and melting if cut incorrectly. The good news is that with the right approach, you can achieve razor-sharp cuts that require minimal finishing work. We’ll cover everything from hand-tool methods perfect for simple straight cuts to power-tool techniques for complex shapes and curves.
Understanding Acrylic Sheet Types and Thickness
Before you begin cutting, it’s important to understand the acrylic you’re working with. Acrylic sheets come in various thicknesses, ranging from thin 1/8-inch sheets to heavy-duty 1-inch or thicker panels. The thickness determines which cutting method works best and how much force you’ll need to apply.
Cast acrylic is more brittle and prone to cracking, making it ideal for precision cuts with hand tools or fine-toothed saw blades. Extruded acrylic is more flexible and forgiving, working well with both hand tools and power tools. Most acrylic sheets are also available with protective film on both sides—always remove this film before cutting to prevent slipping and ensure accurate measurements.
Thin sheets (1/8 inch to 3/16 inch) can be hand-scored and snapped. Medium sheets (1/4 inch to 3/8 inch) benefit from hand tools or fine-toothed power saws. Thick sheets (1/2 inch and above) typically require power tools like table saws, band saws, or circular saws with specialized blades. Understanding your material’s properties helps you select the safest, most effective cutting technique.
Essential Tools for Cutting Acrylic
Having the right tools makes the difference between clean, professional cuts and frustrating failures. Here’s what you should have on hand:
- Acrylic scoring tool or carbide cutter: A handheld tool with a sharp carbide tip, perfect for scoring straight lines on thin to medium sheets
- Fine-toothed saw blade: A blade with 80+ teeth designed specifically for acrylic, preventing chipping and melting
- Table saw: Excellent for ripping long, straight edges on medium to thick acrylic
- Band saw: Ideal for curved cuts and intricate shapes without excessive heat buildup
- Circular saw: Portable option for straight cuts on sheets that won’t fit on a table saw
- Jigsaw: Perfect for detailed cutouts and freeform designs
- Drill with appropriate bits: For creating holes or starting points for internal cuts
- Straight edge or ruler: Essential for marking accurate cut lines
- Clamps: Heavy-duty clamps hold sheets firmly in place, preventing movement during cutting
- Safety glasses and dust mask: Protection from flying acrylic shards and fine dust particles
When selecting a saw blade, look for one specifically labeled for acrylic or plastic. A carbide-tipped blade with fine teeth (80-100 teeth for table saws) cuts smoothly without generating excessive heat that can melt the material.
Hand Cutting Methods
Hand cutting is perfect for thin acrylic sheets and offers excellent control over the final result. This method requires no electricity and produces minimal noise, making it ideal for apartments or workshops without power tools.
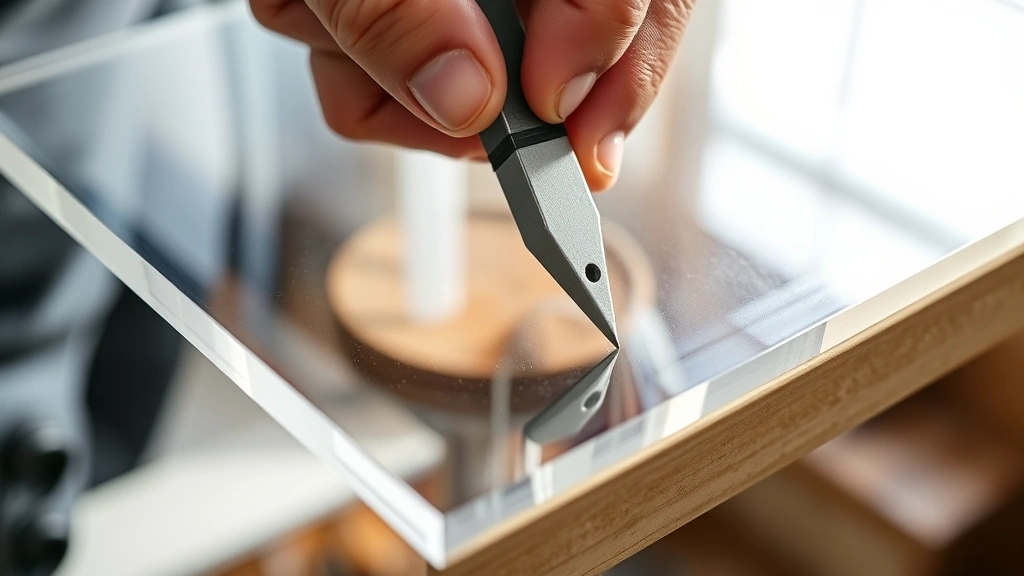
Scoring and Snapping Method: For sheets 1/8 to 3/16 inch thick, scoring is the gold standard. Using a carbide scoring tool, make multiple passes along your marked line with firm, consistent pressure. Don’t try to cut through on the first pass—instead, make 3-4 passes, deepening the score each time. Once the score is deep enough (about 1/4 to 1/3 through the sheet thickness), carefully position the sheet with the scored line at the edge of a table. Supporting both sides equally, apply steady downward pressure until the acrylic snaps cleanly along the score line.
The key to successful scoring is maintaining consistent pressure and keeping your scoring tool perpendicular to the sheet. If you rush or apply uneven pressure, the acrylic may crack unpredictably rather than snap along your intended line. For best results, wear safety glasses—snapping acrylic can send small shards flying.
Hacksaw Method: A fine-toothed hacksaw works well for straight cuts on thin to medium acrylic sheets. Use long, smooth strokes with steady pressure—forcing the saw causes heat buildup and can melt the acrylic. Let the saw do the work. For curved cuts, a coping saw offers better maneuverability. Always clamp your sheet securely to prevent vibration, which causes chipping and can cause the blade to bind.
Power Tool Techniques
Power tools handle thicker acrylic sheets and complex cuts efficiently. However, they generate heat, which is acrylic’s enemy, so proper technique is crucial.
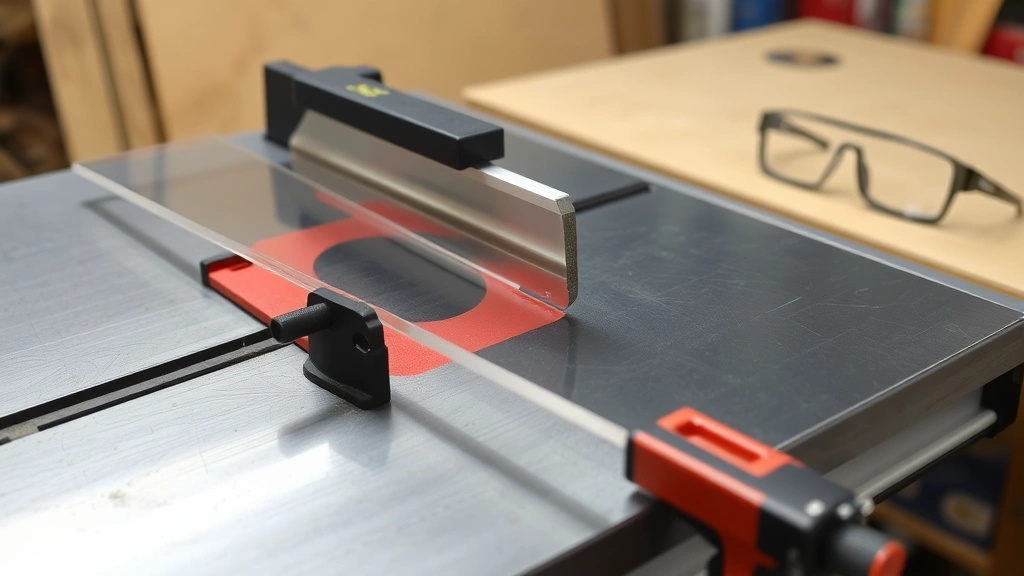
Table Saw Method: A table saw excels at ripping long, straight edges. Install a fine-toothed carbide blade (80-100 teeth) and set the blade height to just barely clear the top of your acrylic sheet. Use a push stick to keep your hands safely away from the blade, and maintain steady, even feed rate. Feed the acrylic slowly—rushing causes heat buildup and melting. Many woodworkers recommend running the saw at moderate speed rather than maximum RPM to reduce heat generation.
Circular Saw Method: For sheets that won’t fit on a table saw, a circular saw with a fine-toothed blade works well. Clamp the sheet to a work surface and use a straight edge as a guide to ensure a straight cut. Wear safety glasses and a dust mask—circular saws throw debris. Cut slowly and let the blade cool between passes if needed.
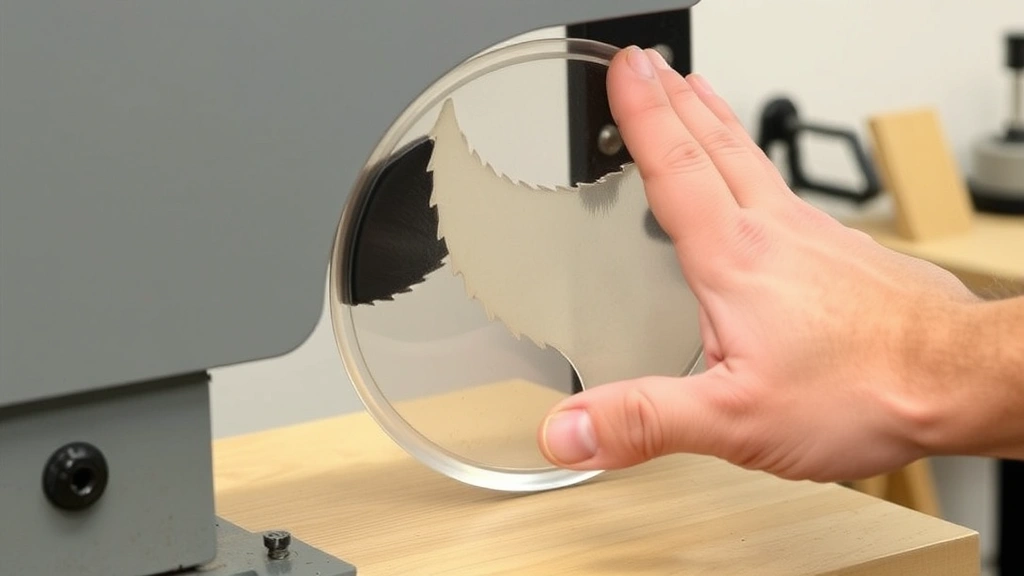
Band Saw Method: Band saws are excellent for curved cuts and detailed shapes. The continuous loop blade generates less heat than reciprocating tools, and the slower cutting action reduces the risk of melting. Use a fine-toothed blade (14+ teeth per inch) and maintain steady feed pressure. Band saws also produce minimal vibration, resulting in cleaner cuts with less stress on the material.
Jigsaw Method: For intricate cutouts and freeform designs, a jigsaw with a fine-toothed acrylic blade is ideal. Drill a starter hole for internal cuts, then carefully guide the blade along your marked line. Keep the saw moving smoothly without forcing—this prevents overheating and blade binding. Jigsaws work best on sheets up to 3/8 inch thick.
Preparing Your Workspace
A well-organized workspace sets you up for success. Start by clearing your work surface and ensuring adequate lighting so you can see your cut lines clearly. Poor visibility leads to mistakes and safety issues.
If you’re using power tools, ensure your workshop has proper dust collection. Acrylic dust is fine and can be irritating to breathe, so a shop vacuum or dust collection system is essential. For hand tools, simply sweeping up afterward prevents slipping hazards.
Support your acrylic sheet properly to prevent sagging or vibration. For table saw work, use outfeed support to prevent the sheet from tipping after the cut. When hand cutting, position the sheet so the cut line is at the edge of your work surface, allowing the cut portion to hang freely without binding. Always wear safety glasses—this is non-negotiable when cutting any material.
Temperature matters too. Cold acrylic is more brittle and prone to cracking, while warm acrylic (around room temperature) is more flexible and forgiving. If your acrylic has been stored in a cold garage, let it warm to room temperature before cutting. Similarly, if your cutting tool is generating heat, take breaks to let both the acrylic and tool cool.
Step-by-Step Cutting Process
For Straight Cuts on Thin Sheets (1/8 to 3/16 inch):
- Remove protective film from both sides of the acrylic sheet
- Mark your cut line clearly using a ruler and permanent marker or grease pencil
- Clamp the sheet firmly to your work surface with the cut line visible and accessible
- Using a carbide scoring tool, score along your marked line with firm, consistent pressure
- Make 3-4 passes, deepening the score each time without cutting completely through
- Position the sheet with the scored line at the table edge, supporting both sides
- Apply steady downward pressure until the acrylic snaps cleanly
- Wear safety glasses throughout the process
For Straight Cuts on Thicker Sheets (1/4 inch and above):
- Remove protective film and mark your cut line clearly
- Install a fine-toothed carbide blade in your table saw or circular saw
- Clamp the acrylic sheet securely to prevent movement during cutting
- Set your saw to moderate speed (not maximum RPM)
- Using a push stick, feed the acrylic slowly and steadily along the cut line
- Maintain even pressure—don’t force the sheet through the blade
- Allow the saw to cool between cuts if you’re making multiple cuts
- Wear safety glasses and a dust mask
For Curved Cuts:
- Mark your desired curve on the acrylic sheet with a pencil or marker
- For internal curves, drill a starter hole along the cut line
- Install a fine-toothed blade in your band saw or jigsaw
- Clamp the sheet securely to your work surface
- Guide the blade slowly along your marked line without forcing
- Keep the blade perpendicular to the sheet surface for clean edges
- Let the saw cool between cuts if needed
- Wear safety glasses and ensure long hair is tied back
Finishing and Polishing Edges
Even with perfect cutting technique, acrylic edges benefit from finishing. Saw-cut edges are often slightly rough or hazy, while scored edges are usually quite clean but may have minor imperfections.
Sanding: Start with 120-grit sandpaper for rough edges, progressing through 220, 320, and 400-grit for increasingly smooth finishes. Sand with the grain (following the direction of any visible lines in the acrylic) using light pressure. Don’t oversand—this can generate heat and cause the acrylic to become cloudy. For best results, wet-sand using a spray bottle to keep the surface cool and reduce dust.
Polishing: After sanding, use a plastic polish or automotive rubbing compound to restore clarity and add shine. Apply with a soft cloth in circular motions, then buff with a clean cloth. For a high-gloss finish, follow with a plastic wax.
Flame Polishing: This advanced technique uses a propane torch to carefully melt the edge surface, creating a crystal-clear, polished finish. Move the torch quickly along the edge—too much heat causes yellowing or warping. This method requires practice and isn’t recommended for beginners, but it produces stunning results when done correctly. Always have a fire extinguisher nearby and work outdoors or in a well-ventilated area.
If you’re uncertain about your finishing skills, many acrylic suppliers offer edge polishing services for a reasonable fee. This is especially worthwhile for visible edges on display pieces.
Common Mistakes to Avoid
Using the Wrong Blade: A blade designed for wood or metal generates excessive heat and causes melting. Always use a fine-toothed carbide blade specifically designed for acrylic or plastic.
Cutting Too Quickly: Patience is essential when cutting acrylic. Rushing causes heat buildup, melting, and stress fractures. Feed the material slowly and let the tool do the work.
Inadequate Clamping: Unsecured sheets vibrate and shift, causing chipping, binding, and safety hazards. Always use heavy-duty clamps and verify stability before starting.
Ignoring Heat Buildup: If your blade or the acrylic feels hot, stop immediately and allow cooling time. Continuing with an overheated tool guarantees poor results and potential hazards.
Cutting While Cold: Acrylic straight from a cold garage is brittle and prone to cracking. Let it warm to room temperature before cutting.
Skipping Safety Gear: Flying acrylic shards can cause serious eye injuries. Wear safety glasses every time you cut acrylic, no exceptions.
Not Removing Protective Film: Cutting with the protective film on causes the sheet to slip and creates inaccurate cuts. Remove the film before marking and cutting.
Forcing Curved Cuts: Pushing a blade through a curve causes binding and kickback. Guide the blade smoothly and let it cut at its own pace.
For additional guidance on home improvement projects, check out our FixWiseHub Blog for comprehensive how-to guides. While acrylic cutting is specialized, the same precision and care apply to many DIY tasks around your home.
FAQ
What’s the best way to cut acrylic sheet at home?
For thin sheets (1/8 to 3/16 inch), scoring and snapping is ideal—it’s simple, requires no power tools, and produces clean edges. For thicker sheets, a table saw with a fine-toothed carbide blade offers excellent results. Always prioritize safety by wearing glasses and using proper clamping.
Can I use a regular saw blade to cut acrylic?
Regular wood or metal blades generate excessive heat and cause melting, chipping, and poor results. Always use a fine-toothed carbide blade specifically designed for acrylic or plastic. This investment ensures clean cuts and prevents ruined material.
Why does my acrylic melt when I cut it?
Melting occurs from excessive heat generated by dull blades, high cutting speeds, or forcing the material through the blade. Use a sharp, fine-toothed blade, cut slowly, and allow cooling breaks. If the blade or acrylic feels hot, stop immediately.
How do I cut curves in acrylic sheet?
A band saw is ideal for curves—it generates less heat than other tools and provides excellent control. A jigsaw also works well for detailed shapes. Mark your curve clearly, drill a starter hole for internal cuts, and guide the blade smoothly without forcing.
What’s the difference between cast and extruded acrylic for cutting?
Cast acrylic is more brittle and works best with scoring or fine-toothed blades. Extruded acrylic is more flexible and forgiving with both hand and power tools. For beginners, extruded acrylic is more forgiving and less prone to unexpected cracking.
Do I need special equipment to cut acrylic?
For thin sheets, a scoring tool and straight edge suffice. For thicker sheets, a table saw with a fine-toothed blade is ideal but not essential—a circular saw, band saw, or jigsaw works too. The key is using the right blade and technique, not expensive equipment.
How do I polish acrylic edges after cutting?
Sand edges starting with 120-grit sandpaper and progressing through finer grits (220, 320, 400). Wet-sand to keep the surface cool. Follow with plastic polish and a soft cloth for a clear, shiny finish. Flame polishing is advanced but produces excellent results when done correctly.
Is it safe to cut acrylic indoors?
Yes, but ensure good ventilation and dust collection. Acrylic dust is fine and can irritate lungs. A shop vacuum or dust collection system is recommended. Always wear a dust mask and safety glasses when cutting indoors.
Can I cut acrylic sheet with a hand drill?
A drill is excellent for creating holes but not suitable for cutting sheets. For sheet cutting, use a scoring tool (thin sheets), hacksaw (straight cuts), or power saws (straight and curved cuts). A drill is a valuable complement to these tools, especially for starting holes for internal cuts.
What thickness acrylic is easiest to cut?
Thin acrylic (1/8 to 3/16 inch) is easiest because scoring and snapping requires minimal equipment and produces clean results. As thickness increases, you need more specialized tools and technique. Most DIYers find 1/4-inch acrylic a good balance—thick enough for durability but still manageable with standard power tools.
Related Posts

Superscript in Google Docs: Expert Tips

Strikethrough in Excel: Easy Steps for Beginners
