
How to Clean Baseball Caps: Expert Tips Revealed
Baseball caps are one of the most versatile accessories in any wardrobe, but they’re also among the hardest items to keep clean. From sweat stains and dirt to stubborn odors, your favorite cap takes a beating every time you wear it. Whether you’re dealing with a vintage cap you want to preserve or a daily-wear favorite that’s seen better days, knowing the right cleaning techniques can extend its life and keep it looking fresh.
The challenge with cleaning baseball caps lies in their construction. Unlike regular clothing that can be tossed in the washing machine, caps have a structured bill, delicate embroidery, and materials that don’t always play well with harsh cleaning methods. This guide will walk you through proven strategies that work for different cap materials and stain types, so you can restore your caps to their original glory without causing damage.
Why Regular Cap Cleaning Matters
Cleaning your baseball caps regularly isn’t just about aesthetics—it’s about health and longevity. Caps accumulate sweat, bacteria, dirt, and UV damage over time. If left uncleaned, these contaminants can cause permanent staining, odor development, and even material degradation. Regular cleaning removes salt deposits from perspiration that can weaken fabric fibers and damage embroidery.
By maintaining a cleaning routine, you’ll notice your caps maintain their color vibrancy, structural integrity, and overall appearance. A well-maintained cap can last for years, while neglected ones deteriorate quickly. This is especially important if you own vintage or specialty caps that hold sentimental value. Think of cap maintenance like caring for a weighted blanket—different materials require different approaches.
Materials You’ll Need
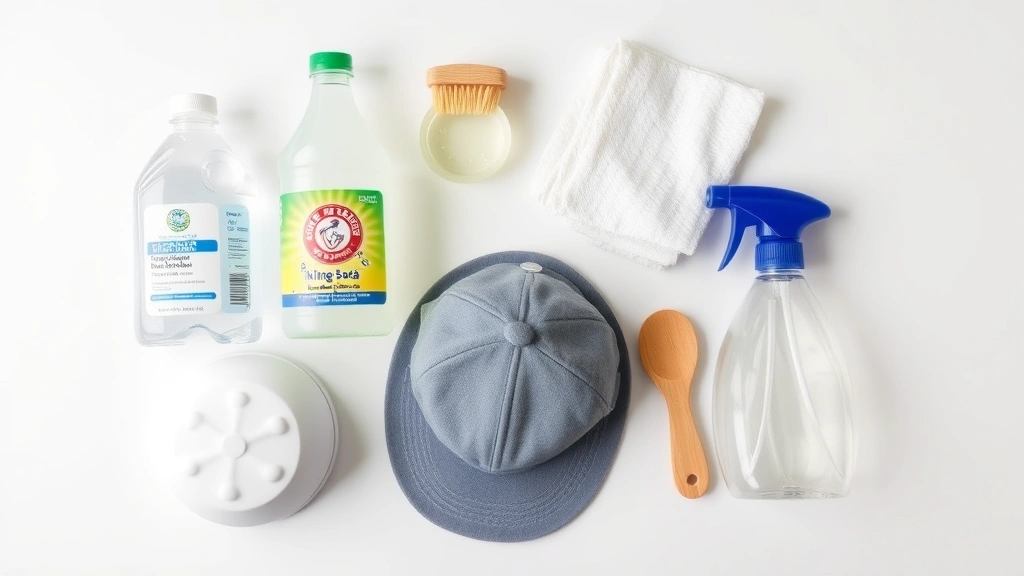
Before you start cleaning, gather these essential supplies:
- Soft-bristled brush – A toothbrush or small cleaning brush works perfectly for scrubbing without damaging fabric
- Mild detergent – Dish soap or gentle laundry detergent; avoid bleach and harsh chemicals
- Warm water – Hot water can damage cap materials and cause shrinkage
- White vinegar – Excellent for removing odors and disinfecting
- Hydrogen peroxide – For stubborn stains on light-colored caps
- Baking soda – Great for absorbing odors and gentle scrubbing
- Clean white cloths – Avoid colored cloths that might bleed dye onto your cap
- Cap form or hat stretcher – Helps maintain shape during drying
- Spray bottle – For applying cleaning solutions evenly
Many of these items are household staples you probably already have. If you’re looking for additional cleaning guidance for other household items, check out our comprehensive guide on how to clean a couch for similar fabric care principles.
Hand-Washing Method for Most Caps
The hand-washing method is the safest approach for cleaning most baseball caps. This method gives you complete control and minimizes the risk of damage to delicate materials or embroidery.
Step 1: Prepare Your Workspace
Fill a sink or bucket with lukewarm water—not hot, as excessive heat can shrink fabrics and fade colors. Add one tablespoon of mild detergent and mix thoroughly. The water should look slightly soapy but not overly sudsy.
Step 2: Initial Soak
Submerge your cap in the soapy water and let it soak for 5-10 minutes. This allows the detergent to penetrate the fabric and loosen dirt and sweat deposits. For caps with heavy staining or odor, you can soak for up to 15 minutes.
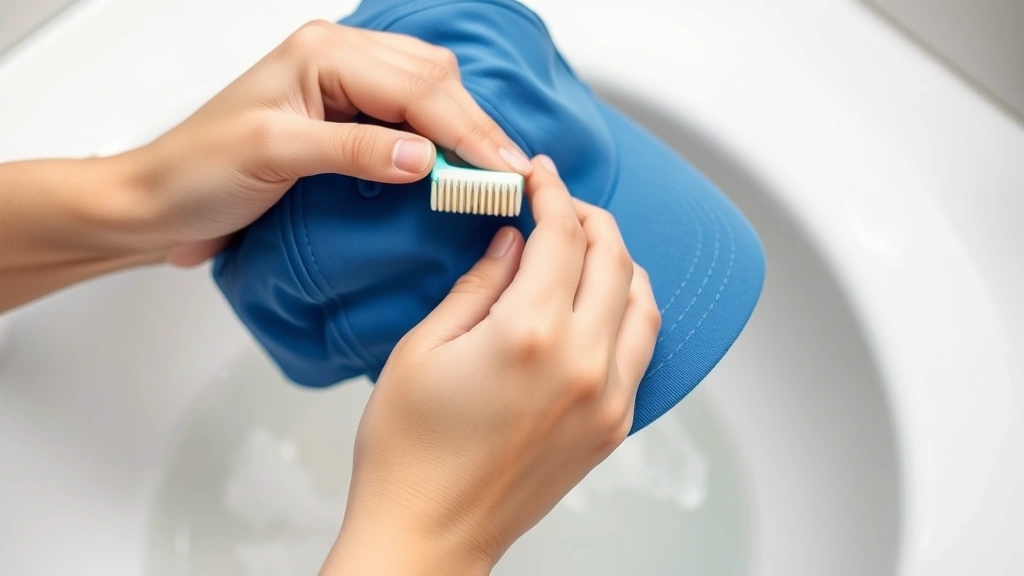
Step 3: Gentle Scrubbing
Using a soft-bristled brush, gently scrub the bill and sweatband where dirt and sweat accumulate most. Work in circular motions, paying extra attention to seams and stitching. Be careful around embroidered logos—use very light pressure in these areas to avoid damaging the threads.
Step 4: Target Problem Areas
For visible stains, create a paste with baking soda and water. Apply this directly to the stain and let it sit for 5-10 minutes before gently scrubbing. For stubborn stains on light-colored caps, you can use a solution of equal parts hydrogen peroxide and water, but test this on an inconspicuous area first.
Step 5: Rinse Thoroughly
Rinse the cap under cool running water until all soap residue is gone. Rinse multiple times if necessary—leftover soap can attract dirt and cause discoloration. You’ll know you’re done when the water runs clear.
Step 6: Final Rinse with Vinegar Solution
For a final rinse, mix one tablespoon of white vinegar with two cups of water. This removes any remaining soap residue and helps eliminate odors. Rinse one more time with plain water afterward.
Spot-Cleaning Techniques for Stubborn Stains
Not all stains require a full washing. For minor blemishes and localized stains, spot-cleaning is more efficient and gentler on your cap.
Sweat Stains
Sweat stains typically appear as yellow or brownish discoloration on the bill and sweatband. Create a solution of one part white vinegar to two parts water. Spray this onto the stained area and let it sit for 30 minutes. Scrub gently with a soft brush and rinse thoroughly. For severe sweat stains, make a paste of baking soda and vinegar, apply it to the stain, and let it sit for one hour before scrubbing and rinsing.
Grass and Dirt Stains
Allow the stain to dry completely first. Use a soft brush or old toothbrush to brush away dried dirt. Then spray the area with a mixture of one tablespoon mild detergent and one cup water. Let it sit for 10 minutes, scrub gently, and rinse with cool water.
Oil and Grease Stains
For oil-based stains, sprinkle baking soda directly on the stain and let it sit for 15 minutes to absorb the oil. Brush away the baking soda, then treat with a small amount of dish soap diluted in water. These stains are particularly stubborn and may require repeating the process.
Mildew and Mold
If your cap has developed mildew (usually indicated by a musty smell or dark spots), mix one part white vinegar with one part water. Spray the affected areas and let them air dry in sunlight. The combination of vinegar and UV rays will kill mold spores. For persistent mildew, you might need to repeat this process several times.
Special Considerations by Material Type
Different cap materials require different cleaning approaches. Understanding your cap’s composition ensures you clean it effectively without causing damage.
Cotton Caps
Cotton is durable and forgiving, making it ideal for beginners. You can use the standard hand-washing method without worry. Cotton caps can handle slightly warmer water and more vigorous scrubbing than delicate materials. They’re also good candidates for the washing machine on a gentle cycle if you use a mesh laundry bag, though hand-washing is still preferred.
Wool Caps
Wool requires extra gentleness. Always use cool water and a specialized wool detergent if possible. Never scrub aggressively, as wool fibers can felt and become matted. Instead, gently squeeze the soapy water through the fabric. For wool caps, avoid vinegar and hydrogen peroxide, which can damage the fibers.
Synthetic and Polyester Caps
These materials are generally very durable and can handle warm water and moderate scrubbing. They’re resistant to shrinkage and color fading, making them forgiving to clean. Synthetic caps often dry quickly, which is an added bonus.
Suede and Leather Accents
If your cap has suede or leather elements, treat them separately. Similar to our guide on how to clean leather, use a specialized leather cleaner or a solution of equal parts white vinegar and water. Apply with a soft cloth and never soak these materials. Always test on a hidden area first.
Embroidered and Specialty Caps
Caps with embroidery, patches, or special details require the gentlest approach. Avoid scrubbing directly on embroidered areas. Instead, focus cleaning efforts on the bill and sweatband. If the embroidered area needs cleaning, use a soft cloth with a diluted detergent solution and dab gently rather than scrub.
Drying and Storage Best Practices
Proper drying is just as important as the cleaning process. Improper drying can damage your cap’s shape and cause mildew growth.
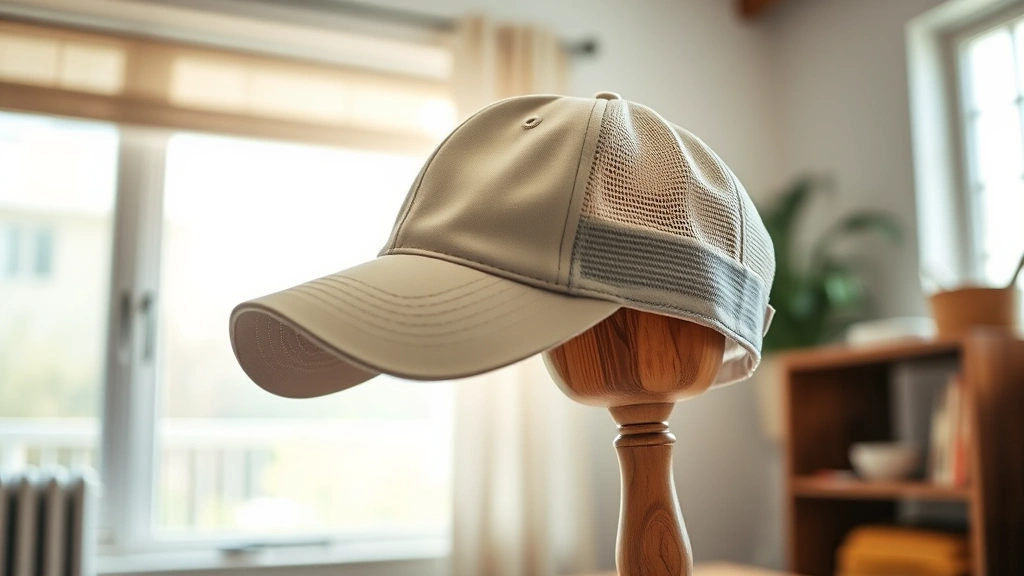
Air Drying Method
After washing, gently squeeze out excess water—don’t wring your cap, as this can damage the shape. Place your cap on a clean towel to absorb remaining moisture. Then position it on a cap form, hat stretcher, or even a bowl to maintain its shape while drying. Never use a clothes dryer, as heat can shrink fabrics and damage embroidery.
Drying Location
Place your cap in a well-ventilated area away from direct sunlight. While sunlight can help eliminate odors and kill bacteria, prolonged UV exposure can fade colors. A shaded area with good air circulation is ideal. Drying typically takes 24-48 hours depending on humidity and material type.
Long-Term Storage
Once completely dry, store your cap in a cool, dry place. Use a hat box or shelf where it won’t be crushed. If storing multiple caps, don’t stack them—this can permanently deform the bills. You can stuff the crown with acid-free tissue paper to help maintain shape. Avoid plastic storage bags, which can trap moisture and promote mildew growth.
Preventative Maintenance Tips
The best approach to cap care is prevention. By maintaining your caps regularly, you’ll reduce the need for intensive cleaning sessions.
Weekly Maintenance
After wearing your cap, especially during outdoor activities or exercise, use a soft brush to remove surface dirt and dust. This prevents dirt from becoming embedded in the fabric. If you notice light sweat stains forming, address them immediately with a damp cloth.
Rotation Strategy
If you have multiple caps, rotate them throughout the week. This gives each cap time to air out between wears, reducing odor buildup and extending the time between deep cleanings. It’s similar to how you’d rotate household items for maintenance—consistent care beats crisis management.
Odor Prevention
Store caps with a small sachet of baking soda or activated charcoal to absorb odors. When not wearing your cap, place it in a well-ventilated area rather than a closed bag. If your cap develops an odor, sprinkle baking soda inside and let it sit overnight, then brush it out.
Bill Care
The bill is particularly prone to staining and damage. Wipe the bill with a damp cloth after each wear to prevent sweat and dirt accumulation. The bill is the first thing people notice, so keeping it clean significantly improves your cap’s overall appearance.
Sweatband Attention
The sweatband is where most bacteria and odor originate. If your cap has a removable sweatband, wash it separately when possible. If it’s permanent, focus extra attention here during cleaning sessions. Some people prefer to wear a sweatband liner inside their cap to protect the sweatband itself.
For more comprehensive cleaning guidance on various household items, visit the FixWise Hub Blog for additional tutorials and expert tips.
FAQ
Can I machine wash my baseball cap?
While some caps can handle gentle machine washing, hand-washing is always the safer option. If you choose to machine wash, use a mesh laundry bag, cold water, gentle cycle, and air dry only. Never use a dryer. Hand-washing gives you better control and reduces the risk of damage to the bill’s structure and any embroidery.
What’s the best way to remove stubborn odors from my cap?
Soak your cap in a solution of one part white vinegar to two parts water for 30 minutes, then wash normally. Alternatively, sprinkle baking soda inside the cap and let it sit overnight to absorb odors. You can also place your cap in sunlight for a few hours, as UV rays naturally kill odor-causing bacteria.
How often should I clean my baseball cap?
Light cleaning (surface brushing) should be done weekly if worn regularly. Deep cleaning with washing should happen every 2-4 weeks depending on usage and activity level. If your cap is worn during sports or outdoor activities, increase cleaning frequency. Caps worn occasionally might only need deep cleaning every 2-3 months.
Can I use bleach on my baseball cap?
Avoid bleach on colored caps, as it will cause discoloration and damage. Even on white caps, bleach can weaken fibers and damage embroidery. Stick with gentler alternatives like hydrogen peroxide for light-colored caps, or vinegar and baking soda for all cap colors. These options are nearly as effective without the harsh side effects.
Why is my cap still smelly after washing?
This usually indicates incomplete rinsing or drying. Make sure you rinse multiple times until all soap is removed, then rinse again with vinegar solution. Dry completely in a well-ventilated area—incomplete drying allows mildew to develop. If the smell persists, soak in a vinegar solution before washing again.
Is it safe to use a hat form while the cap is wet?
Yes, using a hat form while your cap is still slightly damp is actually recommended. This helps the cap dry in its proper shape. However, ensure the form is clean and won’t transfer dye or dirt to your wet cap. Remove the form once the cap is completely dry to allow air circulation inside the crown.
What should I do if my cap’s bill has become bent or warped?
Soak the bill in warm water for 10 minutes to soften it, then gently reshape it to its original form. Use a hat form or curved object to hold it in place while it dries. For more severe warping, you may need to repeat this process several times. Prevention is key—avoid storing caps in ways that bend or crush the bill.
Can I clean a vintage or collectible cap the same way?
Vintage or collectible caps require extra care. Use only cool water, gentle detergent, and minimal scrubbing. Test any cleaning solution on an inconspicuous area first. For valuable caps, consider professional cleaning services. The investment is worth protecting a cap with sentimental or monetary value.