
Master the Art of Tying a Bow with Your Tie for a Polished Look
Mastering the art of tying a bow with your tie is an essential skill that can elevate your formal attire from ordinary to extraordinary. Whether you’re attending a black-tie event, a wedding, or simply want to add a touch of sophistication to your evening wear, knowing how to create a perfect bow tie knot with a regular necktie is a valuable technique that every well-dressed individual should possess.
The bow tie knot represents timeless elegance and has been a symbol of refined taste for centuries. While bow ties themselves are wonderful accessories, sometimes you may find yourself with only a regular necktie but still desire that classic bow tie aesthetic. This comprehensive guide will teach you the step-by-step process of transforming your standard necktie into a stylish bow, along with essential tips for achieving the perfect look every time.
Understanding Bow Tie Fundamentals
Before diving into the actual tying process, it’s crucial to understand what makes a bow tie distinctive and elegant. The bow tie’s appeal lies in its symmetrical shape, balanced proportions, and the way it frames the collar and face. Unlike traditional neckties that hang vertically, bow ties create a horizontal focal point that draws attention to the wearer’s face and upper torso.
The key to a successful bow tie creation with a regular necktie lies in understanding the fundamental structure. A proper bow tie consists of two symmetrical loops with a center knot that holds everything in place. The proportions should be balanced, with neither side overpowering the other, and the overall width should complement your collar style and face shape.
When selecting a necktie for this transformation, consider the fabric weight and texture. Silk ties work exceptionally well due to their flexibility and ability to hold shape, while cotton and linen blends can also create beautiful bows. Avoid ties that are too thick or stiff, as they will be difficult to manipulate into the desired bow shape.

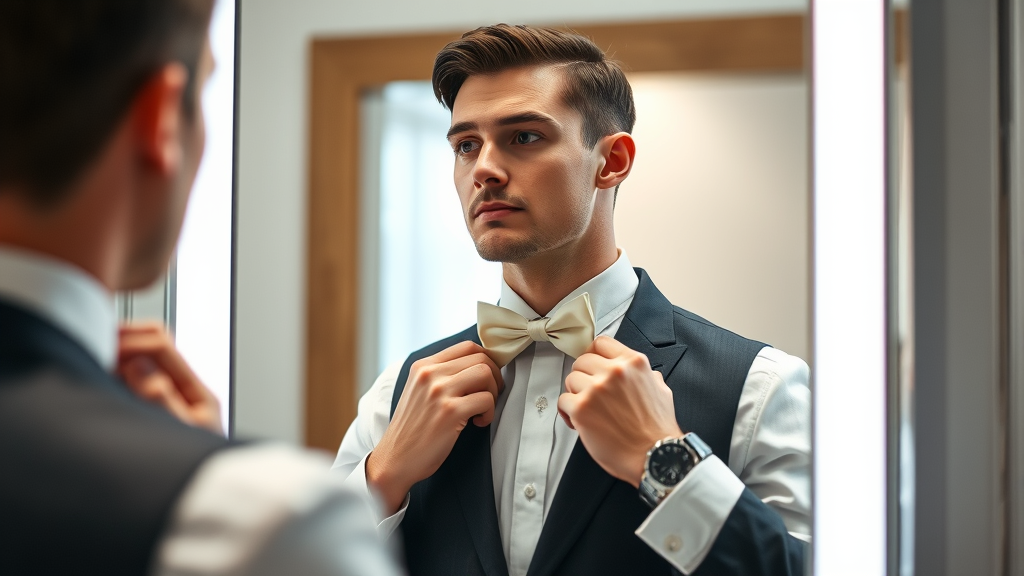
Preparing Your Tie and Collar
Proper preparation is essential for achieving a polished bow tie look. Start by ensuring your collar is properly positioned and your shirt is buttoned all the way to the top. The collar should be crisp and well-pressed, as it will serve as the foundation for your bow tie. A wrinkled or poorly positioned collar can undermine even the most perfectly tied bow.
When positioning the tie around your neck, make sure the collar is flipped up initially. This will give you better access to work with the tie and ensure that the collar doesn’t interfere with the tying process. The tie should rest comfortably around your neck without being too tight or too loose – you should be able to fit one finger between the tie and your neck.
Consider the length of your tie carefully. Longer ties provide more material to work with and can create fuller, more dramatic bows, while shorter ties may require more precise technique but can result in neater, more compact bows. The standard necktie length typically provides adequate material for creating an attractive bow, but you may need to adjust your technique based on the specific tie you’re using.
Step-by-Step Tying Process
Begin the tying process by draping the tie around your neck with the collar flipped up. Position the tie so that one end is significantly longer than the other – typically, the right end should be about 12 inches longer than the left end. This asymmetrical starting position is crucial for creating the proper bow shape.
Cross the longer end over the shorter end, creating an X-shape just below your collar. Hold this intersection firmly with your non-dominant hand while using your dominant hand to manipulate the longer end. Bring the longer end up through the loop you’ve created around your neck, similar to the beginning of a traditional tie knot, but don’t pull it tight yet.
Now comes the critical step that transforms your regular tie into a bow tie. Take the shorter end and fold it in half horizontally, creating one side of your bow. Hold this folded section against your collar while bringing the longer end down over the center of this folded section. This longer end will wrap around the folded section to secure the bow and create the other half.
Fold the longer end back on itself, creating the second half of the bow. Push this folded section through the loop behind the first folded section. This step requires patience and practice, as it can be tricky to manipulate the fabric while maintaining the proper shape. Once you’ve pushed the second loop through, gently pull on both loops to tighten the knot.
Perfecting the Bow Shape
The final shaping of your bow tie is where artistry meets technique. Once the basic knot is in place, you’ll need to adjust and fine-tune the shape to achieve that polished, professional appearance. Start by ensuring that both loops are roughly the same size – asymmetrical loops can make the entire look appear sloppy or unintentional.
Gently pull and adjust each loop, working the fabric to create the desired fullness and shape. The loops should be plump but not overly puffy, with clean lines and defined edges. If one loop appears larger than the other, carefully adjust by pulling on the appropriate sections of the tie. Remember that slight imperfections can add character and authenticity to a hand-tied bow, so don’t aim for machine-like perfection.
Pay attention to the center knot as well. This should be tight enough to hold the bow securely in place but not so tight that it creates unsightly bunching or distortion. The knot should appear neat and centered, serving as an anchor point for the entire bow structure. Some gentle manipulation of the fabric around the knot can help achieve a cleaner appearance.

Troubleshooting Common Issues
Even with careful attention to technique, you may encounter common issues when learning to tie a bow with your necktie. One of the most frequent problems is uneven loops, where one side of the bow appears significantly larger or smaller than the other. This usually occurs when the initial positioning of the tie ends is incorrect or when one side is pulled more tightly than the other during the tying process.
To correct uneven loops, carefully loosen the knot slightly and adjust the positioning of the fabric. You may need to completely retie the bow if the imbalance is severe. Another common issue is a bow that appears too loose or droopy, which typically results from not tightening the center knot sufficiently or using a tie that’s too long for the technique.
If your bow keeps coming undone throughout the evening, the problem likely lies in the center knot not being secure enough. Make sure you’re creating adequate friction by properly weaving the second loop through the back of the first loop. Additionally, ensure that you’re pulling both loops simultaneously when tightening, rather than pulling on just one side.
Some individuals struggle with creating loops that maintain their shape throughout the evening. This issue often stems from using ties with fabrics that don’t hold their form well or from not creating enough structure in the initial folding process. When folding each side of the bow, make sure you’re creating a firm crease that will help maintain the loop’s shape.
Styling Tips and Appropriate Occasions
Understanding when and how to wear a bow tie created from a regular necktie is essential for achieving a polished, appropriate look. This technique works particularly well for semi-formal and formal occasions where you want to add a touch of creativity and personal style to your attire. Black-tie optional events, cocktail parties, and creative professional gatherings are all excellent opportunities to showcase this skill.
When styling your bow tie look, consider the overall harmony of your outfit. The bow should complement your shirt collar style, with spread collars generally working better than narrow point collars. The pocket square can be an excellent complementary accessory, but avoid matching it too closely to your tie – subtle coordination is more sophisticated than exact matching.
Color selection plays a crucial role in the success of your bow tie look. Solid colors often work better than complex patterns when creating a bow with a regular necktie, as the folding and manipulation can distort intricate designs. Navy, burgundy, forest green, and classic black are versatile choices that work well with this technique. If you do choose a patterned tie, opt for subtle patterns like small dots or simple stripes that won’t become visually confusing when folded.
Consider the formality level of your event when deciding whether to attempt this look. While creative and stylish, a necktie transformed into a bow tie may not be appropriate for the most formal occasions where traditional bow ties are expected. However, for events where you want to demonstrate personal style while maintaining elegance, this technique can be perfect.
Maintenance and Care
Proper maintenance of your bow tie throughout the evening is crucial for maintaining that polished appearance. Unlike traditional neckties that remain relatively stable once tied, bow ties require occasional adjustment to maintain their shape and position. Check your bow periodically throughout the event, especially after eating, dancing, or other activities that might cause it to shift.
When making adjustments, resist the urge to completely retie the bow unless absolutely necessary. Instead, make small corrections by gently manipulating the loops and adjusting the center knot. This approach will help you maintain the overall structure while fine-tuning the appearance.
After the event, carefully untie your bow tie and allow the necktie to return to its natural shape. Hang the tie properly to prevent wrinkles and maintain the fabric’s integrity. If the tie has become wrinkled from the manipulation required to create the bow, consider having it professionally pressed or using a steamer to restore its smooth appearance.
When storing ties that you frequently use for bow tie creation, consider hanging them separately from your regular rotation. The repeated folding and manipulation required for this technique can cause additional wear on the fabric, particularly at the points where the bow loops are created. Proper storage and care will help extend the life of your ties while ensuring they continue to create beautiful bows.
Frequently Asked Questions
What type of necktie works best for creating a bow tie?
Silk ties work exceptionally well for creating bow ties due to their flexibility and ability to hold shape. The fabric should be neither too thick nor too thin – medium-weight silk provides the ideal balance of structure and pliability. Avoid ties with very stiff interfacing or those made from thick materials like heavy wool, as they can be difficult to manipulate into the proper bow shape.
How long should my necktie be to create a proper bow?
A standard-length necktie (approximately 57-60 inches) provides adequate material for creating an attractive bow tie. However, longer ties (60+ inches) can be easier to work with and allow for more adjustment options. If your tie is on the shorter side, you may need to be more precise with your initial positioning to ensure you have enough material for both loops.
Can I use this technique with patterned or textured ties?
Yes, but with some considerations. Subtle patterns like small dots, thin stripes, or simple geometric designs can work well and add visual interest to your bow tie. However, complex patterns or large designs may become distorted or visually confusing when folded into a bow shape. Textured ties can create interesting dimension but may be more challenging to shape precisely.
How do I prevent my bow tie from coming undone during the evening?
The key to a secure bow tie is ensuring the center knot is properly tightened and that the second loop is correctly threaded through the back of the first loop. Make sure you’re pulling both loops simultaneously when tightening, and check that there’s adequate friction between the fabric layers. If your bow continues to come loose, you may need to adjust your technique or consider using a different tie with better grip characteristics.
Is it appropriate to wear a necktie bow tie to formal events?
This depends on the specific dress code and formality level of the event. For black-tie events that specifically require traditional bow ties, using a necktie to create a bow might not be appropriate. However, for black-tie optional, cocktail parties, or creative professional events, this technique can be a stylish and acceptable choice that demonstrates personal flair while maintaining elegance.
What should I do if one loop of my bow is larger than the other?
Uneven loops are a common issue that can usually be corrected by adjusting the positioning of the tie ends before tying or by carefully manipulating the loops after the initial knot is formed. If the imbalance is severe, you may need to loosen the center knot and redistribute the fabric. Start with one end slightly longer than the other (about 12 inches difference) and make small adjustments as needed during the tying process.
How often should I practice this technique to master it?
Like any skill involving manual dexterity, regular practice is essential for mastering the bow tie technique. Practice for 10-15 minutes several times per week until you can create a satisfactory bow tie consistently. Most people find they can achieve decent results after 5-10 practice sessions, but true mastery that allows for quick, confident tying in various situations may require several weeks of regular practice.
Related Posts

How Long to Boil Lobster Tails: Cooking Guide

How Long to Fly from New York to London? Travel Times
