
Install an Electric Doorbell: Expert Tips Inside
Install an Electric Doorbell: Expert Tips Inside
Installing an electric doorbell transforms your home’s entryway with a modern, reliable way to greet visitors. Whether you’re upgrading from a mechanical chime or installing your first doorbell system, understanding the basics of wiring and installation ensures a professional result. This comprehensive guide walks you through every step, from shutting off power to testing your finished installation.
An electric doorbell system consists of three main components: the doorbell button (installed at your entrance), the transformer (which converts household voltage to safe low voltage), and the chime unit (the speaker that produces the sound). Modern systems are safer and more reliable than older mechanical versions, and many homeowners find the installation process straightforward with proper preparation and attention to safety protocols.

Understanding Your Doorbell System Components
Before you begin any installation work, familiarize yourself with how an electric doorbell system operates. The transformer is the heart of your system—it steps down your home’s standard 120-volt electrical current to a safer 8-24 volts, depending on your specific doorbell model. This low voltage makes the system safe to work with and ideal for residential use.
The doorbell button is a simple switch that completes the circuit when pressed. When someone pushes the button, electricity flows through the circuit to activate your chime. The chime unit itself contains an electromagnet that strikes a bell or produces a digital tone. Modern doorbells often feature wireless options, but hardwired systems remain popular for their reliability and consistent power supply.
Understanding voltage requirements is crucial. Most residential doorbells operate on 16 volts, though some systems use 8 or 24 volts. Always check your specific doorbell’s specifications before purchasing materials. The transformer you select must match your system’s voltage requirements to ensure proper operation.
Tools and Materials You’ll Need
Gathering the right tools before starting prevents frustrating mid-project trips to the hardware store. For a typical doorbell installation, you’ll need:
- Screwdrivers (both Phillips and flathead)
- Wire strippers to remove insulation from doorbell wire
- Drill with bits for making pilot holes
- Voltage tester for confirming power is off
- Wire nuts or terminal connectors
- Doorbell-rated low-voltage wire (typically 18 or 20 gauge)
- The doorbell kit (button, chime, transformer)
- Electrical tape for securing connections
- Drywall anchors or screws for mounting
- Fish tape if running wires through walls
Quality materials matter significantly when installing electrical components. Invest in proper doorbell wire rated for your application—never use regular household electrical wire for low-voltage doorbell circuits. Visit reputable retailers like Home Depot or Lowe’s for certified doorbell components that meet safety standards.
Safety Precautions Before Starting
Working with electrical systems demands respect and caution. The transformer in your doorbell system connects to your home’s main electrical panel, making proper safety procedures non-negotiable. Always use a voltage tester to confirm that power is completely off before touching any wires connected to your main panel.
Turn off the circuit breaker that controls the outlet where you’ll install the transformer. If you’re unsure which breaker controls a specific outlet, switch off the main breaker as a precaution. Use a voltage tester on the outlet to verify that power is truly off—never assume a breaker switch is accurate without confirming with a testing device.
Wear safety glasses during installation, especially when drilling or working overhead. If you’re uncomfortable working with electrical systems, hire a licensed electrician. The cost of professional installation is minimal compared to potential safety risks. Most jurisdictions require electrical permits for doorbell installation, so check with your local building department before beginning work.
Locating and Preparing the Installation Site
Choosing the right location for your transformer determines your installation’s success. The transformer must be mounted near an electrical outlet—ideally within 6-12 inches—to minimize wire runs and maintain safety. Common installation locations include:
- Inside a hallway closet near an exterior wall
- In a utility room or basement near an outlet
- Inside a garage on an interior wall
- Behind a kitchen cabinet or in a pantry
Avoid damp locations like bathrooms or areas exposed to outdoor weather. The transformer needs protection from moisture and temperature extremes. If you must install in a garage or utility space, consider a weatherproof enclosure. For more information on electrical safety in various home spaces, consult resources like This Old House.
Measure the distance from your chosen transformer location to your front door. Plan your wire route to avoid sharp bends, nails, and moving parts. Running wire through walls requires careful planning—use conduit to protect wires from damage, and consider hiring a professional if walls are already finished and routing seems complicated.
Installing the Transformer
The transformer is where your doorbell installation begins. Start by turning off power at the breaker and confirming with a voltage tester. Remove the cover plate from the outlet where you’ll install the transformer plug.
Most transformers plug directly into a standard outlet, simplifying installation considerably. Position the transformer so its wires can reach your planned chime location without excessive slack. If the outlet is in an inconvenient location, install a new outlet closer to your planned installation site—this is a job for a licensed electrician if you’re uncomfortable with electrical work.
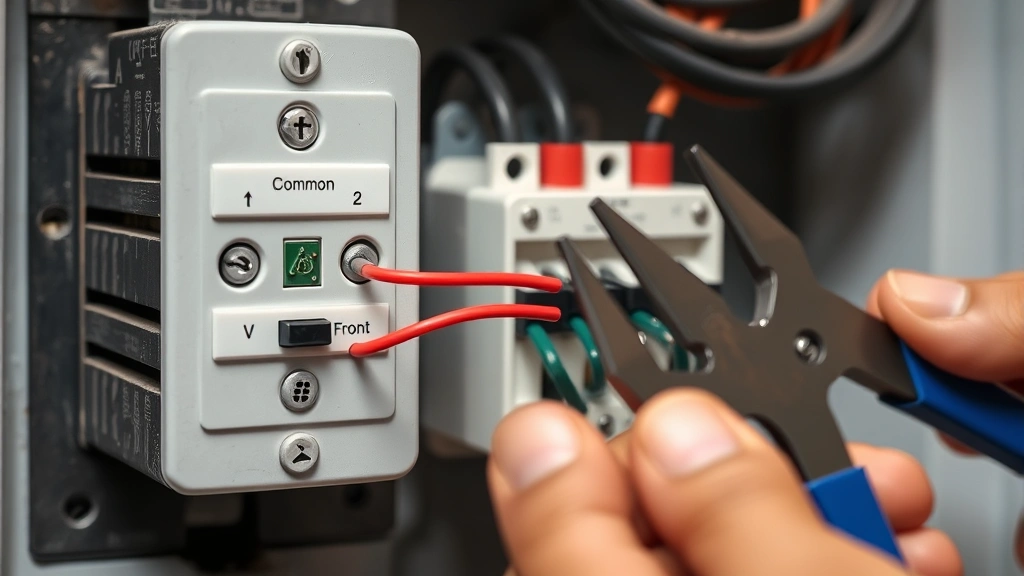
Once the transformer is positioned, you’ll see two low-voltage terminals on the unit, typically labeled “Common” or “C” and “Front” or “F.” These terminals receive the doorbell wires that run to your button and chime. Leave the transformer unplugged until you’ve completed all wiring connections.
If your transformer doesn’t plug in but instead connects directly to an outlet’s terminals, you must turn off power at the breaker and use wire nuts to secure the connections. This method requires more electrical knowledge and should only be attempted by experienced DIYers or professionals.
Running Doorbell Wires
Running wire from your transformer to the button and chime is the most time-consuming part of installation. Doorbell wire is thin and flexible, making it relatively easy to route through walls and along baseboards. Plan your route to minimize visible wire and protect it from damage.
For surface-mounted wire, use staples or clips designed for low-voltage wire. Space fasteners every 12-18 inches to prevent sagging. Never use nails, which can puncture wire insulation. If running wire through walls, use conduit—plastic conduit is inexpensive and protects wire from rodents and construction damage.
At your front door, you’ll need to drill a hole for the button wires to pass through. Use a drill bit slightly larger than your wire diameter. If drilling through exterior walls, drill at a slight downward angle to prevent water from entering your home. Seal the hole around the wire with caulk after installation.
For the chime location indoors, route wires to your chosen spot on the wall. If you’re mounting the chime in a wall cavity, you may need to fish wire through studs using a fish tape. This technique takes practice, so watch instructional videos from Family Handyman before attempting it.
Installing the Doorbell Button
The doorbell button is the visible component that guests interact with. Mount it at a convenient height—typically 48 inches from the ground to the button center. This height is accessible for visitors of varying heights and ages.
Choose a location that’s protected from direct rain and snow. The front porch, entryway, or vestibule offers ideal protection. Avoid mounting buttons in locations where they’re exposed to harsh weather or where landscaping might obscure them.
To install the button, first strip about half an inch of insulation from each wire end. Most doorbell buttons have two terminals where wires connect. Strip the wire, insert it into the terminal, and tighten the screw securely. Some buttons use push-to-connect terminals—insert the stripped wire into the hole and release to grip it.
After wiring, test the button by pressing it. If you’ve already connected the transformer and chime, you should hear the chime sound. If nothing happens, check your wiring connections and ensure the transformer is plugged in. Use a voltage tester at the button terminals to confirm power is reaching the button.
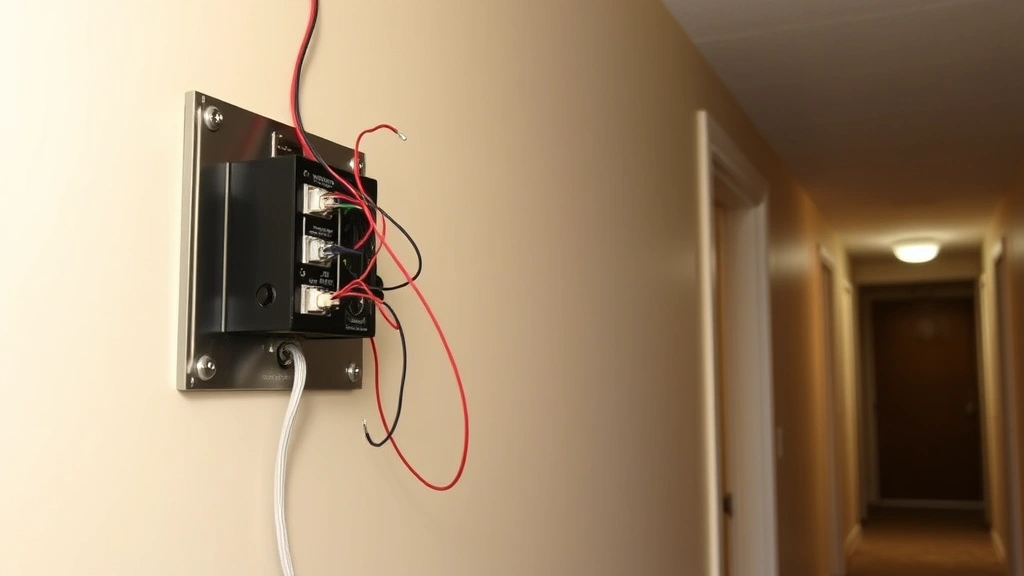
Mounting the Chime Unit
Your chime unit should be located in a central area where you’ll hear it throughout your home. Common locations include hallways, kitchens, or living rooms near the center of the house. Avoid mounting it in noisy areas like near appliances or in rooms with background music.
The chime typically mounts on a wall using screws or adhesive strips. If using screws, locate studs using a stud finder for maximum security. Drill pilot holes to prevent the wall from cracking. If mounting on drywall between studs, use appropriate drywall anchors rated for the chime’s weight.
Some chimes are surface-mounted boxes, while others fit into wall cavities. Surface-mounted units are easier to install—simply screw them to the wall and make connections. In-wall units require cutting a hole in drywall and securing the unit inside the wall cavity, which demands more skill and planning.
Position the chime at ear level—approximately 60 inches from the floor—for optimal sound perception. Ensure the mounting surface is solid and level. After mounting, connect the wires from your transformer and button to the appropriate terminals on the chime unit.
Wiring the Complete System
Now that all components are physically installed, it’s time to connect the electrical circuit. This is where your understanding of the system becomes critical. The basic circuit flows from the transformer’s low-voltage output, through the doorbell button (when pressed), to the chime, and back to the transformer’s common terminal.
Start at the transformer. You’ll see terminals labeled “Common” (C or COM), “Front” (F), and possibly “Back” (B) if your system has multiple chimes. Run one wire from the Common terminal to one terminal on your doorbell button. Run a second wire from the Front terminal, through your button’s second terminal, and on to your chime’s input terminal.
From your chime’s output terminal, run a wire back to the transformer’s Common terminal. This completes the circuit. When the button is pressed, it allows current to flow from the transformer through the chime and back, activating the chime.
Double-check all connections before powering on. Strip about a quarter-inch of insulation from each wire end and insert wires firmly into terminals. Tighten terminal screws securely—loose connections are the most common cause of doorbell malfunction. Ensure no bare wire is exposed, and use wire nuts to insulate any connections outside of terminals.
If your system includes a back button for a secondary entrance, wire it in parallel with the front button. Both buttons will activate the same chime, creating convenience for multiple entry points. Some advanced systems allow different chime sounds for front and back buttons—check your chime’s manual for this capability.
Testing and Troubleshooting
Once all wiring is complete, plug in the transformer and test your system. Press the doorbell button and listen for the chime. If everything works, congratulations—your installation is successful.
If the chime doesn’t sound, work through these troubleshooting steps systematically:
- Confirm transformer power: Plug a lamp into the same outlet to verify the outlet works. If the lamp doesn’t turn on, the outlet may have no power. Check the breaker or hire an electrician.
- Test button circuit: Use a voltage tester at the button terminals with the button unpressed. You should read voltage (typically 16V). If no voltage appears, check the wire connection at the transformer.
- Press the button: While pressing the button, the voltage should drop to near zero as current flows through the chime. If voltage remains unchanged, the button may be faulty or wiring may be broken.
- Check chime connections: Verify that wires are firmly attached to chime terminals. Loose connections are the most common problem. Remove and reseat each wire, ensuring it’s fully inserted and the terminal screw is tight.
- Test chime power: Use a voltage tester directly on the chime terminals. You should read voltage when the button is not pressed. If no voltage appears, trace the wire path and look for breaks or loose connections.
- Replace the button: If voltage reaches the button but nothing happens when pressed, the button may be defective. Purchase a replacement and install it using the same wiring method.
Modern doorbell systems are remarkably reliable when properly installed. Most problems stem from loose connections or incorrect wiring rather than component failure. Take time to verify each connection, and test as you go rather than waiting until the end.
After confirming your system works, secure any exposed wires with clips or conduit. Caulk holes where wires enter your home to prevent water intrusion and pest entry. Apply weatherproof sealant around the button housing to protect it from moisture.
For comprehensive electrical guidance, consult Family Handyman’s doorbell installation guide. Regular maintenance involves cleaning the button periodically and ensuring wires remain secure. Most hardwired doorbell systems operate trouble-free for 10-15 years or longer.
FAQ
Can I install a doorbell myself, or do I need a professional?
Most homeowners can install a basic hardwired doorbell system themselves if they’re comfortable with basic electrical work and follow safety protocols carefully. However, if your home has outdated wiring, you’re uncomfortable working with electricity, or your local codes require permits and inspections, hire a licensed electrician. Professional installation costs $100-300, which is reasonable insurance against safety issues.
What voltage do most residential doorbells use?
Most residential doorbell systems operate on 16 volts, though some use 8, 12, or 24 volts. Check your specific doorbell kit’s documentation to determine the correct voltage for your system. The transformer you purchase must match your doorbell’s voltage requirements. Installing a transformer with incorrect voltage can damage components or prevent the system from functioning.
Can I install a wireless doorbell instead of hardwired?
Wireless doorbells are excellent alternatives that eliminate the need for running wires and transformer installation. They operate on batteries and use radio frequency to communicate between the button and chime. Wireless systems are easier to install but require periodic battery replacement. For a permanent, maintenance-free solution, hardwired systems remain superior, though wireless options work well for renters or temporary installations.
What should I do if my doorbell button gets wet?
Moisture is the primary enemy of outdoor electrical components. If your button gets wet, it may temporarily stop working. Ensure your button is properly weatherproofed with a protective cover or housing. If water enters the button, allow it to dry completely before testing. Consider upgrading to a weatherproof button designed for wet climates if you live in a rainy area. For information on protecting outdoor electrical installations, see This Old House’s outdoor electrical safety guide.
How long does a doorbell system typically last?
Well-installed hardwired doorbell systems often operate for 15-20 years or longer without issues. The transformer is the most likely component to eventually fail, but replacement is straightforward. Buttons and chimes rarely fail if protected from moisture and physical damage. Regular inspection and prompt repair of any problems extend system lifespan significantly.
Can I add a second doorbell chime to my existing system?
Yes, adding a second chime is possible and popular for larger homes. You can wire a second chime in parallel with your first one, so both activate when the button is pressed. Alternatively, some advanced systems allow different chimes for different buttons or locations. Consult your chime’s manual for multi-chime wiring instructions, or hire an electrician if the installation seems complex.
What’s the difference between mechanical and electronic chimes?
Mechanical chimes use an electromagnet to strike a bell or chime bar, producing the classic “ding-dong” sound. Electronic chimes use digital circuits to produce various tones and melodies. Electronic chimes offer more sound options and often include adjustable volume, while mechanical chimes provide traditional reliability and require no batteries. Both work equally well with hardwired systems, so choose based on your preference for sound and features.
Related Posts

Superscript in Google Docs: Expert Tips

Strikethrough in Excel: Easy Steps for Beginners
