

Fix White Spots on Phone Screen: Expert Tips
How to Fix White Spots on Phone Screen: Expert Tips
White spots appearing on your phone screen can be frustrating and concerning, especially when you’re unsure whether they indicate a serious hardware problem or a simple fixable issue. These spots can range from minor cosmetic blemishes to signs of underlying display damage, and understanding their cause is the first step toward resolving them. Whether you’re dealing with dead pixels, dust particles, moisture damage, or pressure-related marks, this comprehensive guide will walk you through diagnostic techniques and practical solutions to restore your phone’s display to its former clarity.
Your smartphone screen is one of the most delicate and expensive components of your device, making it crucial to address any visual anomalies promptly. White spots can appear suddenly due to various reasons, from manufacturing defects to accidental damage, and knowing how to properly diagnose and treat them can save you hundreds of dollars in repair costs. Throughout this guide, we’ll explore proven methods used by professionals and share expert tips that work for most modern smartphones, whether you’re using an iPhone, Android device, or any other brand.
Understanding White Spots on Phone Screens
White spots on phone screens manifest in different ways, and each type requires a different approach to resolution. These spots can appear as small pinpricks, larger blotches, or scattered marks across your display, and they may be permanent fixtures or temporary occurrences depending on their origin. Understanding the nature of these spots is essential before attempting any repair method, as an inappropriate fix could worsen the situation or cause additional damage.
Modern smartphone screens consist of multiple layers, including the protective glass, the LCD or OLED display panel, and various adhesive layers that hold everything together. When white spots appear, they typically indicate one of several issues: trapped air bubbles between layers, dead or stuck pixels that are permanently illuminated, dust particles that have infiltrated the screen assembly, moisture that has seeped into the display, or physical damage to the screen itself. Each of these causes requires specific diagnostic steps and treatment approaches to achieve the best results.
The most common white spots are caused by dead pixels or stuck pixels that remain white regardless of what’s displayed on your screen. These individual pixels lose their ability to change color and instead remain in a white or light state permanently. Other white spots might be caused by dust particles trapped between the screen layers, which typically appear as small dark or light spots depending on the background content. Moisture-related spots often appear hazy or cloudy and may change appearance throughout the day as humidity levels fluctuate.
Identifying the Root Cause
Before attempting any repair method, you must accurately identify what’s causing the white spots on your screen. This diagnostic process involves careful observation and systematic testing to narrow down the possibilities. Start by examining your phone in different lighting conditions—bright sunlight, dim indoor light, and darkness—as different types of spots become more or less visible depending on lighting.
One effective diagnostic technique is to display solid colors on your screen and observe how the white spots behave. Open an image editor or use a color-filling app to display a completely black screen, then a white screen, then red, green, and blue screens in sequence. White spots that remain visible on all colored backgrounds are likely dead pixels or physical damage. Spots that only appear on certain colors might be stuck pixels. Spots that change appearance or seem to move slightly when you tilt your phone are likely dust particles or moisture trapped between layers.
Check whether the spots are visible from the front of the screen or if you can see them from the back. If you can see marks on the back of the phone that correspond to the white spots on the front, you’re likely dealing with external dirt or debris on the screen protector or outer glass layer. If the spots are only visible from the front and don’t correspond to any marks on the back, the issue is likely internal to the screen assembly itself.
Document the exact location, size, and appearance of each white spot. Take clear photographs with good lighting to help you track whether the spots change over time or in response to your repair attempts. This documentation will also be valuable if you need to consult repair guides or contact customer support for your device.
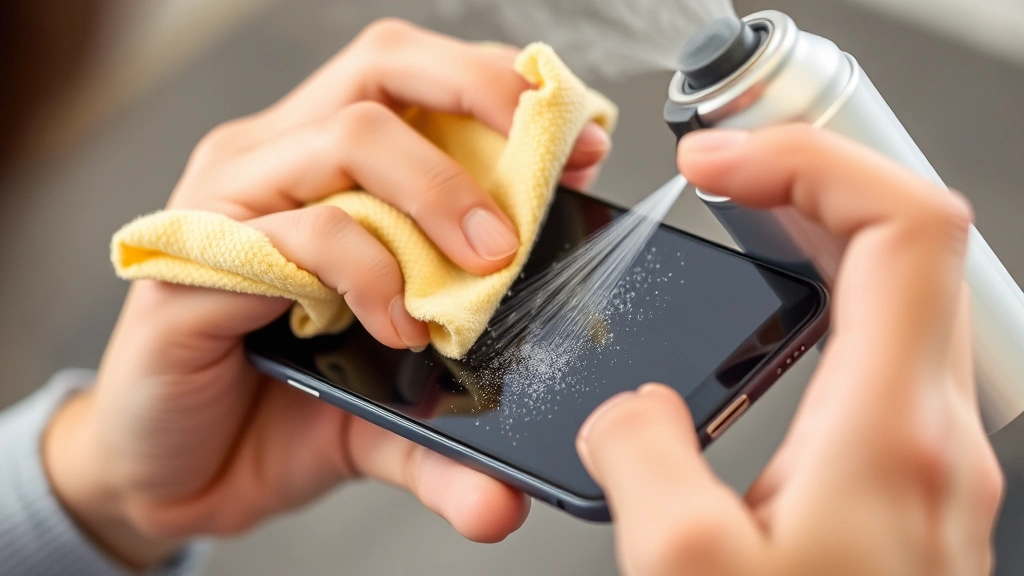
Cleaning Methods for Dust and Debris
If you’ve determined that your white spots are caused by dust particles or external debris, cleaning is your first line of defense. This approach is non-invasive and often completely reverses the problem without any risk to your device’s functionality. Begin by powering off your phone completely and disconnecting any cables or accessories to ensure safety during the cleaning process.
Start with the gentlest cleaning method first: use a soft, lint-free cloth slightly dampened with distilled water to gently wipe the screen in circular motions. Avoid using tap water, as minerals and impurities can leave residue. Never spray liquid directly onto your phone; instead, apply moisture to the cloth first. Pay special attention to the edges and corners where dust tends to accumulate. This simple method often removes surface dust and light debris that may appear as white spots.
For more stubborn spots, use a microfiber cloth specifically designed for electronics cleaning. These cloths are gentler than paper towels or regular fabrics and won’t scratch your screen. Apply gentle pressure and use a circular motion to work at persistent spots. If the spots remain after dry wiping, slightly dampen the microfiber cloth with distilled water and repeat the process.
If dust appears to be trapped between the screen layers rather than on the surface, try using compressed air. Hold the can upright and use short bursts at a slight angle to the screen’s edge, allowing air pressure to push dust out from between the layers. Never hold the can upside down, as liquid propellant can damage your screen. Keep the nozzle at least six inches away from your phone and avoid concentrated bursts on any single area.
For particularly stubborn cases, a mixture of distilled water and white vinegar in equal parts can be effective. Dampen a microfiber cloth with this solution and gently clean the screen. The vinegar helps break down mineral deposits and stubborn residue without leaving streaks. Follow up with a cloth dampened only with distilled water to remove any vinegar residue, then dry completely with a dry microfiber cloth.
After cleaning, allow your phone to air dry completely for at least 30 minutes before powering it back on. This prevents any residual moisture from interfering with the touchscreen’s electrical sensors. Once your phone has dried thoroughly, power it on and observe whether the white spots have been eliminated. Most external cleaning successfully resolves dust-related spots.
Addressing Dead and Stuck Pixels
Dead pixels and stuck pixels are individual pixels on your screen that have malfunctioned and no longer respond to color signals correctly. A dead pixel appears black because it has lost all power, while a stuck pixel appears white or in a specific color because it’s receiving constant power to that color channel. Fortunately, several methods can sometimes revive stuck pixels, though dead pixels are typically permanent without professional repair.
The pressure method is one of the most popular DIY approaches for stuck pixels. Power off your phone and locate the exact position of the stuck pixel. Using a soft, rounded object like the eraser end of a pencil or a wooden stick, gently apply moderate pressure directly to the stuck pixel area for 5-10 seconds. The goal is to apply enough pressure to stimulate the pixel without damaging surrounding pixels or the screen itself. Be extremely careful not to press too hard, as excessive pressure can cause additional damage. Some users report success with this method, though results are not guaranteed.
Software-based pixel-fixing applications represent another approach worth trying. These apps work by rapidly cycling pixels through different colors and brightness levels, which can sometimes unstick pixels that are stuck in a particular state. Search your phone’s app store for “dead pixel fixer” or “stuck pixel repair” applications. Download a reputable app with good reviews and follow its instructions carefully. While these apps won’t fix truly dead pixels, they have success rates of 30-50% for stuck pixels, making them worth attempting before seeking professional repair.
The screen massage technique involves using a soft cloth to gently massage the area around the stuck pixel in circular motions. This stimulation sometimes encourages the pixel to return to normal function, particularly if the malfunction is caused by a temporary electrical glitch rather than permanent hardware failure. Perform this massage for 2-3 minutes, then check whether the pixel has returned to normal. You may need to repeat this process several times over a few days to see results.
Try displaying your phone’s screen at maximum brightness for extended periods. Some stuck pixels respond to prolonged exposure to high brightness levels by returning to normal function. Set your phone to display a white screen (the opposite color of a white stuck pixel) at full brightness and leave it running for 30 minutes to an hour. This technique is particularly effective for pixels stuck in darker states.

Handling Moisture and Water Damage
If white spots appeared after your phone came into contact with water or high humidity, moisture damage is likely the culprit. These spots often appear hazy or cloudy and may seem to change slightly as environmental humidity fluctuates. Addressing moisture damage requires immediate action to prevent the problem from worsening and potentially causing additional damage to internal components.
The first step in treating moisture damage is to power off your phone immediately. Continuing to use a wet phone can cause short circuits and permanent damage to the logic board. Remove any protective case or screen protector to allow better air circulation around the device. If your phone has a removable battery (increasingly rare on modern devices), remove it as well to prevent short circuits.
Use a soft, lint-free cloth to gently pat the exterior of your phone dry. Don’t rub or apply pressure, as this can push moisture deeper into the device. Pay special attention to speaker grilles, microphone openings, charging ports, and the headphone jack (if present), as these are common entry points for moisture.
Place your phone in a container filled with uncooked rice, silica gel packets, or specialty drying products designed for electronics. These desiccants absorb moisture from the air and help remove moisture from your device. Bury your phone completely in the desiccant material and seal the container. Leave it undisturbed for 24-48 hours. While rice is commonly recommended, silica gel is actually more effective and won’t leave dust inside your device, so use it if available.
Alternatively, you can use a hair dryer on the lowest heat setting, held at least 12 inches away from your phone, to gently warm the device and encourage moisture evaporation. Move the dryer constantly to avoid concentrating heat on any single area, and never use high heat settings, as excessive heat can damage internal components. Spend 10-15 minutes on this process, then allow your phone to cool completely before attempting to power it on.
After the drying period, wait an additional 24 hours before powering on your phone. This extended waiting period ensures that all moisture has been thoroughly removed. When you do power it on, do so carefully and watch for any signs of malfunction. If the white spots have disappeared, you’ve successfully resolved the moisture issue. If spots remain or if your phone malfunctions, the moisture may have caused internal damage requiring professional repair.
To prevent future moisture damage, invest in a quality waterproof phone case or screen protector. These protective accessories create barriers against water and humidity without interfering with your phone’s functionality. Even phones advertised as water-resistant can benefit from additional protection, as their water resistance ratings are tested under specific conditions and may not hold up to prolonged exposure or high-pressure water.
Pressure and Impact-Related Spots
White spots sometimes appear after your phone has experienced physical impact, such as being dropped, sat on, or bumped against hard objects. These spots are often caused by pressure damage to the LCD or OLED display panel, where the impact has disrupted the liquid crystal layer or the light-emitting diodes. Pressure-related damage can sometimes be partially reversed if addressed quickly, though results depend on the severity of the impact.
If you know exactly when the impact occurred, begin treatment immediately. Power off your phone and examine the area surrounding the white spots for cracks, dents, or other visible damage. If the screen is cracked, professional repair is necessary, as attempting DIY fixes on cracked screens can cause the crack to spread or introduce additional damage.
For pressure-related white spots without visible cracks, try the gentle heat method. Use a hair dryer on the lowest setting to warm the affected area for 5-10 minutes, holding the dryer at least 12 inches away. The gentle heat can sometimes help the display layers re-bond or allow the liquid crystal to resettle. Allow the phone to cool naturally, then power it on to check for improvement.
The light pressure massage technique can also help with pressure-related spots. Using your fingertip, apply gentle circular pressure around the affected area for 2-3 minutes. This stimulation can sometimes encourage the display layers to re-bond or the liquid crystal to redistribute more evenly. Be extremely careful not to apply excessive pressure, as this will worsen the damage.
If the white spots appeared after impact but the phone fell on soft surfaces or the impact seemed minor, wait 24-48 hours before attempting repairs. Sometimes, display damage from minor impacts is temporary, and the spots disappear on their own as the display settles. Avoid further impact and handle the phone with extra care during this observation period.
For severe pressure damage or impact-related spots that don’t improve after 48 hours, professional screen replacement is typically the only effective solution. Attempting aggressive DIY repairs on impact-damaged screens risks spreading damage to surrounding components and making the problem worse. Professional technicians have the tools and expertise to safely replace the display without causing additional harm to your device.
Advanced Software Solutions
Beyond physical cleaning and pixel repair techniques, several software-based approaches can help address or conceal white spots on your phone screen. These methods won’t fix physical damage or hardware failures, but they can improve the appearance of your display and sometimes resolve issues related to display settings or software glitches.
Adjust your display settings to see if white spots become less noticeable. Reduce screen brightness to a comfortable level, as spots often become more visible at maximum brightness. Access your phone’s display settings and experiment with color temperature, saturation, and contrast adjustments. Some phones allow you to enable a grayscale mode or reduce color saturation, which can make white spots less distracting by lowering the overall contrast between the spots and the surrounding display.
Perform a hard reset of your phone’s display by holding down the power button and volume buttons simultaneously (the exact key combination varies by phone model) until your phone restarts. This process forces your phone to reinitialize all hardware components, including the display, and can sometimes resolve temporary display glitches that manifest as white spots. Before performing a hard reset, back up your data, as some reset procedures may erase personal information.
Update your phone’s operating system to the latest available version. Software updates often include fixes for display-related bugs and glitches that might cause or contribute to white spots. Check your phone’s settings menu for system updates and install any available updates before attempting other solutions.
If you’ve experienced white spots after installing a particular app or making significant changes to your phone’s settings, try uninstalling the app or reverting the settings changes. Some apps can interfere with display rendering or cause software glitches that manifest as visual anomalies on your screen. Use your phone’s app manager to uninstall recently installed apps one at a time, testing your screen after each uninstallation to determine if any particular app is causing the issue.
Consider using a custom launcher or installing a screen filter app that overlays a semi-transparent layer on top of your display. While this won’t fix the underlying problem, it can make white spots less noticeable by reducing the contrast between the spots and surrounding content. These apps are particularly useful as temporary solutions while you arrange for professional repair.
When to Seek Professional Help
Despite your best DIY efforts, some white spots require professional repair to fully resolve. Recognizing when to seek professional help prevents you from wasting time on ineffective treatments and avoids the risk of causing additional damage through aggressive DIY repair attempts. Several situations warrant professional intervention from certified technicians.
If white spots are accompanied by cracks, shattered glass, or visible physical damage to your screen, professional repair is necessary. Attempting DIY fixes on physically damaged screens risks spreading the damage further and introducing dust or debris into the phone’s internal components. Professional technicians have the proper tools, clean environments, and expertise to safely repair or replace damaged screens without causing additional harm.
Large areas of white spots covering significant portions of your display indicate serious display panel damage that won’t respond to cleaning or simple pixel-fixing techniques. These situations typically require complete display replacement, which requires specialized equipment and expertise. Attempting aggressive DIY fixes on severely damaged displays can make the problem worse and potentially damage other components.
If white spots appeared after water damage and persist after proper drying procedures, internal moisture may have caused damage to the display panel or related circuitry. Professional technicians can safely disassemble your phone, thoroughly dry internal components, and replace any damaged parts. This level of repair is beyond the scope of DIY methods and requires professional equipment and expertise.
When white spots are accompanied by other display issues—such as lines on the screen, color distortion, unresponsive areas, or flickering—a more serious display malfunction is likely present. These compound issues usually require professional diagnosis and repair to fully resolve. Visit an authorized service center for your phone’s brand or a reputable third-party repair shop to get an accurate diagnosis.
If your phone is still under manufacturer warranty, contact your phone’s manufacturer before attempting any repairs. Many manufacturers cover display defects under warranty and will repair or replace your phone for free. Attempting DIY repairs may void your warranty, so it’s important to check your warranty status and coverage before proceeding with any treatment methods.
Professional repair shops can typically diagnose the exact cause of your white spots through detailed inspection and testing. They have access to replacement parts and specialized tools that make repairs possible without risking additional damage. While professional repair costs money, it’s often more cost-effective than replacing your entire phone, and it ensures that repairs are done correctly with proper tools and techniques.
Many authorized service centers offer mail-in repair services, making it convenient to get professional help even if you don’t have a local service center nearby. Some retailers like This Old House partner with repair services, and you can also check with Family Handyman for local service recommendations. Be sure to back up your data before sending your phone for repair, as the repair process may involve factory resets or data transfers.
If you need to replace your screen yourself, purchase parts only from reputable sellers and follow detailed guides specific to your phone model. Many online retailers and technology stores sell replacement screens and the specialized tools needed for installation. However, this approach requires significant technical skill and carries risks of causing additional damage, so it’s generally recommended only for users with previous experience with phone repairs.
FAQ
Can I fix white spots on my phone screen without professional help?
Many white spots can be fixed at home using the methods described in this guide, particularly those caused by dust, debris, or stuck pixels. However, spots caused by physical damage, severe water damage, or dead pixels may require professional repair. Start with non-invasive methods like cleaning and software fixes before seeking professional help.
How long does it take to fix white spots on a phone screen?
Simple cleaning methods can resolve white spots in minutes to hours. Drying out moisture damage requires 24-48 hours. Stuck pixel repair techniques may take several days of repeated attempts to show results. Professional repair typically takes 1-7 days depending on the complexity of the issue and your service center’s workload.
Will white spots get worse over time?
This depends on the cause. Dead pixels and stuck pixels typically remain stable and don’t worsen. Moisture-related spots may worsen if the underlying moisture damage spreads to additional areas. Physical damage spots may spread if the screen cracks further. Addressing white spots promptly prevents potential worsening of the underlying issue.
Is it safe to use my phone if it has white spots?
White spots alone don’t make your phone unsafe to use. However, if white spots are accompanied by water damage, your phone may have internal moisture that could cause short circuits. If white spots resulted from physical impact, your screen may be compromised and vulnerable to further damage. Use caution and consider professional inspection if you’re concerned about internal damage.
How much does professional screen repair cost?
Professional screen replacement typically costs between $150-$400 depending on your phone model, whether you use an authorized service center or third-party repair shop, and your phone’s age. Older or less common models may cost more due to parts availability. Check with multiple repair shops to compare prices before making a decision.
Can I prevent white spots from appearing on my phone screen?
Yes, you can reduce your risk by using protective cases and screen protectors, avoiding exposure to water and high humidity, handling your phone carefully to prevent impact damage, and keeping your phone’s software updated. Regular gentle cleaning with appropriate materials also prevents dust accumulation that can create the appearance of spots.
What’s the difference between dead pixels and stuck pixels?
Dead pixels appear black because they’ve lost power and can’t display any color. Stuck pixels appear white or in specific colors because they’re receiving constant power and can’t change colors. Stuck pixels are sometimes fixable through software or physical stimulation techniques, while dead pixels are typically permanent without professional repair or replacement.
Should I try multiple repair methods or stick with one?
Start with the gentlest methods first and progress to more aggressive techniques only if initial methods fail. Begin with cleaning, then try software solutions, then pressure-based techniques. Attempting multiple aggressive methods simultaneously increases the risk of causing additional damage. Give each method at least 24 hours to show results before moving to the next approach.
Related Posts

Superscript in Google Docs: Expert Tips

Strikethrough in Excel: Easy Steps for Beginners
