
How to Make Apple Cider: Expert Guide
How to Make Apple Cider: Expert Guide
There’s something deeply satisfying about crafting your own apple cider at home. Whether you’re drawn to the warm spice-laden versions that define autumn or the crisp, fresh-pressed varieties that capture the essence of orchard-picked fruit, making cider from scratch connects you to centuries of tradition while filling your kitchen with an aroma that’s pure comfort. The process isn’t as intimidating as it might seem—in fact, it’s one of the most rewarding kitchen projects you can tackle, requiring minimal equipment and readily available ingredients.
The beauty of homemade apple cider lies in its versatility and the control you have over the final product. Unlike store-bought versions that sit on shelves for weeks, your cider can be enjoyed fresh, spiced to your exact preferences, or even fermented into something entirely different. Whether you’re a seasoned cook or someone who’s never made anything from scratch before, this guide will walk you through every step of the process, from selecting the right apples to troubleshooting common issues.
What many people don’t realize is that making apple cider is less about complex techniques and more about understanding a few fundamental principles. Once you grasp the basics, you’ll find yourself experimenting with different apple varieties, spice combinations, and processing methods. Let’s dive into everything you need to know.
Choosing the Right Apples
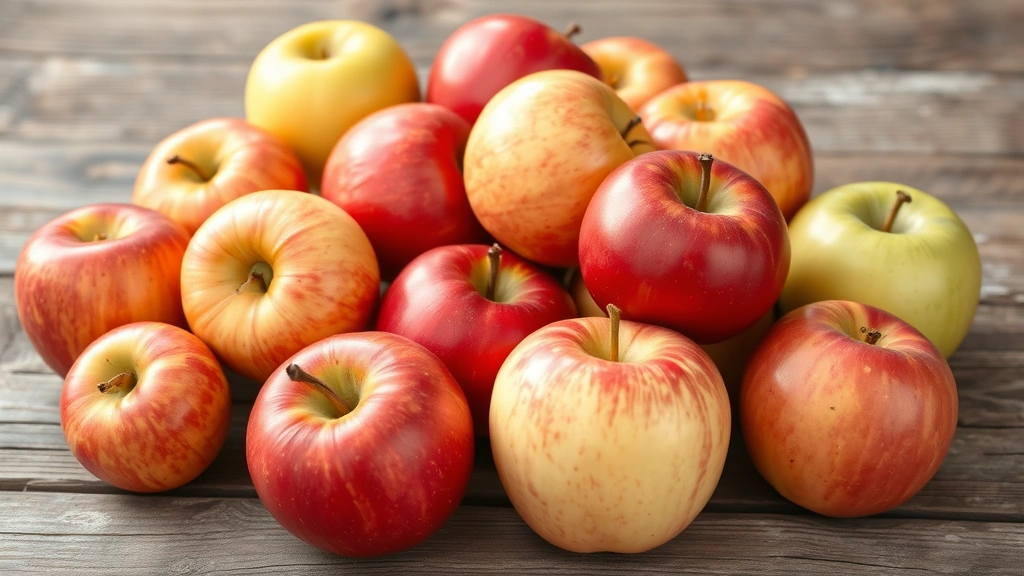
The foundation of exceptional homemade cider starts with selecting quality apples. Unlike baking, where you might want specific varieties for particular textures, cider benefits from a blend of different apple types. The ideal combination includes sweet apples for body and natural sugars, tart apples for complexity and balance, and aromatic varieties that contribute distinctive flavors.
Sweet varieties like Gala, Fuji, and Honeycrisp provide the sugar content necessary for fermentation and natural sweetness. Tart apples such as Granny Smith, Pink Lady, and Cortland add the acidity that prevents the cider from tasting flat and one-dimensional. Aromatic varieties like Jonagold, Winesap, and Crispin introduce subtle spice notes and depth. A general guideline is to aim for a ratio of roughly 50% sweet, 30% tart, and 20% aromatic apples, though you can adjust based on your preferences.
Freshness matters significantly. The best time to make cider is during apple season—typically September through November—when apples are at their peak. If you’re making cider later in the season, look for apples that feel firm to the touch and lack soft spots. You might also consider visiting a local orchard or farmers market where you can discuss specific varieties with growers who understand their flavor profiles. One helpful tip: if you’re trying to keep apples from turning brown while you work, store them in cool conditions and work in batches if you’re processing a large quantity.
Quantity-wise, plan on approximately 25-30 pounds of apples to yield one gallon of cider. This ratio accounts for water loss during cooking and the volume reduction that occurs as you extract and concentrate the juice.
Essential Equipment
You don’t need specialized or expensive equipment to make excellent apple cider. In fact, most home cooks already have the basics in their kitchen. Here’s what you’ll actually need:
- Large stainless steel pot: A 12-16 quart capacity works well for most home batches. Avoid aluminum, which can react with acidic apple juice.
- Colander or mesh strainer: For initial filtering of large pulp and debris.
- Cheesecloth or fine mesh strainer: Essential for achieving that clear, polished appearance in finished cider.
- Cutting board and sharp knife: For prepping apples. A sturdy vegetable chopper can speed up the process considerably.
- Wooden spoon: For stirring without scratching your pot.
- Thermometer: A candy or instant-read thermometer helps you monitor temperature during cooking.
- Glass bottles or jars: For storage. Avoid plastic if you plan to store cider long-term, as it can absorb flavors and odors.
- Funnel: Makes transferring hot liquid significantly easier and safer.
Optional but helpful items include a food mill for processing apples faster, a cider press if you’re planning to make large quantities regularly, or an immersion blender for breaking down apple pieces. However, these aren’t necessary for small home batches.
Preparing Your Apples
Preparation is where many home cooks rush through unnecessarily. Taking time here pays dividends in the final product’s quality. Start by washing all apples thoroughly under cool running water, scrubbing gently to remove any dirt or debris. Don’t use soap—plain water is sufficient and safer.
Next, cut each apple into quarters, removing the stem and blossom end. You don’t need to peel or remove seeds—in fact, apple skins and seeds contribute valuable tannins and flavor compounds to your cider. If an apple shows signs of mold or significant damage, discard it entirely; even small mold spots can negatively impact the entire batch.
For faster processing, roughly chop the apple quarters into smaller pieces. This increases the surface area and helps extract juice more efficiently. Some people use a food processor for this step, which works beautifully if you don’t mind the extra cleanup. The goal is pieces roughly 1-2 inches in size.
As you prepare apples, place them directly into your large pot to prevent browning. You might notice the apples begin oxidizing slightly—this is completely normal and won’t affect your final cider. If you’re concerned about appearance during the preparation phase, you can toss the cut apples with a small amount of lemon juice, though this step is primarily aesthetic.
Extracting the Juice
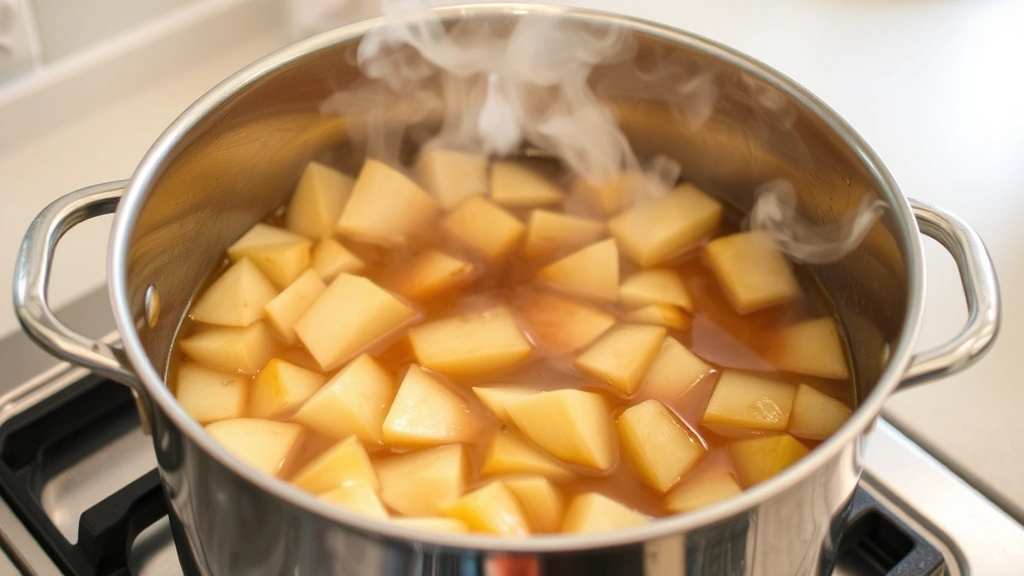
This is where the actual cider-making begins. Fill your pot with the prepared apples until it’s roughly three-quarters full. Add just enough water to barely cover the apples—typically 2-4 cups depending on your apple quantity. The water helps extract juice and prevents scorching, but you want to minimize it since you’ll be concentrating the cider later.
Bring the mixture to a boil over medium-high heat, then reduce to a gentle simmer. Let it cook for 20-30 minutes, stirring occasionally and using a wooden spoon to gently crush the apples as they soften. You’re not making applesauce here, so avoid aggressive mashing. The apples will naturally break down as they heat and release their juice.
The mixture will transform from individual apple pieces into a soupy, fragrant mass. When the apples have softened considerably and the liquid has taken on a rich amber color, it’s time to strain. Carefully pour the entire contents through a colander lined with cheesecloth into a large bowl or another pot. Let it drain naturally for several hours or overnight—resist the urge to squeeze the cheesecloth, as this forces pulp through and creates cloudiness in your finished cider.
Once the initial draining is complete, gather the corners of the cheesecloth and gently squeeze out any remaining liquid. Compost the apple solids or save them for other uses. You should have roughly 1-1.5 gallons of raw apple juice at this point, depending on your starting quantity and apple variety.
The Cooking Process
Now comes the step that transforms raw juice into finished cider: cooking and concentrating. Pour your strained apple juice back into your cleaned pot and bring it to a boil over medium heat. Once it reaches a boil, reduce the heat to maintain a gentle simmer. This is crucial—a rolling boil will cause excessive evaporation and can concentrate flavors too intensely.
Let the juice simmer uncovered for 45 minutes to an hour. During this time, you’ll notice the volume decreasing and the color deepening to a richer, more complex amber or even light brown. This concentration step is what separates homemade cider from store-bought juice—the flavors become more pronounced and developed. Use a thermometer to monitor the temperature; you’re aiming to maintain around 180-190°F throughout the simmering process.
Skim any foam that rises to the surface during the first 15-20 minutes of simmering. This foam is primarily proteins and other solids, and removing it results in clearer, cleaner-tasting cider. A simple slotted spoon or fine mesh skimmer works perfectly for this task.
The cooking time can vary based on how concentrated you want your final cider. Shorter cooking times (30-40 minutes) yield a lighter, fresher-tasting cider with more subtle apple flavor. Longer cooking times (up to 90 minutes) produce a deeper, more caramelized flavor profile. For your first batch, aim for the middle ground—about an hour.
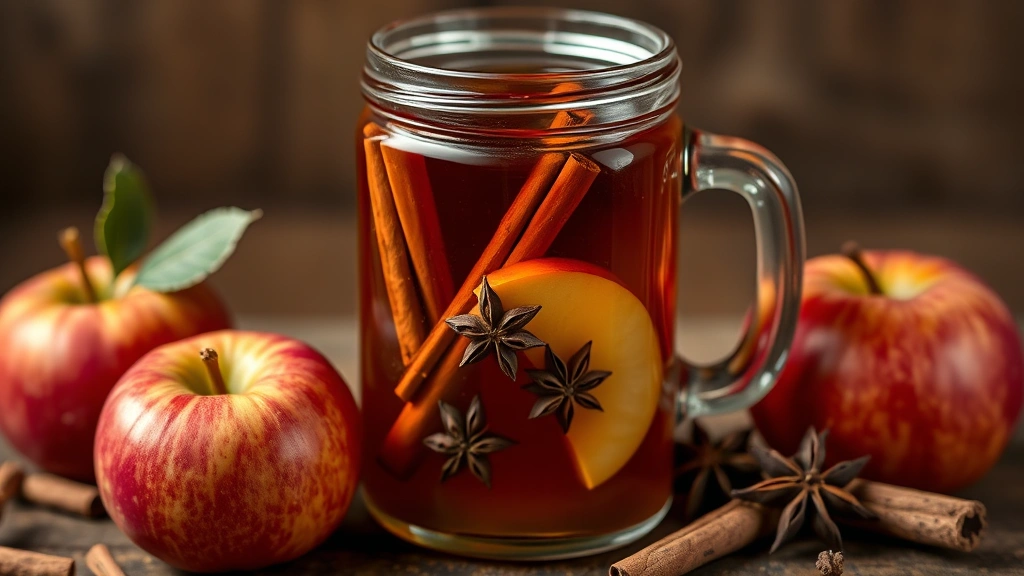
Spicing and Flavoring
This is where your creativity truly shines. Classic spiced cider includes cinnamon, nutmeg, allspice, and cloves, but the specific combination and quantities are entirely up to you. The key is adding spices during the final stage of cooking so their flavors fully infuse without becoming overpowering.
For a traditional spiced cider serving 8-10 people, add:
- 3-4 cinnamon sticks (or 1 teaspoon ground cinnamon)
- 4-6 whole cloves
- 2-3 star anise pods
- 1/4 teaspoon ground nutmeg
- 1-2 whole allspice berries
- Optional: a small piece of fresh ginger or a splash of vanilla extract
Add whole spices about 10-15 minutes before removing the cider from heat. This allows their essential oils to release into the liquid without the spices becoming bitter from prolonged cooking. If using ground spices, add them even closer to the end—just 2-3 minutes before finishing—since they can become overly intense.
Taste your cider as you go. Remember that spices will intensify slightly as the cider cools, so what seems perfectly balanced at serving temperature might taste slightly stronger when chilled. If you prefer your cider on the sweeter side, you can add honey, maple syrup, or brown sugar. Start with a quarter cup and adjust from there. Much like when you’re learning how to make brown gravy, balancing flavors in cider is about tasting and adjusting incrementally rather than dumping in large quantities at once.
Some creative variations worth trying include adding apple brandy or bourbon for depth, incorporating fresh cranberry juice for tartness, or including a bay leaf for subtle herbal notes. The beauty of homemade cider is that you’re not bound by commercial recipes—experiment and develop your signature version.
Storage and Preservation
How you store your cider depends on whether you’ve made fresh cider intended for short-term consumption or if you’re planning to preserve it longer. Fresh, unsweetened cider will last approximately 7-10 days in the refrigerator. If you’ve added sweetener or spices, it will keep slightly longer—usually 10-14 days.
For longer storage, you have several options. Freezing is the simplest method: allow the cider to cool completely, then pour it into freezer-safe containers or jars, leaving about an inch of headspace for expansion. Frozen cider will keep for several months and thaws beautifully for reheating. When you’re ready to enjoy it, simply thaw at room temperature or heat gently on the stovetop.
Canning is another preservation method if you want shelf-stable cider. However, this requires specific equipment and careful attention to food safety protocols. If you’re interested in canning, consult resources about making distilled water for the canning process, as you’ll need pure water for proper canning techniques. For detailed canning instructions, refer to the National Center for Home Food Preservation, which provides tested, safe procedures.
If you’re interested in fermented cider (which becomes hard cider), the process is entirely different and requires additional ingredients like yeast and specific equipment. Store-bought cider often undergoes pasteurization to prevent fermentation, but homemade cider will naturally begin fermenting if left at room temperature. This can be desirable if that’s your goal, or it can be prevented by keeping cider refrigerated.
For the best flavor and quality, store your cider in glass containers rather than plastic. Glass doesn’t absorb flavors or odors and maintains the cider’s integrity over time. Clearly label containers with the date you made the cider and any special ingredients or spices you added.
Troubleshooting Common Issues
Cider tastes too watery or bland: This typically means you didn’t concentrate it long enough or you used apples that were low in natural sugars. For your next batch, simmer longer and aim for a 60-75% reduction in volume. Additionally, include more aromatic and tart apple varieties in your mix.
Cider is too sweet: If you’ve added sweetener and the result is cloying, dilute with a small amount of fresh lemon juice or unsweetened apple juice. For future batches, reduce the sweetener quantity or include more tart apples in your original selection. Sometimes simply serving it warm rather than cold makes excessive sweetness less noticeable.
Cider has an off or unpleasant flavor: This could indicate that one or more of your apples had mold or other issues. Always inspect apples carefully before use. If the flavor is slightly off but not unpleasant, it might simply be an unusual characteristic of that particular apple variety or growing season. Blending with a sweeter or more aromatic cider can sometimes balance problematic flavors.
Cider is cloudy rather than clear: This happens when pulp particles remain in the liquid. Strain through cheesecloth multiple times, or use a coffee filter for ultra-fine filtering. Note that some cloudiness is natural and doesn’t affect taste—it’s purely aesthetic.
Spices are overpowering: If you’ve added too much spice and the cider tastes harsh or bitter, dilute with fresh unsweetened apple juice or water. For future batches, reduce spice quantities by 25-30% and taste as you go. Remember that whole spices are less intense than ground versions of the same spice.
Cider is fermenting or fizzing unexpectedly: If your cider wasn’t intended to ferment and it’s bubbling or developing an alcoholic taste, it’s undergoing natural fermentation. If you want to stop this process, heat the cider gently to 180°F to kill the yeast, then cool and refrigerate immediately. For future batches, ensure your storage containers are very clean and keep cider refrigerated from the moment it cools.
Frequently Asked Questions
Can I make apple cider without a cider press?
Absolutely. The stovetop method described in this guide requires only basic kitchen equipment. A cider press is helpful if you’re making large quantities regularly, but it’s not necessary for occasional home batches. Many people find the stovetop method actually produces superior flavor because the slow cooking and concentrating process develops deeper complexity.
What’s the difference between apple cider and apple juice?
The primary difference is processing. Apple juice is typically filtered until it’s completely clear, often pasteurized, and may have preservatives added. Apple cider is less processed, retains more pulp and sediment (though homemade versions are usually strained), and has a richer, more concentrated apple flavor. Fresh homemade cider falls somewhere in between commercially available versions of these products.
Can I use apples that aren’t perfectly fresh?
You can use slightly aged apples, but avoid any with mold, significant bruising, or soft spots. Slightly older apples actually contain more concentrated sugars, which can produce excellent cider. However, if an apple has visible mold or decay, discard it entirely—mold toxins can contaminate your entire batch.
How much cider does one batch typically yield?
A batch starting with 25-30 pounds of apples typically yields 1-1.5 gallons of finished cider, depending on your cooking time and concentration level. The longer you cook, the more concentrated and less voluminous your final product.
Is homemade cider safe to drink?
Yes, when made properly. The cooking process kills pathogens, and proper storage prevents contamination. However, if you’re serving immunocompromised individuals, very young children, or elderly people, consider pasteurizing your cider by heating it to 160°F for 30 seconds. Always use clean equipment and containers.
Can I add other fruits to my apple cider?
Certainly. Cranberry juice adds tartness and beautiful color. Pear juice creates a more delicate flavor profile. Pomegranate juice introduces depth and slight bitterness. Start with a small percentage of additional fruit juice—perhaps 10-15% of your total volume—and adjust based on how it affects the final flavor.
What if I want to make hard cider or fermented cider?
The process is different from what’s described here. Fermented cider requires adding yeast and allowing the natural sugars to convert to alcohol. This typically takes 2-6 weeks depending on conditions and yeast type. Consult The Homebrewers Association for detailed fermentation guidance and safety protocols.
Can I make cider with store-bought apple juice?
You can, though the results won’t be quite the same as making it from fresh apples. Store-bought juice has already been processed and sometimes pasteurized, which affects flavor development during cooking. If you use store-bought juice, choose varieties labeled “not from concentrate” and skip the initial extraction step—simply bring the juice to a simmer, add spices, and concentrate to your desired level.
How do I know when my cider is done cooking?
Taste is your best guide. The cider should have a rich, concentrated apple flavor and should have reduced to roughly 50-75% of its original volume. The color should be noticeably deeper than when you started. If you’re unsure, you can always cook a bit longer—you can’t undo over-concentration, but you can always dilute if needed.
Can I reheat cider multiple times?
Yes, though repeated reheating can slightly diminish flavor complexity. For best results, reheat only what you plan to consume immediately. If you have leftover cider, cool it completely before refrigerating, then reheat gently as needed. Avoid bringing it to a rolling boil during reheating—a gentle simmer at around 180°F is sufficient.
Related Posts

How Long to Boil Lobster Tails: Cooking Guide

How Long to Fly from New York to London? Travel Times
